With the basic groundwork complete for my archaeological excavation objective marker, I would need to add a number of special features.
 |
| The original concept for the objective marker. |
I recently subscribed to a Patreon for Random Miniatures who produces a range of great 28mm figures including Masters of the Universe, GI Joe, Action Force (the main reason for my joining) plus various fantasy figures. There were several poses of skeleton available and I downloaded the standing pose, resized it to 15mm (reduce to 56% original size) and printed 6 of them.
 |
| 3D printed skeletons painted and ready |
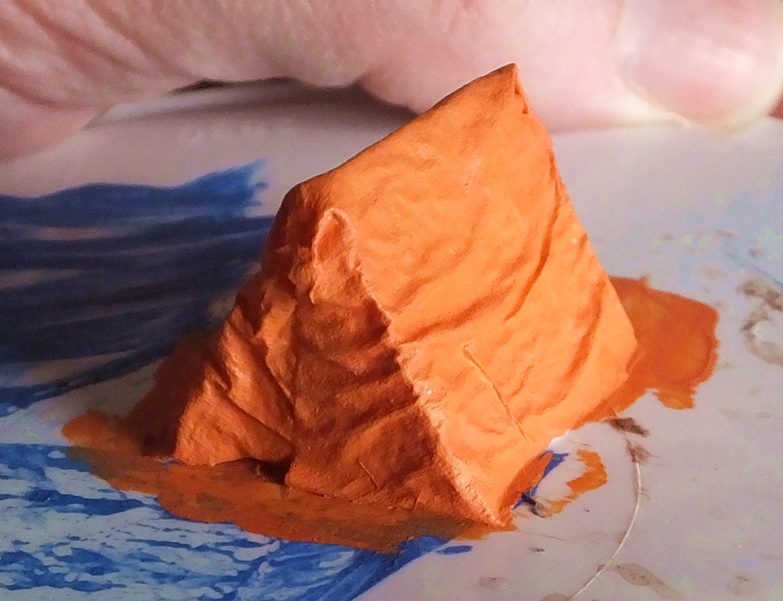
I lost a couple to snapped limbs while removing them from their supports, but I had expected that to happen and was surprised that I didn't lose more. They received a coat of Vallejo bone and a mixed wash of black and sepia ink. I also needed a tent, but wanted to build one the old-fashioned way rather than just 3D printing one. I opted for a chunk of rigid insulation foam cut into shape with PVA soaked tissue draped over it and shaped with a damp brush to try and get the right sort of folds and creases.
 |
| Tent. |
The tissue was painted with a nice bright orange (mixed from the red & yellow Wilko tester pots previously used for the flowers in the statue's flower beds) reminiscent of something like an old Vango Force 10.
 |
| Tent. |
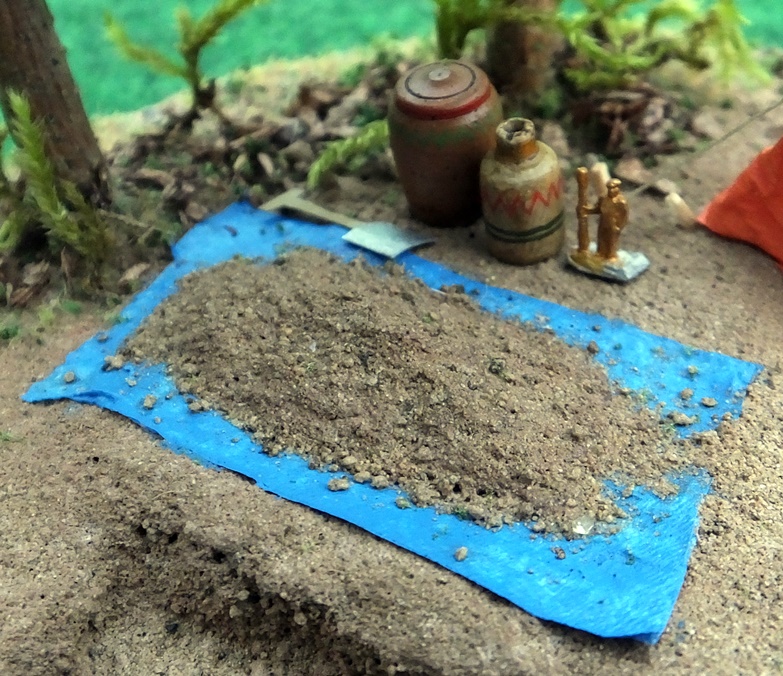
I also used a scrap of tissue for a spoil heap tarpaulin, this time using pale blue acrylic craft paint mixed with PVA to fix it in place. 2 of the skeletons were glued into the excavation with UHU and after that had dried for a few hours, I filled around them with more tilegrout/soil. I used a dry, soft brush to arrange the "soil" around the skeletons and made sure the bones were brushed clean. A spray of isopropanol and a few drips of dilute PVA from a pipette fixed everything in place.
 |
| Main groundwork completed. |
The spoil heap was made with a small blob of the pulped toilet paper & plaster base mixture covered with the soil/grout and sealed with dilute PVA. I gave the skeletons an extra drybrush of pure white to make them contrast more with the surrounding soil.
 |
| Excavation of the burials. |
As well as the spoil heap, I added a couple of pots (Hirst Arts mould 59 Unique Inn Accessories) and a 6mm artillery crewman painted gold, presumably it's a statue they've dug up. You can also see a spade there, this was just cut from a flat bit of card and painted khaki for the handle and GW chainmail for the blade. Once the paint was dry, I curved the blade slightly round a paintbrush handle.
 |
| Spoil heap and a few artefacts. |
The tent was stuck in place with PVA. I used a couple of pieces of a staple for the spikes on top of the tent poles. I carved some tiny tent pegs from a matchstick and PVA glued them into holes that I drilled in the base.
 |
| Tent in position. |
The guy lines were made from pale thread,wrapped around the tent pegs and fixed with a blob of PVA. After the gue had dried, I trimmed the thread down. I should really have made tiny guy runners from matchsticks too, but time was ticking on and I didn't want to screw up what was looking like a reasonably good tent so far!
 |
| Guy-lines and hand-carved wooden tent pegs. |
The final touches were to add the Land Rover and a few tufts of moss from the garden to add some variety to the plants.
 |
| The completed objective marker. |
I decided to make the Land Rover a Time Team one and based the colouring on a few publicity photographs. The Time Team logo on the door was carefully hand painted.
 |
| Grave and Land Rover detail. |
The design had changed somewhat from the original plan, the CD base lacking enough space to accommodate a finds table upon which to display the artefacts and a larger tent/shelter. I was still very pleased with the end result though, the key features were all there and had turned out just as I'd hoped.
 |
| Doesn't look like Tony Robinson on the left? |
I added a couple more card tools to the back of the Land Rover, a pick axe (should really have been a mattock!) and a Cornish shovel, both painted the same as the previous spade and with the shovel blade curved round a paintbrush handle. The little rucksacks were 3D printed and extremely fiddly to paint.
 |
| Tools and bags in the Land Rover. |
What was even more pleasing was that this objective marker won first place in the AK47 Republic Facebook group competition! There was some very stiff competition and I was very surprised when I heard that I'd won. Thank you to the competition organisers and well done to the other entrants, there were some excellent ideas there and I shall be copying some to use myself for future objective markers.


Very cool!
ReplyDeleteThank you!
DeleteGenious!
ReplyDeleteThank you!
DeleteGreat idea and great execution!
ReplyDeleteThanks, I was pleased it turned out as well as it did!
Delete