Number 1 son (5 yrs old) and I are embarking upon a terrain-making project over the summer holidays. He's already given instructions on a small ruined
building I've made but I've been watching some terrain making videos
recently (specifically ones on making your own materials cheaply) and
it's piqued his interest.
Inspired by various videos from the Terrain Tutor and Luke of Luke's APS, our first task is to make some flock clump foliage. I've sourced the bits I need for this over the last couple of weeks.
 |
Materials and tools
|
Reconstituted chip foam off-cuts were free from a local furniture repair and re-upholstery centre. Acrylic paint was £2 a tube from "The Works", PVA £11 from a local hardware shop (extra concentrated, better than the cheap stuff from Poundland), an assortment of jugs £4 in total from the local cheap "warehouse" shop plus a hand blender for £5 from Gumtree (local free-ads web site). Not pictured - tube of black acrylic paint I already had, plus some old ice-cream tubs for storage of the finished product, free from the local ice cream shop. Social distancing was maintained at all times during the collection of the aforementioned supplies!
Stage 1 was to tear the foam into 2-3cm chunks, add a splash of water and wring it through. The hand blender was then used to shred it into a medium sized crumb. The water apparently helps it shred more irregularly than dry foam and it will help draw the paint/PVA mix through in the next stage.
 |
Something to add extra warmth to the basic green.
|
I decided that I'd add a drop of yellow to the paint mix too, I already have a large supply of Wilko tester pots from ainting my
Hirst Arts dungeon scenery and this "Retro Ochre" seemed like just the job.
 |
Paints and PVA ready to go.
|
I had approximately 500ml of shredded foam. To this I added 10ml of PVA, 20ml of green paint, 5ml brown and 5ml of ochre.
 |
Number 1 son undertaking the initial mixing.
|
Donning a blue glove (which always me think of Firefly - "Two by two, hands of blue"), the paint was squeezed and mixed through the shredded foam by Number 1 son.
 |
After initial mix - not enough paint yet.
|
At this point I realised that I had only added half the amount of green I had meant to (should have been 40ml) which is why it looked rather pale! Adding another 10-20ml of green produced a better result.
 |
The end result!
|
The final result includes 4 different shades:
Basic green as described above. This was then split and some variation added to form:
Lighter green (I added an extra 5ml of ochre)
Dark green (additional 5ml of black)
Very dark green (additional 5ml of black, 5ml of brown)
 |
Basic green
|
 |
Light green
|
 |
Dark green
|
 |
Dark brown/green
|
So what did I learn during this initial part of the project?
- Upholstery / furniture repair shops can be very friendly and helpful
- Very few places seem to use rubberised coir (coconut fibre) nowadays
- A little foam goes a long way
- Foam can be very tough. I think I've broken the blender! It got very hot and now the blades stop moving if a lump of foam gets in the way and it seems to have small parts rattling around inside the casing...
- My 5 year old doesn't initially show interest but is keen to be involved once the work is underway
- My garage needs a tidy up
What has been the total investment in terms of time and money? Perhaps an hour or so sourcing the materials (a few minutes at a time taking small detours from other tasks to pick up the various bits), a couple of 'phone calls to obtain the foam, £5 for the blender, probably about 50 pence worth of the PVA and paint. The remainder of the paint will certainly be used in other projects and I needed a new bottle of PVA anyway. Time taken on the shredding/colouring of the foam was about half an hour.
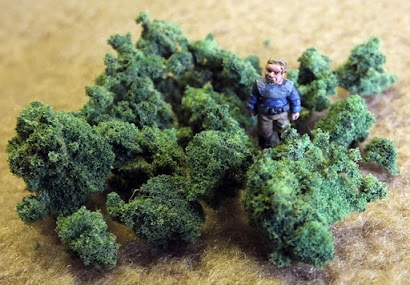
Here's the end result with a 15mm figure for scale.
This will work well as clump foliage for bushes and trees but I'll need to run a bit of it through something like a coffee grinder or pepper mill to produce a finer flock for turf or highlighting trees.


