Showing posts with label Rebel Minis. Show all posts

Tuesday, 17 January 2023

VIPER canopy repaint

After upgrading my other VIPERs with a few extra details, I thought I'd try repainting the canopy on my civilian version in the same way as I did on my Land Rovers.

It didn't work quite as well, but it's still better than the gloss black I started with, so I'm happy.  I'm sure I'll improve over time the more I practice.


The canopies received a coat of gloss medium afterwards, for a nice shiny finish.  I picked up the tube of gloss medium just before Christmas and I've used it on a few things now, either giving a sheen on canopies, or improving the appearance of the water on my amphibious APC.  It will certainly come in useful when I make a larger wargame board later this year which will have a few patches of water on it.

Friday, 13 January 2023

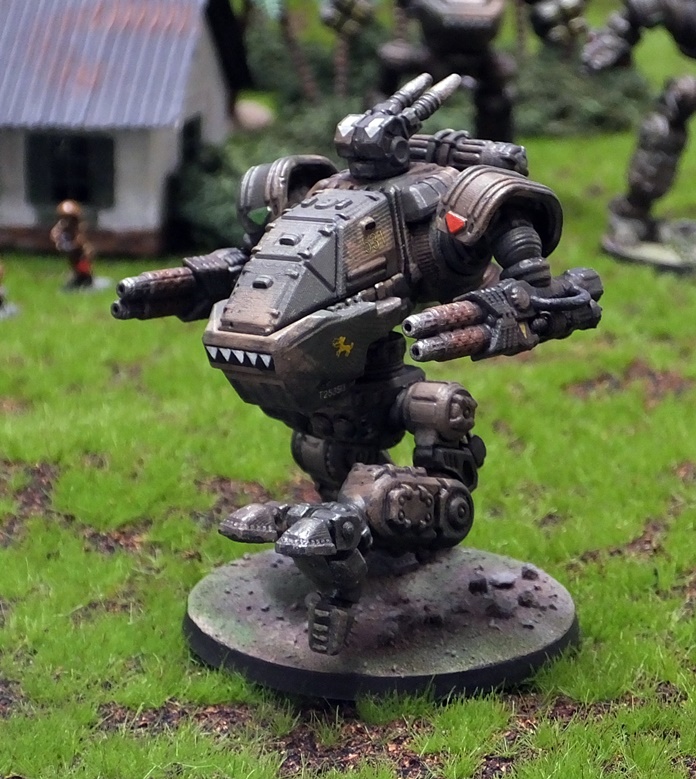
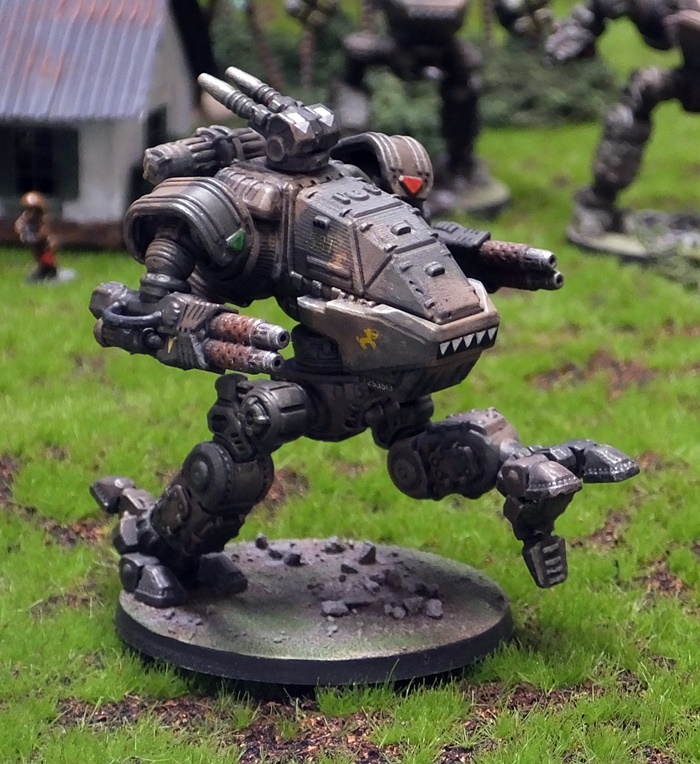
Rebel Minis VIPER Suit 4

My latest VIPER suit has been built in a more dynamic pose than the previous ones.  I reposed the feet and assembled the legs from individual sections rather than using a pre-posed set.  I used gel superglue to ensure a strong bond, there's a lot of weight suported on that back ankle joint.

I used the same paint scheme as the first 2 VIPERs.

The main weapons are a "Suturus Pattern - Project Good Dog Heat Spear".  These are designed by John Bear Ross, designer of the VIPER and therefore a good match in style.  They were resized slightly, though the Imperial Knight ball joints on the original were not the exact same size anyway. Regardless of this, gel superglue fixes them in place well.

Fast moving mecha.

I re-purposed the chin-mount weapons from the Titan Marine VIPER as a light anti-aircraft gun on top of the hull.  The sensors were painted in like gems, which was a bit fiddly between the weapon barrels.

Anti-aircraft guns & sensors.

This VIPER has been printed hollow with an removable canopy and a pilot with ejection seat.  I have also printed an empty seat as an alternative option.

Pilot.

There is space inside the back of the hull for some stowage, ammo boxes, food, tent, weapons.  I have the stowage set so I have various options available once I get them printed.

Pilot.

The running pose was inspired by various BattleTech 'Mechs such as the Locust and various Clan OmniMechs.

Having the top mounted weapons rear-facing gives it a sleeker, faster appearance, and will help ward off pursuers.

Strong glue was needed for this pose!

The altered feet work particularly well with this pose.

Rear facing wepons on top look "faster".

I also added some additional detail to my existing VIPERs.  All had red/green port and starboard markings on the shoulder armour triangles.  The first one had some lenses painted on the teeny lenses alongside the chin gatling.

Sensor lenses on gatling just visible if you zoom in.

I also painted some lenses on the little sensor bubbles to either side of the main guns

Weapon sensor lens.

The ammo box at the side of the cockpit has a small transfer to turn it into a first aid kit.

First aid kit detail.

This VIPER will be the fast recon unit for my Mecha forces, hence the lighter weight weapons and the rear facing guns to discourage pursuit.

Mecha attack!

I can see this VIPER striking behind enemy lines, or flanking them, using its fusion guns to destroy supplies and spread havoc, then outdistancing any pursuit.

Friday, 28 October 2022

Rebel Minis VIPER Suit 3

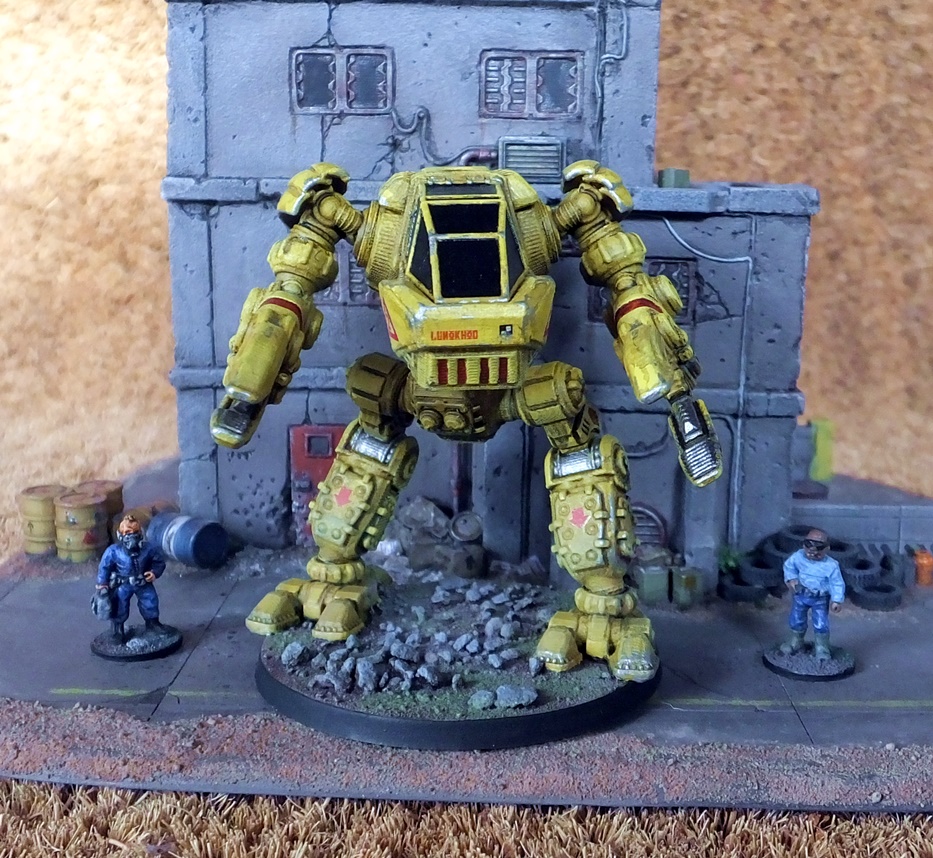
This civilian model of the VIPER comes without weapons or a set of jump jets and also lacks the up-armoured cockpit canopy. 

The large claws seemed ideal as load-lifters on a civilian work-mech.  These come in 3 pre-set poses that vary the angle of the pincers.  There are also finer manipulator claws which come pre-posed or with individual fingers for maximum flexibility.

A small hexagas cannister was added to the rear of the hull.  It probably powers a built in cutting torch or something similar.

I opted for a different set of shoulders to further differentiate this from the military versions.  They also have the benefit of a larger flat area suitable for applying a transfer or two (in this case an ID number).

I've always been rather disappointed with the various yellow model paints I've had, they're often quite translucent or lacking in density.  I think I've found the ideal one now - this has been painted with a Wilko "Bumblebee" latex emulsion tester pot!  The coverage was far better than any craft or model paints I've had and at £1 for a pot containing about 3 times the normal amount it was great value.  It didn't obscure the detail as I had feared it might, so I'd strongly recomend this one.  Because the pigment is so dense, it's also really good for stencilling markings directly onto black or grey tarmac/concrete without having to apply a white undercoat first.

After base coating, the model was varnished with Future floor polish and an assortment of waterslide transfers applied from GW, WWII tank kits and Infinity.  The arrows on the legs are cut from an 8-pointed star of Chaos from an old GW transfer sheet, the ideal scale for 15mm vehicles.

After the decals had a few days to dry, I applied a thinned black ink & matt varnish wash across the mecha, wiping it off quickly to avoid staining the raised areas.

When I acquired a pot of Army Painter blood red speedpaint, I was eager to give it a try and adding a few coloured accents to the VIPER added a bit of extra interest.

I gave the whole model a dusty drybrush, plus some silver chipping around the feet, claws and front of the hull.  This has given it a suitably beaten-up look for a well-used civilian loader/utility mech.  I've avoided rust stains, assuming that sci-fi mecha like this will probably have been built out of stainless steel or various composites.

I also painted on a few lubricant leaks around some of the joints.

The cockpit got an extra coat of Future to give the canopy a shiny finish.

As with the combat VIPERs, this printed pre-supported without any difficulties.

Along with the armoured cockpit and weapons, all parts for this model are also included in the base package for the Rebel Minis Earth Force VIPER, making it even better value for money.  If you play sci-fi in 15mm and have a 3D printer, you should go and buy this now!


This will be an excellent piece of scatter scenery for my 15mm games and might double up in some games as either a repurposed rebel mecha in Tomorrow's War or possibly something for the survivors to try and hotwire in my Escape from Zombie Planet games.

Wednesday, 26 October 2022

Rebel Minis VIPER Suit 2

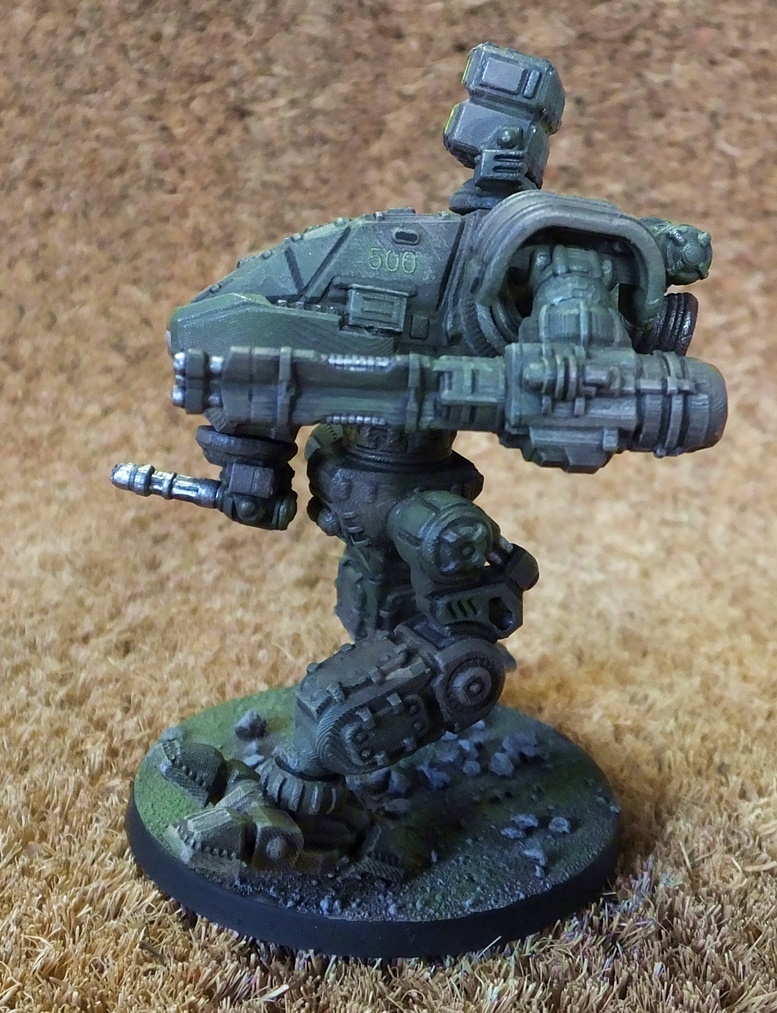
VIPER suit 501 is an anti-armour specialist, equipped with 14 guided missile pods as the primary armament and a chin-mounted point-defence gatling as the secondary weapon.

As an alternative, it could be an artillery or heavy anti-aircraft unit.

I added a small storage cannister to the side of the cockpit.  This is actually a re-scaled WWII German gas mask case.

This pose has turned out better than the first VIPER.

Painting was exactly the same as the first VIPER.

As with the first VIPER, this one has a Jerry can of extra drinking water attached to the main hull.

Water slide transfers were applied similarly to the previous VIPER, though the numbers are obviously slightly different.

I added an extra "NO STEP" transfer to the arm missile pods.  Don't want anyone standing on those!

Don't stand on the missile pods!

Taking advantage of 3D printing, these 3D sculpts are much bigger than the original physical Rebel Minis VIPER suit models, towering over a 15mm figure.

15mm figure for scale.

Tuesday, 18 October 2022

Rebel Minis VIPER Suit 1

My Rebel Minis VIPER (Variable Payload Raider) suits are about as finished as they're going to get for the moment, so I thought it was time to show them off, starting with my general combat VIPER, armed with a pair of tribarrel energy cannon, missile pods and chin-mounted point-defence gatling.

Weapons twisted to keep on target.

These are 3D prints from files purchased from Rebel Minis Digital Direct, the 15mm (1/100th Scale) Earth Force VIPER Suit. Due to the recent drop in the GBP/USD exhange rate, they're more expensive now than when I bought them, but still less than you'd pay for a physical model.  I actually paid slightly more than the current cost, but the price dropped shortly after I bought them and the designer (the highly talented and all-round splendid chap Mr John Bear Ross) refunded me the difference, which was very kind of him.

Note jerry can of spare drinking water on the hull.

The hips, upper and lower legs are all available as separate parts for extra poseability, but for a quick first experiment, I just grabbed one of the 3 preposed sets of legs to speed things up.  Shoulders, lower arms, missile launcher, chin gun and jet pack all come as separate items.  Feet are available in various fixed poses or as an "unfused poseable" version.  The main hull comes as either a single fused block (with armoured or plain options) or as the hull base, canopy and separate ejector seat if you want to produce a detailed interior.  All parts are available in plain or pre-supported formats.  I used the pre-supported versions and they all printed without any problems.  The mecha was assembled using gel superglue (cyanoacrylate) and the snug, positive fit of all the parts made it a breeze.  The feet and weapon arms are ball-jointed, providing a wide degree of poseability.  Other parts use a round peg and socket fitting.

Pose doesn't look too bad from this angle.

I tried a walking pose with all the weapons twisted to face a target. I'm not sure this has really come off, it does look a bit awkward!  A few extra items of personal crew equipment were added, a jerrycan on one side of the cockpit and an ammo box on the other.  I'll add more items to further VIPER suits such as tarpaulins, spare reaction mass tanks for the jump jets etc.

Jet pack detail.

After a Wilko grey spray primer, the VIPER was painted with Humbrol acrylic dark green, with sand brown camo patches on top.  Engine bells on the jump jets were a mix of burnt umber and burnt sienna with a gentle silver drybrush.  A few smaller details such as the leg pistons, gun barrels etc. were picked out in silver.

Stomp stomp!

The whole model was varnished with Future floor polish to give a good surface for waterslide transfers.  The canopy has the main ID number (yellow with black edging), a set of old GW Space Ork transfers provided the dog-tooth pattern on the front. A WWII British tank ID number in white sits on either side, just above the chin-mounted gun.  The missile pod doors were edged in white, then overpainted with yellow.

Note the spare ammo box below the ID number.

 A dilute wash of Vallejo black ink & matt varnish was applied over the whole model, then dabbed off in places.  A few silver chips were added around the feet and a dusty yellow/brown drybrush finished ff the model.  As you can see, the markings are pretty much invisible, so larger pure white transfers will be a better bet for future models.  The green and brown base camo pattern is much more visible in real life, it looks fairly grey in these photographs and I couldn't get it to show up much better no matter how I adjusted saturation, contrast or gamma levels.  Despite these little issues, as a first trial model this has turned out great, printing easily and assembling with great ease.

Tuesday, 19 July 2022

Kickstarters ahoy! Stork heavy lift VTOL and ScorpionMech

 A quick post about a couple of Kickstarters currently underway from companies I would strongly recommend based on personal experience:

First off, the lovely people at Kore have their Stork heavy lift VTOL running, 13 days left as I write this (finishes 1st August) and it funded in under 18 hours.  This is a Skycrane style transport VTOL with interchangeable payload pods that fit under the rear fuselage.  It also has the potential to carry various armoured vehicles.


Stork image borrowed from Kickstarter

I saw their LARC VTOL at the Diceni games show in Norwich earlier this year, here's a slightly blurry close-up of the 15mm version (cropped from a much larger image, hence the poor quality!).

LARC gunship.

 I've opted for the stl file collection at £12, which includes the Stork VTOL, 3 different rear pods (cargo, personnel, gun pod) plus weapons for the forward hull to convert it from a civilian to a military version.  If they reach 100 stl backers, they'll include the file for their adblimp - I spotted this at Diceni too.

Adblimp.
 

I also selected the £6 add-on for the stl files of the LARC which includes both standard and military versions, plus a "stretched" version with extra carrying capacity.

If you prefer physical models, they've still got you covered, in 15mm the Stork will be £25 and you can add on 15mm LARCs for £5 each (excellent value because they're normally £9.50).  28mm and 6mm versions of the Stork are also available.

It's been a pleasure dealing with Kore in the past so if you're after some cool aircraft, take a look at their kickstarter, or have a look at their web page for the many other excellent vehicles that they produce.

Secondly, as I posted about a couple of weeks ago, Rebel Minis Digital Direct still have their ScorpionMech Kickstarter running for another 41 hours at the time of writing (finishing 21st July).  Again, it's been a pleasure dealing with them in the past, they've been helpful and obliging and even refunded me the difference when they dropped the price on something I'd already bought a week earlier (VIPER suits).  They've already passed the stretch goals for 15mm and 8mm versions, jet packs and missile pods.

ScorpionMech Kickstarter

Examples of some of their models I've already printed to show the detail and quality of the sculpts, the VIPER suit:

Combat VIPER

Bear in mind these were printed on a sub-£100 resin printer so any print lines or lack in quality are the results of this rather than the stl files!

Civilian VIPER load-lifter.


Friday, 8 July 2022

Rebel Minis ScorpionMech Kickstarter

 I thought I'd drop in a quick post about the new Rebel Minis Digital Direct Kickstarter for their new ScorpionMech which ends around 20th/21st July (not sure which, depends on which time zone you're in?).  This has been designed by the talented Mr John Bear Ross, many 15mm sci fi gamers may well have some of his models already - he has designed a lot for Rebel Minis and also produced a lot of lovely vehicles for Critical Mass Games, some of which are now available from Ral Partha Europe. Although the main model is 28mm, the stretch goal for 15mm versions has already been reached, and those will be included in the basic pledge which is $30 or about £25.

Picture from Kickstarter.

A lot of the older models are available as add-ons to the Kickstarter.  I purchased the digital files for the Earth Force and Titan Marine VIPER suits a few weeks ago and although they aren't finished yet, I thought I'd share a few photographs I took so you can see the sort of detail and quality you get. These are available as some of the add-ons to the Kickstarter and they're absolutely fantastic.

My first combat VIPER is an all-missile version, either a tank-hunter armed with ATGMs, or a mobile artillery unit.

Missile VIPER.

Missile VIPER.


Missile VIPER.


Missile VIPER.

The second combat VIPER has a more general loadout.  I tried for a pose as if it's tracking a target on the move, with the missile pod, chin gun and right arm all swivelling.  Not sure if it really worked but it's a bit different from any other mecha poses that I have.


Anti-tank VIPER.

Anti-tank VIPER.

Jet pack detail.

I painted the standard cockpit VIPER as a civilian construction or loading mech.  This is actually painted with emulsion house paints!  The Wilkinson's tester pot "Bumblebee" yellow turns out to be better than any acrylic model paint that I've found.

Construction/loading VIPER.

Construction/loading VIPER.

Construction/loading VIPER.

Construction/loading VIPER.

Construction/loading VIPER.

Once I've got the VIPERs finished off, I'll take a few better photographs and go into more detail on their various features and how I painted them.