Monday 18 December 2023

Projects on the go...

I have several projects edging towards completion at the moment.  This box contains a lot of my new Epic scale 40K armour, printed during October on my resin printed.  Down the left side we have a load of Leman Russ with various different hulls and turrets.  The white ones in the first 3 compartments will end up red as part of my traitor forces.  The others are in varying stages of completion for my loyalist Imperial Guards.  The 4 compartments bottom right are all Basilisk artillery, all now finished, nearby are some Trojan transport vehicles and 3 munitions trailers.  The Valkyrie VTOL transport is an older model but it's only recently that I've had enough space to put it with the rest of my vehicles.

Epic armour.

Almost ready for assembly is my Rocker Bug vehicle from Dragon's Rest.  This is all FDM printing from the last couple of weeks.  Once I have the internal detail painted, I can fit the last bits together.  I need to sand the inside of the wheel hubs to get them to rotate more freely.  This was a useful learning experience.  When I print another vehicle, I will probably print some of the internal details in resin for crisper detail, such as seats and stowage.

Rocker Bug.


Monday 4 December 2023

New toy and first results...

 I've been thinking about getting an FDM 3D printer for a few months.  My resin printer is still doing an excellent job on smaller items (more of these to come on the blog in the next week or two), but I've seen a number of larger buildings and vehicles that simply wouldn't fit the small build plate

New printer.

 In the Black Friday sales I spotted the Ender 3 Neo for £119 direct from the manufacturer Creality.  A quick check on google provided me an additional £5 off voucher.

Printing some wheels.

This version of the popular Ender 3 comes with a lot of extra features as standard, such as an auto-levelling system, glass print bed and various other add-ons.

Corridor.

Rather than waste filament on the Benchy boat or the random sheep included on the memory card, I jumped straight in with a bit of corridor section from The Dragon's Rest.  After all, watching 3 or 4 YouTube videos on setting up the printer make me an expert, right? Right?

Corridor internal view.

As a first print, I'm really impressed.  The layer lines are far more obvious than my Photon Zero, but I knew they would be.  The detail is great, and the effect from gaming distances of 2-3 feet is excellent.

Corridor top and bottom fit together.

The corridor come in 2 sections, with lots of internal details suck as mesh tread decking, pipes, panels, cannisters etc.  Designed for 28mm, I reduced it to 56%.

External detail.

I used a plain grey spray undercoat, heavy white drybrush and some accent colours (Army Painter Speedpaint blood red, Vallejo Xpress Imperial yellow, Xpress turquoise, Xpress Martian orange).

External detail - other side.

The black section on the end is a connector to "Hub Alpha", which was the next thing I printed.  This took three print runs, one for the hub, one for the roof, another for the doors and other attachments.

Hub Alpha.

The hub includes blank inserts, doors, ramps and corridor connectors which all fit into/onto the doorways.

Hub Alpha interior.

I've also been printing a "Rocker Bug" vehicle.  This is 5 print runs so far, 1 more to go for the bogie arms for the wheels.

Rocker Bug.

These all came from the Dragon's Rest "Outpost Origins Ultimate Kickstarter Collection".  This was another Black Friday special at 50% off.  The models don't show up too well in the black plastic (I'm using PLA - Poly Lactic Acid, derived from corn starch/sugar cane etc), but if the weather holds up tomorrow, I should be able to spray undercoat it.

Tuesday 28 November 2023

Road Train Redux Kickstarter

 Kore's latest Kickstarter has almost reached its goal of £750, only £26 to go as I write this, but less than 2 days left.  They're refreshing a lot of their older designs and moulds to make them more printer friendly and easier to cast.


HAWG from Kore's display stand at Diceni.

For only £14 you can get a huge bundle of stl files for printing at home.  I'll quote direct from the Kickstarter:

"The STL Pledge level will give you all of the files for every vehicle that we are remastering - The Goliath Landtrain, Samson alt. cab, RP01 4x4, Type 404 APC, HAWG & Adblimp! You will also get files for every trailer option for the Landtrain plus the HAWG's 2 loadouts. That is a serious stack of hardware ready to print."

My Road Train (awaiting repair!)
 

As an optional extra, you can add the Stork heavy lift VTOL stl files for only £10.  I have one part-printed, but I have completed several of the smaller but similar LARCs:


Stretched LARC transport.

Another option is get lots of resin printed physical models, which tend to be £4-8 in 15mm or £10-30 for 28mm.

LARC gunship.

These models are great, I'd strongly recommend supporting the Kickstarter here if you can!  Mark from Kore is a lovely chap who really engages with the gaming community, and I hope they manage to get there.

Friday 24 November 2023

Starship seats

Following on from yesterday's starship consoles, the EC3D set also includes some great starship seats.

I've adopted a basic GW leadbelcher with black wash for the main structure of each seat.

The larger seat looks like the sort a captain might sit in on the bridge.  I've used GW goregrunta fur drybrushed with Vallejo khaki for a leathery look.

I added a few small accents such as the green cables on the sides and some GW mithril silver on ducting.

The next seat is probably that of the pilot/navigator.  I used Vallejo Xpress caribbean turqoise for the padding.

The seat has leg holes and lots of buttons.  The buttons were all dotted in with white, then coloured with Vallejo Xpress snake green, martian orange, Imperial yellow and plasma red.  If I use this in a large starship, I'll probably print another mirrored one so that I can create a symmetrical bridge layout.

The final seat is more basic, and I used Vallejo Xpress snake green for the padding.

The seats all look very sturdy.

Although I printed these at 56%, I do wonder whether they could be reduced further in size.  They do seem slightly large for a 15mm figure, but it might not be so noticeable during the heat of a desperate battle!

Thursday 23 November 2023

Control consoles

 I've printed some control panels before, but EC3D do a great set that includes a range of consoles plus some starship seats. As always, these are all printed 56% original size, flat on the build plate, without additional supports.

The first console I painted Vallejo Xpress Imperial yellow over a plain white undercoat.  The buttons were dotted in with Xpress colours, plasma red, snake green, martian orange.

Cables and ducting were painted silver with a black wash.

Some chipping was applied with some silver paint on a scrap of sponge.

The screen is black with various lines, dots and squiggles in white.  Some have been overpainted with red and orange to add a bit of colour.  I might produce another of these consoles and paint it to match my bar scenery, it has the look of a meal order station.

The next console has a thin black wash over the white undercoat.  Buttons are shaded with Xpress snake green and plasma red.

Cables are painted in silver with a darker black wash.

The screen was painted black with white details, overpainted with assorted colours.

The bigger console is a similar colour scheme, giving a well-worn, grungy look.

The back of this one is plainer than the others, but still has a couple of little details.

 These will be right at home on a starship or in a lab, control centre or other sci-fi building.

Wednesday 22 November 2023

Egg-stremely comfortable chairs

 These egg-squisite chairs from the EC3D furnishing set.  Reduced by 56% to convert from 28mm to 15mm, they print support-free on the build plate.  They have nice panel detail on the base and seat back, so I thought they'd look good with very little effort from me.

They have a Vallejo khaki base coat, thinned sepia wash (1 part Vallejo sepia ink, 1 part Vallejo matt varnish, 2 parts water) which I wiped off the tops of the seat backs before it dried, then a final drybrush of Vallejo bone white.  The seats cushions were coloured with Army Painter cloudburst blue speedpaint.  This came out slightly darker than I expected, so I might repaint them or add more highlights at some stage, but they're table ready now anyway.

I did have a 7th chair but alas, I dropped it in the tub of isopropanol I use for rinsing the prints, and it vanished forever into the murky depths...


Monday 20 November 2023

Off to the cantina

The stereotypical D&D adventure starts in the local tavern. It's a less frequently used starting point in science fiction, but it still crops up regularly, the Star Wars Mos Eisley cantina scene being one of the most obvious examples.  I knew I needed a range of bar scenery for my 15mm games and Evan Carothers (EC3D/Ecaroth) has produced a fantastic set of models for 3D printing in his modular cantina and bar.
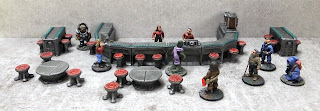
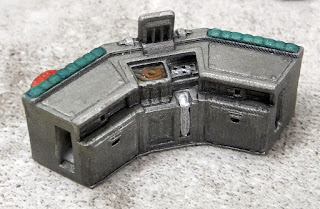
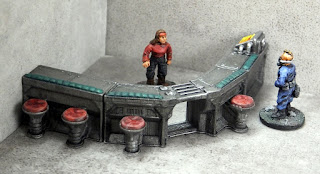
The bar.
 

The bar comprises a number of sections that can be fixed together using openlock clips (3D printable spring clips that can be used to fix together floor tiles, wall panels and all manner of other bits produced by a number of different 3D designers).  I printed at 56% to convert from 28mm to 15mm.  As usual with EC3D, these are all self-supporting to print flat on the build plate.  The whole of the main bar printed on one build plate.  I had a second print run for the smaller stools, tables, seating booths etc.

Straight sections (internal).

 The straight sections include a simple seating section, an order station, drinks dispenser and a plain section.  I've painted them all GW Leadbelcher, black ink washed, then drybrushed with GW chainmail to highlight.  Bar stool cushions were painted in Vallejo khaki, then with Army Painter Speedpaint blood red.  A very gentle drybrush with khaki gave a slightly worn/distressed look to the seats.  The padding along the edge of the bar is Vallejo Xpress snake green.  A few extra details (pipes, drink dispenser) were touched in with my 30-year-old pot of GW Mithril silver.

Straight sections (external).

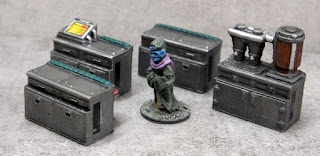
There are 3 angled sections featuring different details, one entry hatch (I've printed 2), a small sink and a plain seating section.  All of them include cupboards on the inside, the same as the straight sections.

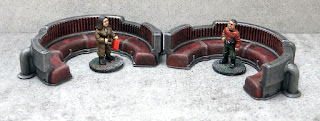
Curved sections (external).

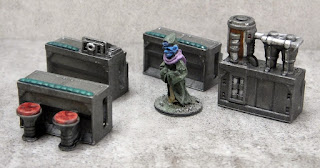
Painting is the same as the straight sections, with red bar stools and green edging on the bar.

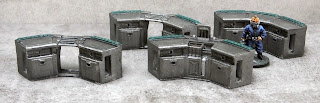
Curved sections (internal).
  

The little sink is a lovely detail, containing some rippled water (I've painted mine a murky brown) and a small drainage area adjacent.

Wash up area.

I printed some extra stools from the office furniture set and painted them to match the rest of the bar scenery.  The patrons need some sort of separate seating to pick up and throw in a fight...

Bar stools.

The set also includes some curved seating booths and tables.  Multiple versions are included, some with the tables attached.  I opted for separate tables to give additional flexibility.

Seating alcoves.

These will fit neatly in a darkened corner for a smuggler and his first mate to discuss shady dealings with potential clients.

Tables optional.

There are some smaller, straight tables too, in the same format as the bar.
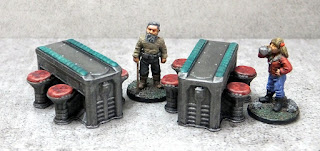
Small tables.

The bar can be set up in all sorts of different ways.  A large oval in the centre of the room...
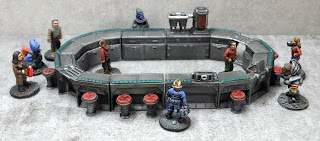
Oval bar.

A smaller corner bar...

Corner bar.

The small tables look good either in the middle of a room or against the edge.

Small tables.

This set contains everything you need for a dimly lit spaceport scum drinking hole, a high-tech cyberpunk bar or a backwater colony planet cantina.  Other items I haven't yet printed include tables with attached bottles and drinking vessels, a whole range of separate bottles/tankards etc, other seating options and some large centrepiece items with a range of drinks displays.


Sunday 19 November 2023

Storage lockers

The EC3D beds and lockers set also includes these larger equipment lockers.

Lockers.

As per usual, I rescaled to 56%.  Because they were quite large, chunky objects, I hollowed them and punched holes to save resin.  I find that a 1.5m thick shell is usually more than sufficient.

Hollowed & punched.

The paint scheme is simple.  Vallejo Khaki base coat, sepia wash, drybrush of the base colour and a highlight od Vallejo bone white.  Some GW leadbelcher was applied with a scrap of spinge for a chipping effect. The arrows were flooded with Vallejo Xpress plasma red.

Chipping detail.

These will fill the walls nicely in any space station or military base.