Showing posts with label Scenery. Show all posts

Wednesday, 29 April 2026

AK47 Republic - Animal Magic Competition

 The AK47 Republic Facebook Group recently ran an "Animal Magic Challenge".  The animal connection could be whatever you wanted - the many varied entries included DUKWs, Scorpion tanks, Fox armoured cars, a fish cannery piece of scenery, a hippopotamus, camels and more.

My entry was a toy African Elephant that I found in one of the local charity shops for 10p.  Needed a scrub with an old toothbrush, and a few mould lines trimming with a razor blade.  It was superglued to a 25mm round MDF base, painted in Vallejo cold grey and given a few dabs of Army Painter strong tone wash underneath the body to add some variation to the colour.  A quick drybrush of Vallejo stonewall grey, tusks and eyes painted in white, pupils dotted in finished the elephant.  The base received a coat of my sifted sharp sand & brown tile grout basing mixture followed by a sprinkle of static grass.  It'll look right at home hiding in the jungle on my game board.


Given the quality of all the other entries, I was very surprised when I won the "popular vote"!  My prize was dispatched by that fine gentleman, Mr Jimmy James and included a strip of "well done" stickers and a sheet of Vietnam gun-truck waterslide transfers.  The transfers should come in useful - several would make good names for starships, especially space pirates.


Sunday, 5 April 2026

More crate stacks

 A couple more stacks of freight, this time larger, so only for use as static scenery rather than any sort of vehicle load.


 Both were drybrushed white, then painted with Army Painter Blood Red speedpaint, Vallejo Imperial Yellow and Martian Orange Xpress paints.  The crate catches were painted with GW Leadbelcher.  The tarpaulin was painted with Army Painted Camo Cloak.  The crates look pretty good, but the layer lines are very prominent on the tarp.  Organic shapes definitely don't look as good as more technical shapes!  A quick rub over with some putty or filler and a gentle sand will probably help, but it's ready for use in games as it is for the moment.

Saturday, 4 April 2026

15mm ruined sci-fi building

 I printed Dutchmogul's 15mm sci-fi hab block, but made a stupid mistake.  I rescaled it to about 60%, thinking that it was 28mm!  The resulting building is slightly too small for 15mm figures, and has some areas where the walls were too thin and have failed.  Despite that, I didn't want to just dispose of it, so I turned it into a ruined building instead.

  I used this as an opportunity to try a few new things.  The base is 3mm Foamex PVC board, with expansion joins scored into the "concrete" yard area.  The edges of the base were bevelled and sanded.  Around the edges, I painted with burnt umber, then PVA glued tilegrout/sieved sharp sand, then some static grass and a few small foam bushes.  The fencing is 3D printed posts from db678 on Thingiverse, which come in 2 halves.  You clip them together around whatever mesh you've using.  They're really neat, and come with a cranked top that you can drill and put extra wire strands through if desired.  I think if printed larger they’d have a couple of holes, but by reducing from 28mm to 15mm the holes are too small to print cleanly on my FDM printer.

I added a small wall from a partial print (half-height to use up last bit of filament on the spool).

The doorway is too small for a normal human-sized 15mm figure, though a small alien would fit, such as Kaamados Dominion Squamata from Ral Partha Europe (former Critical Mass Games) or Neeks from Loud Ninja Games/Alternative Armies.

The stairs go no-where.  You can see where the print failed slightly around the windows because the walls ended up too thin.

A few supports from other prints were repurposed to make a nice entrance arch.  Waste not, want not!

A partial fence surrounds the building, much damaged and missing. Grass grows along the bases of the walls, this place has obviously been empty for some time.


Overall, a fun little project. At some point, I will try printing the hab unit again - but at the correct scale!

Friday, 3 April 2026

15mm Watchtower

I 3D printed this tower some time in 2024, but circumstances have prevented me from getting many photographs of much of the bits I've been printing since 2023.  This comes from TheDude21 and is a Desert Tower.  It is designed for 28--32mm figures, so I rescaled it to about 56% original size for my 15mm games.

The tower printed in 2 sections, plus the roof piece.  I also printed a set of antennae to add some interest to the top of the roof.

The tower has lots of panel detail plus a few pipes, hatches etc.  There is a floor in the top where your sentry can stand to keep watch.

Base colour was white masonry paint.  The doors are Wilko Bumblebee yellow emulsion wall paint.  I sponged on lots of burnt umber and burnt sienna for the rust effects, plus a few rust streaks and a couple of little clumps of grass to add to the battered, weathered appearance.

The communications antennae are just glued straight on the top of the roof.

Rescaled as it is, the internal floor makes it just the right height for a 15mm figure to peer out.


 There is no internal detail other than the lookout at the top, so it's mainly just a piece of LOS and movement blocking terrain, or maybe a potential objective marker, but it was a quick and easy print and looks good on the table.  What else can you ask?

Saturday, 14 February 2026

Sci-Fi Urban Game Board

 I have a piece of grey art board that I lay down as the basis for urban games.  It works well, as seen in some of my previous games, but I fancied something with defined roadways and other markings to add some extra character.

We had some internal doors replaced during building work a couple of years ago, and I cut up the old doors into square sections with the plan to build some modular terrain with them.  They're sturdy and rigid, but relatively light in weight.  I decided that one of these pieces would be the ideal thing to use.

 I started by sanding the painted surface down to give a good key for whatever I glue or paint onto it.  After a wipe with a damp cloth to remove and sanding dust and greasy fingerprints (hazard of having children), I sketched out the road design with a fine permanent marker.  I've stuck some felt pads on the underside to prevent it sliding around and ensure there is no risk of it scratching whatever table I put it on for gaming.

Outline planning.

 The design includes a central "island" with roads of 2 different widths around it.  Once I had decided on the initial road layout, I added on some parking areas.

Practice panels at bottom.

I wanted the design to have a low relief finish, which I created using cereal box cardboard.  I used Tesco Malt Wheat boxes, which I find to be a particularly smooth, dense card, ideal for model making.

Low relief cardboard panels.

Each area of ground is delineated by 3mm edging strips.  The interior is filled with a mixture of interlocking card shapes.  Rather than a basic grid, I've tried to make it more varied, with angled panels.  The outlines were glued in place first, then infilled.  I've used UHU glue which grips quickly, causes less warping than PVA would, and will hopefully last better.

Kerbs in place.

Infilling took a long time for the first 3 sections.  The first few pieces of card were quick, but it soon became time consuming to try and measure and cut the more intricate pieces.

Tools & materials.

Cutting was done using scissors and a craft knife, with a metal straight edge used to keep the lines straight.

Adding kerbs.

I decided on a faster method for the later sections of the board.  After carefuly trimming to the exact size, I worked out the panel design in pencil, then inked it in with felt-tip once I had finalised it.  The pen lines are about 1mm wide, so by cutting them away completely, it leaves suitable gaps between the panels.

Central "island" panel design.

One of the sections was partly completed, so it took a while to cut the insert to the correct shape.

Designing panels to fit in.

I drew in angled corners for several of the panels.  Some of the larger panels have smaller strips separated from them.

Ready to cut out.

I applied a base coat of grey washable wall paint that I got remaindered for £1 in B&Q.  I chose the washable sort because it should be harder wearing than normal emulsion paint, and an ink wash can be applied without soaking in too quickly or reactivating it.  I applied the paint with a scrap of sponge, which leaves a much smoother finish than a paintbrush and also uses less paint.

Painting the panels with sponge.

 Thinly applied, the paint dried in just a few minutes.  I mixed up a wash, a couple of drops of black ink and a generous squirt of thinned matt varnish, no exact proportions, just enough for a good stain.  Each section received a generous coating of the wash.  I immediately used a piece of kitchen roll to wipe away most of the ink, leaving the panels stained.  I painted a second coat of wash onto some panels to produce a little more variation in the shading.

Base colours completed.

I painted the edging kerbs with Vallejo Imperial Yellow Xpress paint.  Being semi-translucent, this lets the shading and staining show through from underneath, adding a weathered effect to the kerbs.

Road markings added.

 The roads have been painted with white masonry paint, tinted to a dark grey with some more of the black ink. [Edit: now that the board is finished, this hasn't proved to be as durable as I'd hoped.  I think it will scratch off fairly quickly.  I might try more sanding and perhaps sticking a layer of thick paper onto the road beds for a better base layer.  If anyone has a suggestion, please let me know in the comments!]

Panel detail.

Road markings were stencilled on using a piece of paper and a scrap of sponge. The white markings are masonry paint.  The yellow markings are a tester pot of old Wilko "Bumblebee" wall paint.  The centre of the road are 20mm long, 2mm wide slots cut in a piece of A4 paper, with a 10mm gap between each line.

Panel detail.
 

Parking area & panel detail.
 

Parking area.

  A few photographs with buildings (3D printed Flatline City) and figures (mainly GZG civilians, plus a few Alternative Armies and Checkpoint Miniatures):


The narrow road are designed so that the Flatline City bridges and platforms span the gap neatly.

Flatline City skybridge.


Flatline City walkway.

The thing that prompted me to get this finished was the prospect of a Five Parsecs battle taking place in a city - coming soon to a blog near you!

Saturday, 22 March 2025

AK-47 Republic 2025 Special Objective Build - Peace Harmony School

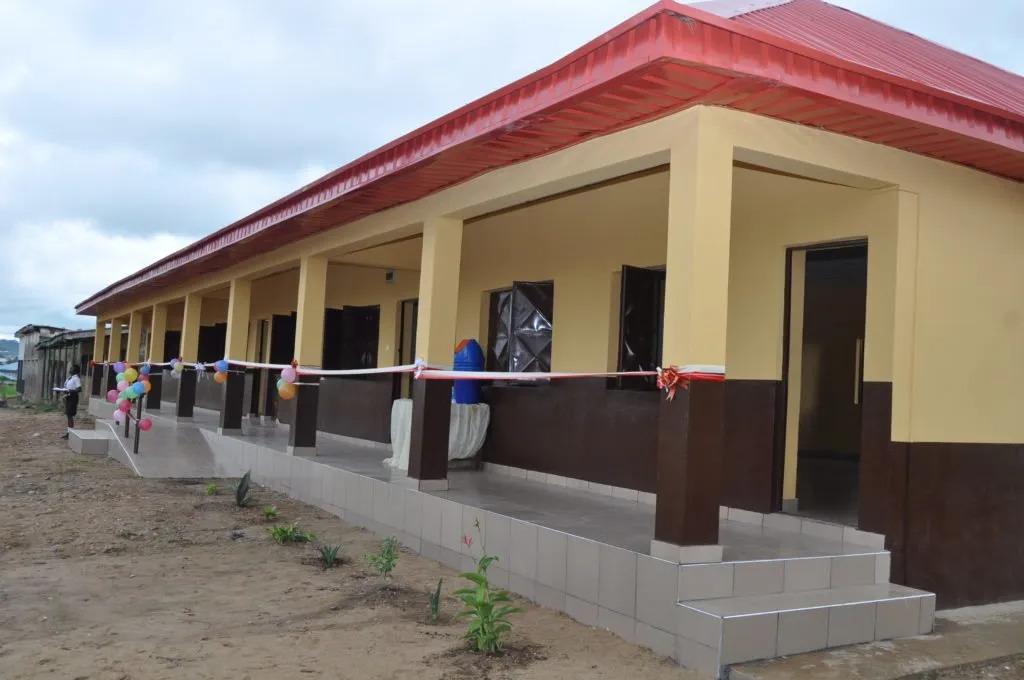
I managed to squeeze in a second build for the AK47 Republic competition.  My inspiration came from a photo which I think must have been posted on the Ak457 Republic Facebook group, though I can't find it now. (If you recognise it as one you posted, let me know so I can credit you!). A school!


Inspiration!

 I did consider a damaged building but decided that an intact one would give more of a sense of hope.  I had a look at a few African schools for inspiration...

Rather damaged but I like the colours.


I don't want to build a damaged one.

Verandahs seem a common feature.

Another nice verandah.

Another verandah.

Typical 2-tone colour scheme.

I'd have added litter bins if I'd had time.

Bare block walls would have taken too long.

Inspiring slogans on the wall.

Classroom names noted.

Nice maps on the wall.

 A reminder of the rules:

  • 10x3" base
  • Must have a vehicle on it
  • Must have a name badge/sign on it
  • Can't just be a banana on a base.

My initial sketch had 3 classrooms (or 2 classrooms and a library), but before cutting the parts out, I realised that I hadn't left a gap for the vehicle that the objective should have!

Plans.

The basic construction was the same as the garage, foamcore on a Foamex base.  I incorporated a verandah and used bits of barbecue skewer for the support poles.  The windows are larger than usual, many of the schools I looked at had big windows to let in plenty of light, presumably because they are shaded below the verandah.

Completed objective with figures for scale.

Quentin (6) suggested that his school's playground was better because it had play equipment.  So thanks to his suggestion, I added a seesaw and swings to the space next to the building.

Play equipment.

The seesaw is just a piece of coffee stirrer, cereal packet card seats and a barbecue skewer, given a wash of Army Painter strong tone wash.

Seesaw and swings.
 

The swing frame is a section of FDM 3D printing filament, warmed over a candle until I could fold it into shape.  Some superglue and bicarbonate of soda was used to fix another section into the top.  I painted it orange, gave it a dark wash and added a few patches of rust and some metallic scuffs around the bottom of the legs.  The seats are coffee stirrer with small holes drilled in the ends.  I soaked some tan cotton in PVA to stiffen it and once dry, superglued it into place through the seat holes and wrapped around the frame cross piece.

Playground.

The school bus is a repainted Matchbox vehicle.  I kept the original yellow body but added a red roof and bonnet for a little more colour.  I added some extra details such as headlights and some patches of rust (sponged on with burnt umber & burnt sienna).  The whole model had a coat of Army Painter strong tone wash to enhance the detail.  This preserved the writing on the bus and helped save time I needed to spend on other parts of the build.

Swings.

 After gluing the swings into place on the base, I added some extra static grass around the bottom of the legs to hide the join.  I made sure that I left the patches under the seats free of grass to show the wear from use.

Seesaw.

 The seesaw was squeezed in next to the swings, again leaving bare patches under the seats where the ground would get worn.

Rear view.

The roof is cereal packet card glued to 3 triangular braces.  Sections of corrugated card were glued on top, the bracing helping prevent warping.  The roof was painted a pale grey all over, then certain panels picked out in a few different greys, mixed by adding a few drops of dark grey or taupe into the base colour.  Various panels were brushed roughly around the edges with burnt umber, then some burnt sienna added more selectively for the rusty effects.

School name.

I came across a few "Peace Schools" when researching.  Most involved the town/country name but I wanted mine to be flexible for use in a number of different scenarios, so went with a more generic name.  The sign was printed out in a number of different typefaces, this one looked the best.  The sign was glued on with PVA, then over painted with thinned PVA.  I gave it a thin wash of Army Painter soft tone to give a subtle weathered look.

Verandah.

The verandah works well.  I used filler mixed with PVA and gray paint for the concrete surface.  My usual ground cover (brown tile grout mixed with fine sifted sharp sand) was sprinkled along the wall and around the bases of the pillars.  I used a small, dry brush to move it into the right positions, then applied thinned PVA with a generous dose of washing liquid to help it flow smoothly to fix everything in place.  A bit more static grass around the edges finished off the groundwork.

Classrooms.

 I labelled the classrooms to finish the model off.  The walls have been coated with a mix of PVA and filler, I was doing this in more of a hurry than the garage, so didn't have time to do the messier sifting-filler-over-PVA method.  The main colour is a 25p tester pot of Wilko "Cornish Sand" house paint with a "Black Forest" border along the bottom.  The window sills are coffee stirrers.

If I'd had time, I would have added a few extra details such as rubbish bins against a couple of the verandah poles and a few slogans ("Laziness will cause you pain", "What saves a man is to take a step" "Don't look where you fall, but where you slipped" "All children can learn").  I like the idea of a map of Africa, this could have gone on the end of the school next to the playground.  I did print a map out, but it didn't look very good in black and white and even if I had hand-coloured it, I don't think it would have looked quite right.  After I'd taken the photographs, I also realised that I'd forgotten to add any doors!

So, there we have it, another objective ready for use as a Special Objective in AK-47 Republic, or just as general scenery in a game!