Thursday 29 February 2024

A good sort out...

 I don't have a dedicated hobby space, so my painting and model making tends to happen on the dining room table, or more commonly, in the evenings using a lap tray.  In fact, I have two lap trays, and they've become increasingly crowded over the last couple of years.  I need a 0.5 or 1mm drill bit which is somewhere in this lot.  Time for a sort out, so let's see what we have...

Clockwise from top left: misprint Epic scale vehicles part way to becoming scenery; an upscaled Battletech jeep which has turned out too large for 15mm; some paints; some Blue Moon Vleta Reavers glued to lollipop sticks for painting; assorted bits of rubbish card/paper and some stencils; 30x30mm base for AK-47 Republic; a Pringles tub lid used as a palette but now covered with 15mm figures and a Battletech LRM carrier; sponges to use for paint chipping effects; old toothbrush heads and various bits of broken toys etc fur use in scenery; some Battletech civilian vehicles; an Action Force Kraken; a 15mm Raptor Mecha about 90% complete.

Drill bits; pin vice; old COVID tests which will be used in scenery; a broken bit of Lego that I just glued back together for the kids; a bag of lollipop sticks and 3D printed fence posts; bottle of liquid polystyrene cement; my AK-47 Republic technical for the recent competition.  In the centre is another pringles tub lid with Epic Leman Russ turrets, 15mm figures and bits of scenery, some hex netting that looks too useful to throw away...

15mm figures, mainly Alternative Armies and Old Glory UK African militia..

3D printed arcade machines; some more Alternative Armies figures; Battletech LRM carrier; a couple of grav sleds awaiting handlebars for the last finishing touch; 3D printed tyres and crates; missile launchers from Brigade Models.

Paintbrushes, knives etc.

A Lovecraftian "Elder Thing"; assorted dead bodies, flying eyeballs etc.

GZG OutRim Coalition weapon teams.

Blotz MDF building with a 3D printed tuk-tuk, some 3D printed monsters (Wendigos and Pigmen)

Barbarians; Age of Sigmar figure; Candelabras; Eland/Panhard AML; giant lobster warrior; Star Wars luggabeast

Space Marine; 3D printed scenery (15mm chairs, 28mm cooking vessels, books); "Elder Thing"; a few 15mm figures; computer consoles; Battletech civilian bus; Eland/Panhard AML

Sorting this lot took a LONG time!

After all that, I never did find the drill bit.


Monday 26 February 2024

Cryogenic Suspension Capsules

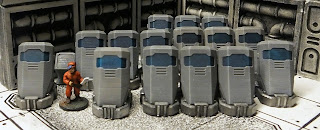
These cryogenic capsules from Dutchmogul were one of the first things that I printed when I got my 3D printer in late 2020.  I only printed a single bank of capsules with a control panel.  More recently, I printed a few more, enough to put the crew of a small starship into suspended animation.  I have finally finished painting them all, too!

Designed for 15mm use, these were printed straight on the build plate with no need to re-scale or support them.

 
You could probably hollow them out to save resin, but I didn't bother because they aren't all that big and if they were hollowed, you'd need to support them, which would use a lot of what you were saving.


After a grey spray primer, the base colour of Vallejo cold grey was given a black ink wash, then drybrushed with Vallejo stonewall grey.
 

Metal parts were painted GW leadbelcher, black washed, then highlighted with my 30 year old pot of GW mithril silver.  The monitor screens are black with white squiggles for text.

 
The windows were painted with Vallejo Xpress Caribbean Turquoise paint.  I'll add some gloss varnish another day to give them a contrasting texture.


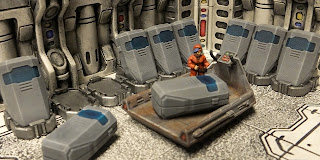
The cryogenic capsules come in 3 varieties, a single, a triple and a triple with attached control panel.  I printed the control panel version as it came and again in a mirrored version, so I can have a matching one on the opposite side or a cryogenics bay or other end of the row of capsules.


Also from Dutchmogul are these sci-fi loot markers, including various crates, a cryogenic capsule and a capsule base containing a robot.

 I've already shown some of the robots in a previous blog post.


The cryopods and bases are available as separate items in a Tinkercad file, so I downloaded some stand-alone pieces to print individually.

As well as scenery, these can lend themselves to objective markers, perhaps needing to steal a specific capsule, or maybe evacuate some capsules from an alien threat.

 
Individual capsules will easily fit onto this grav sled for transport.

These have turned out great, I've seen that there is also a remixed version available with an opening lid and padded interior, which would be a good addition another day.

Sunday 25 February 2024

Industrial Crate Piles

As if I didn't already have enough cargo bay scatter scenery, these Industrial Crate Piles are by Project_Radium on Thingiverse.  As usual, the originals were for 28-32mm games, so have been rescaled to 56%.  They were printed flat on the build plate.

The large base crates are Vallejo Stonewall Grey with a heavy black wash, then a grey drybrush.  The big chunk of machinery is Humbrol matt yellow with a sepia wash, the little labels are hand painted.

The smaller crates are Vallejo Russian Uniform Green with a black ink wash.

The blue crates are Humbrol 25 matt blue with a black wash painted into the panel lines.  Red crates are Humbrol 60 matt scarlet, a shading wash and some detail picked out in silver.

 These will give nice big blocks of cover to troops and will quickly fill out a cargo bay.


Saturday 24 February 2024

Robo-vac

 After the battle, there is always the problem of clearing up the body parts, blood pools and alien slime from the space station corridors.  A freebie model from Curufin on Thingiverse, I'm sure that these little robot vacuum cleaners will do the job excellently!

I rescaled to 56% of the original 28mm size.  Although the model is designed to print support-free on the build plate, I raised it up and supported it to avoid the "elephant's foot" deforming the wheels and vacuum head.

After a white undercoat, I painted the little robots in Vallejo Xpress Imperial Yellow, selected additional shading with some sepia ink.  Details were added with some red Army Painter speedpaint on the rear lights, Vallejo Xpress Snake Green on the front light, Xpress Mars Orange on the top light.  The hose, vacuum head and wheels are Vallejo Cold Grey, highlighted with Stonewall Grey, given a black wash, then the hose clips added with GW Mithril Silver.  The other metal parts are GW Leadbelcher, black wash, Mithril Silver highlights.

I have an idea of them acting as moving cover or distractions during a game, or maybe one could be jury-rigged to carry some explosives...

Sunday 4 February 2024

Return to the Dungeon!

 After a gap of several years, I finally managed to make it back to the Old Buckenham Bone Crushers today.  The kids spent the morning playing with all my dungeon parts and then Number 1 Son accompanied me to his first ever wargames club meeting.  A game of Heroquest seemed the easiest option for a novice gamer to pick up without too much difficulty, and I hoped that the scenery and minimal rules would keep his attention focussed.

Lots of dungeon!

The adventurers will start at the bottom of a spiral stair, with a choice of two different directions.  This photograph is from my planning.  During the game, dungeon sections are only placed on the table as they explore...

Adventurers enter top right.

The adventurers stick together, heading into a large hall containing 3 Goblins who are rapidly dispatched.

The hall, once the Goblins have been slain.

A search of the treasure chests revealed a healing potion and some gold coins.  The barbarian is surprised to find a Goblin hiding in the chest he opens!  The Goblin leaps out and cracks the barbarian on the knee with his club before being slain.

Through the archway.

Off the large room is a storage room and scriptorium with an Orc and a Goblin.

Into the scriptorium.

Our heroes pile into the room and get stuck in to the Orcs.

Attaaaaaack!

With the Orcs dead, the heroes have a good rummage in the cupboards and on the desks, finding a shield, more gold and another healing potion.

Pillaaaaaage!

Out of the other side of the room, they encounter a Beastman but he proves no match for the master of swords.  After taking an extraordinarily long time (lots of very poor dice rolling) to break down the doors either side of the vestibule, our heroes uncover a store room and a prison cell.

He doesn't look too well.

The occupant of the cell is sadly beyond help, but he has some treasure our heroes steal, before leaving his corpse for the rats...

Leave him for the rats.

After a lengthy trudge along the corridors, pausing only to slay a skeleton, the adventurers discover the evil wizard's bedchamber.  A Chaos Champion guards the entrance.  After a brief scuffle with the master of swords leaves the champion injured, the wizard mutters an incantation and finishes it off with a blast of fire.  The Chaos Champion gives an inhuman scream as it is consumed by the flames and the charred armour clatters to the flagstones, its occupant now nothing but soot.

The Sorceror in his lair!

The Chaos Sorceror sends a lightning bolt fizzing down the corridor but fails to injure the master of swords or the barbarian.  The master of swords takes a mighty swing at the Sorceror, dealing him 3 wounds.  The barbarian assists and the Chaos Sorceror is no more.

Must be some treasure in here.

Although there was more dungeon to explore, time was short so we decided to call it a day now that the Chaos Sorceror had been defeated.  Venturing further into the dungeon would have revealed the Sorceror's summoning room and a large hall adjoining, plus another room off that.

The complete dungeon.

At the opposite end, near the entrance stair, was the treasure room with its brightly patterened red and yellow floor.  

Complete dungeon - exploded view.

I usually take a couple of photographs for reference before a game, one being an exploded view to make it easier to see which pieces I need.

Another view of the complete dungeon.

 Finally, a couple more photographs of the scriptorium and the main hall.

Main hall (and Goblin).


Scriptorium.

 I'm hoping I might manage another trip to the club soon, but this time with the wait measured in months rather than years!

Friday 2 February 2024

AK-47 Technical Competition

The AK-47 Republic Facebook group had a competition in January to build a technical using a die-cast vehicle or other model as the starting point and including a Peter Pig gun or crew.

Looks a bit bare so far...

I decided to use a generic "Made in China" truck I got for a few pence at a car boot sale or charity shop some time ago.  It's missing whatever used to be on the back, so I will be using some 1mm plasticard, treadplate plasticard and a few other bits to rebuild it.  I cut away the rear rivet to get the vehicle apart so I could clean it and paint the inside.  I originally intended to include a gunner and a driver, but it turned out the driver was almost invisible inside the vehicle, so he'll be saved for another project.  The gunner isn't tall enough to see over the top of the cab, so he'll be facing off the back of the vehicle.

Starting materials.

After cleaning the body, I sanded the rear to give a good key for the glue.  I cut some plasticard for the truck bed, and decided to use a couple of matchsticks for the sides.

Truck bed coming together.

A bit of superglue got the basic shape together.  It was looking rather bare, so I would need to add some more to it...

Basic structure assembled.

I intended using some Milliput to make sandbags for the back, but I couldn't find where I'd put it.  I resorted to squeezing out some Wilko brown wood filler, put it between a couple of sheets of cling film and squeezed it into a thin sheet.  After it had dried for a few minutes, I peeled off the clingfilm and cut thin strips and rolled them into thin sausages.  Cutting into small segments gave me some vaguely sandbag-shaped bits, which I placed around the back of the vehicle.  As I expected would happen, as soon as the wood filler sandbags had set in place, I found the missing box of Milliput.

Sandbags in place and basecoated.

I had a few bits of stowage that I had 3D printed, including Jerry cans, ammo boxes etc. These got superglued around the truck bed.  Once completed, the vehicle got a matt grey primer undercoat, an all-over coat of Vallejo desert sand, followed by a wash of 1 part sepia ink, 1 part matt varnish and 1 part water.  The seats were painted in Vallejo Xpress Caribbean Turquoise.  Why such an odd colour?  Because this is a converted civilian vehicle.

Sandbags and stowage.

 I used Army Painter Camo Cloak speedpaint for the camo patches.  Headlights are my 30-year-old GW Mithril Silver.  I painted some Vallejo Xpress Martian Orange over a silver base on the indicators, but this hasn't worked very well.  I'll repaint them another day using my normal method of white base for the orange.

Front view.

The sandbags were drybrushed heavily with Vallejo Khaki, then Vallejo Bonewhite, to ensure they contrasted with the vehicle colour.  I also drybrushed the bonewhite over the timber side sections where the paint will have worn away from people and equipment going on and off the back.

Side view.

The figure is painted to match my mortar crews.  Khaki fatigues, sepia wash, camo cloak and GW Goregrunta fur camp spots, grey boots and beret with a heavy black wash.  The figure base has been painted to match the truck bed.

Rear view.

Stowage has been painted in a range of colours, Vallejo Russian Uniform Green ammo boxes, Vallejo Xpress Imperial Yellow Jerry cans, desert sand Jerry cans, blue, red and grey on the other small cans.

Sandbag and stowage detail.

Ideally I would have done a lot more weathering, including some paint chipping with a bit of sponge, a bit more dusty drybrushing over the vehicle, maybe some rust patches.  As it was though, I finished just 15 minutes before the 31st January competition deadline, so this will do for the time being!