Showing posts with label Epic. Show all posts

Sunday, 15 December 2024

Epic Knights and Epic box art

 During our game of Adeptus Titanicus the other week, I also dug out my Epic Knights and admired once again the fantastic box art and model photography of these big box games.

AT88 box art.

Number 1 son had fun playing with all the various weapons I have.  I won an eBay lot of 16 Warlords many years ago and have lots to use!  I have a couple of metal Reaver Titans there too.

 I started using some of the bits to build some alternate weapon heads for my Titans, inspired by the Colin Dixon-designed metal ones that GW released around 1990-91.  I constructed a carapace landing pad too, though it's only a square of plasticard with a magnet mounting underneath, more work needed!

 The Imperial Knights (presumably the "one man titans" mentioned in an earlier White Dwarf as something that would have been in the never-released Codex Titanicus II) were a bit of an oddity.  I really loved the models, and got a set of each, but never really got to use them.

My Knights Paladin are accompanied by a couple of plastic Knights from the Titan Legions box.  I never had Titan Legions, but did pick up a second hand set of the Knights to bolster my forces.  The plastic Knights were obviously based on the metal knight on the left, with chainsword and battlecannon.  I was slightly disappointed in the rules, I had hoped for more weapon variety, the same as larger Titans, but they all counted as a battle cannon and generic close combat weapon.  That Paladin with a power fist and multi-melta would have been great!

Knights Paladin

I have a couple of Warhound Titans, one of which is seen here leading my Knight Lancers.  I picked up an extra Lancer from somewhere, handy because the rules in WD gave minimum unit sizes of 4 and the Knights were sold in packs of 3.  These all had a las-cannon and 2 multi-lasers.  2 of the 3 designs clearly had las-cannon, but the lead Lancer weapon looks more like a battle cannon.

Warhound & Knights Lancer

Wardens were slow-moving, heavily armoured units, with a battle cannon and 2 multi-lasers.  That fits the centre & right models, but the left one obviously has a multi-launcher instead (would presumably count as a grade 2 weapon for AT88/SM).

Wardens

 The model photography for Adeptus Titanicus and Space Marine was comparable to that which appeared in White Dwarf at the time.  These were obviously much more involved photo shoots than those which appeared from 1990-91 onwards.  Time was taken to disguise the bases with flock, "smoke" was blown across the battlefield to give a greater sense of atmosphere.  Most of the scenery was scratch built or modified model railway or 1/300 WWII resin scenery.  The AT88 pictures exclusively feature the prototype metal Warlord Titans.  Within a year or two, photography focussed more on the individual paint jobs, with models simply grouped on a gaming board with some scenery arrayed around them.  They would still "tell a story", but not with the same atmosphere that you got from these older images.  A lot of the artistry was gone.  Make sure you click on the images to view them at a larger size so you can appreciate the amount of detail in them!

AT88 model photography.

The same city walls can be seen in the box art for Space Marine, but here the Titans are plastic Warlords, along with the metal Reavers, Warhounds and Eldar Phantom.  The Space Marines, Land Raiders and Rhinos are the metal ones released for Adeptus Titanicus, not the plastic ones included in the Space Marine box.

Space Marine model photography.

The Warp Runners "Sunburst Group" task force picture from White Dwarf made a big impact on me when I originally saw it.

"Sunburst Group" Warp Runners Titans.

It's interesting to see where much of the scenery in the original AT88 photo-shoots originated.  The towering scenery, tiny Space Marines and smoke all come together to make a great battle scene.

Original battle scene.

"Legions of Power" toys have been used for the block structure atop the tower on the left of the photo, augmented with some lattice steelwork to help give a sense of scale.  A hemispherical Legions of Power connector sticks up from one corner, with a Blue Zoid gun and dish antenna on top.  Incidentally, a Legions of Power cockpit made its way into a 40K scale Scout Titan that appeared in a later issue of White Dwarf, along with parts from the Red Scavenger Zoid.  Guns from the Dark Future plastic kits appear in various guises.  Some were also used in White Dwarf to convert Rhino APCs into what looked like an early form of proto-Predator tank.  There looks to be an electric motor used as the base of a tower.  The warehouses in the foreground are from a resin WWII/modern scenery range sold by a long-closed company, I think it was TableTopGames ("TTG").  I ordered a lot of their scenery (from a photocopied paper mail-order catalogue - no internet then!) to use for BattleTech and recognised the warehouse when my order arrived.  There are obviously bits from various railway model kits in there, probably N gauge.  Those fuel silos on the left - maybe started life as ping-pong balls?  I'm not sure, but the storage tank, back right, might have been 25mm scenery from Ainsty Castings.

Annotated battle scene.

I hope you've found these ramblings of interest!

Saturday, 14 December 2024

Adeptus Titanicus 1988

 I tried a game of the original Adeptus Titanicus from 1988 with Number 1 son.  AT88 included 6 Warlord Titans with interchangeable weapons, 8 expanded polystyrene buildings, 2 range rulers, dice and rules.  20 or so years ago, I magnetised my Titan weapons and started painting my loyalists in Warp Runners colours and traitors in Death's Heads' colours.  One day I might summon the courage to try painting the flames on the Warp Runner legs and carapace!

We played a simple game, 2 Nemesis class Warlords on each side.

Death's Heads.

Warp Runners.

We faced each other across a city using my card/plastic Space Marine buildings.  I only used the tall ones, so that they would block LOS completely.

The battlefield.

On the right, both sides gave Advance orders.  As the titans came into range, void shields flared as plasma fire, autocannon and multi-launcher missiles flickered back and forth.

Exchanging fire as they close.

On the left, the Titans moved more slowly and exchanged fairly ineffectual long-range fire.

Long range duel.

Turn 2 resulted in Charge orders for the Death's Head on the left flank, closing the gap quickly.  Both sides managed to repair a couple of void shields.

Closing the distance.

On the right, void shields winked out under sustained las-cannon, autocannon and heavy plasma gun fire, followed by a powerful plasma cannon blast.  The traitor staggered back as both close combat arms crashed to the ground.  The close combat titan was left without power fist or chainfist!

Goodbye close combat weapons!

Continuous fire pummelled the Titan, striking deep into the hull.  Plasma, lasers and explosive shells wreaked havoc, damaging first the plasma reactor, then the MIU (Mind Impulse Units - how the crew control the Titan via neural links), legs and a carapace weapon mount.

Leg, reactor, MIU damage...

 On the left flank, Charge orders bring the loyalist into contact with the traitor.  Weapons fire flickers back and forth as the Titans close, the Warp Runner losing a multi-launcher while the Death's Head's Defence Laser is blown off.  The Warp Runner's chainfist scores a single close combat hit before being disabled by return fire in the next turn.  Both Titans have lost their void shield generators, though at this close range the shields would have merged anyway, offering no protection from each other.


Damage mounts on both sides...

Finally, the inevitable happens. As the Death's Head on the right stands immobile, desperately trying to repair the reactor, the Warp Runner pounds it with every weapon.  Peppered by autocannon shells, las-cannon and maximal plasma gun/cannon fire, after 5 or 6 "no further damage" rolls, luck finally runs out for the traitor as the reactor loses containment and the Titan is engulfed in a plasma reactor breach.


First traitor Titan suffers reactor meltdown.

On the left flank, the Warp Runner is lucky enough to fire first.  Multi-launcher missiles spray armour fragments across the battlefield and a Defence Laser shot pierces the traitor plasma reactor.  Standing close to the traitor, the Warp Runner's MIUs are fried by the plasma explosion and the crew are left stunned.


Fortunately for them, the Imperial forces have triumphed.  All that remains of the traitor forces are 2 craters filled with radioactive lava.  The Emperor Protects!

Monday, 18 December 2023

Projects on the go...

I have several projects edging towards completion at the moment.  This box contains a lot of my new Epic scale 40K armour, printed during October on my resin printed.  Down the left side we have a load of Leman Russ with various different hulls and turrets.  The white ones in the first 3 compartments will end up red as part of my traitor forces.  The others are in varying stages of completion for my loyalist Imperial Guards.  The 4 compartments bottom right are all Basilisk artillery, all now finished, nearby are some Trojan transport vehicles and 3 munitions trailers.  The Valkyrie VTOL transport is an older model but it's only recently that I've had enough space to put it with the rest of my vehicles.

Epic armour.

Almost ready for assembly is my Rocker Bug vehicle from Dragon's Rest.  This is all FDM printing from the last couple of weeks.  Once I have the internal detail painted, I can fit the last bits together.  I need to sand the inside of the wheel hubs to get them to rotate more freely.  This was a useful learning experience.  When I print another vehicle, I will probably print some of the internal details in resin for crisper detail, such as seats and stowage.

Rocker Bug.


Saturday, 29 July 2023

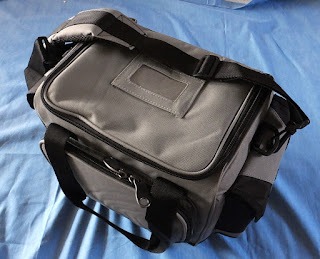
Lidl wargame storage case

Lidl are currently selling a fishing tackle bag wargame storage case for £25.  I didn't buy one when I saw it, but after considering, I decided that it might come in handy for some of my Epic scale vehicles.  As it happened, we were passing a couple of Lidls on a day out yesterday, and the second one had a few cases left.

The front pocket has a few elastic straps so you can keep your pencils neat.  There's space for lots of dice and a tape measure too.

The 2 side pockets both contain 12-compartment containers.  I'm thinking these will be useful for order counters and the like.

The main compartment includes a zip compartment in the top of the cover.

The main compartment contains 6 large plastic multi-compartment trays.  These will come in extremely useful.

Each tray has 18 compartments, which will be excellent for all my tiny tanks.  They stack neatly in the bag, which is well padded to protect them. The 2 long dividers are fixed, the rest are slot-in removable ones, so you have space for larger vehicles if required.

My Epic models are rather cramped at the moment, so spreading them into some extra cases will be good.  The existing cases are the same size, so I can mix and match which ones I transport in the bag.

The metal models will need a little padding, but the resin ones are very light and should be fine once they're spread out across extra cases.  If I swap some around, I might reallocate a tray or two to my 15mm scatter scenery which is about to overflow from its existing couple of trays.


Saturday, 22 April 2023

Epic Centaurs

These teeny tiny tanks are Epic scale Centaurs.  The Centaur is a tracked utility vehicle used by the Imperial Guard for scouting, supply and towing light artillery pieces.

These versions are modified as weapons carriers in the style of WWII Bren Carrier variants.  They come from designer Morteforte (Michael Withers).  I chose to use the multi-melta armed variant.

After cleaning up the resin prints, I undercoated them with Wilko grey spray primer.  The Humbrol 75 Bronze Green base coat was highlighted with Humbrol 86 light olive.  Camo stripes were painted on with a mix of 1/3 black, 1/3 matt varnish, 1/3 water.  Silver tracks and weapons received a wash of black ink and matt varnish.  A very light drybrush of dusty khaki/grey mix finished them off.

These really are tiny! I'm not sure whether to rescale them to 110% or 120% if I print some more or just leave them this size.


Even this small, they print with amazing detail.  I'm still really impressed at what such a cheap 3D printer can produce.

Saturday, 7 January 2023

Epic Valkyrie

 My Epic Imperial Guards have received some air transport in the form of this Valkyrie from Stroganoff on Thingiverse. This was printed in one piece using AnyCubic Eco-Resin.

Being a clumsy oaf, as I was preparing to undercoat it I dropped it on the garage floor and it shattered.  Fortunately I managed to find all the bits and repair it.  Gel supergue works very well on this resin and the repairs are practically invisible now that it has been painted.

As with my other Epic Imperial Guard vehicles, this has a Humbrol 75 bronze green base coat, Humbrol 86 olive drybrush.  The camo stripes are Vallejo black diluted with matt varnish to give a contrast paint effect.

I tried a new technique with the windows on this model, blue with extra highlights instead of the usual gloss black.  It has worked better than I expected, so I shall definitely try this again on some other models.

I painted the underside a paler colour for aerial camouflage, GW Corax white with Vallejo stoneall gray patches.

This is a lovely model and I'd like to print another 3 or 4 to give me the capability to transport a whole infantry detachment.  I'll just need to be more careful not to drop them...


Friday, 6 January 2023

Record number of posts and plans for 2023

I tried to put a bit more effort into maintaining my blog last year and it has paid off, with 80 posts - the most I've ever managed!

Looking back over the last 12 years, I can see how the events of my life affected my spare time.

Starting with 60 posts in each of the first couple of years, I managed to up the number to 65 for 2012. Things dropped off in 2013 with only 51, then down to 24 for 2014.  In 2015 we had our first child, as seen by the fact I only managed 9 posts!  I crept up to 11 posts in 2016, then 34 in 2017.  2018 I fell back to only 12 posts.  When our second child came on the scene in 2019, only 6 posts.  2020 was a strange year, partly due to COVID and working from home, but also for family reasons that I'll go into on another post.  The end result was that I completely missed the 10th anniversary of my blog, but never mind.  I've managed to slowly build up again since then, thanks in part to the AK-47 Republic Facebook Group running regular competitions which kept me particularly focussed on finishing things this last year.

T-55s for AK-47 Republic

I started off my blog to document my move into 15mm sci-fi wargaming.  Since then, it's expanded to include other scales and periods.  I have always enjoyed Heroquest dungeon escapades and I've been constructing plenty of scenery for this and have run several games.

Part of my Heroquest dungeon.
 

I've played Epic (6mm) gaming ever since I got the original Space Marine & Adeptus Titanicus back in the late 1980's and having a 3D printer has allowed me to indulge in expanding my armies with minimal effort. I've also been putting a lot more time into 15mm scenery recently and have been making a real effort to organise my hobby more efficiently, which has obviously been yielding results.

3D printed Epic 40K.

I can see how my painting style has changed over the years.  I started off painting in acrylics - even now, some of my lesser used original Citadel Colour paint set are still going strong, 30 or so years after I got them.  I started using inks but didn't really get on with them, mainly because it never occurred to me that perhaps I might dilute them to get a better result.  I had switched to Humbrol enamels for some of my figures and most of my vehicles around the time I started my blog, but have gradually moved back to acrylics, mainly because of the wider range now available.  I particularly like the Vallejo acrylics.  Many of my earliest 15mm figures were an enamel base coat and a lighter shade enamel drybrush as a highlight.  I had tried using inks for shading but had difficulties getting good results.  I also went through a phase of using black enamel thinned with white spirit for a shading wash but looking back on those figures now, they appear murky and have some very obvious tide marks!  My earliest 15mm Old Crow vehicles were just a black undercoat, drybrushed with the camo colours on top. 

Old Crow Glaive with black undercoat.

 My painting improved considerably when I got a bottle of Pledge floor polish, the renamed version of the famous Johnson's Klear/Future floor polish beloved by modellers for many years.  A friend at Cornwall Military Modelling Society had told me about this back in the early 1990's, when he used to use it for his amazing military aircraft, but it was a long time before I decided to try it myself.  Using a coat of the polish before applying waterslide transfers really helps them blend into the surface.  I also started mixing in some black or sepia ink for a shading wash, giving far better results than my heavy handed undiluted ink shading from earlier years.

 A few years ago, I bought a bottle of Vallejo matt varnish to try and remove the shine left on models from the Pledge.  This didn't work very well, leaving a whitish residue from the matting agent in some of the creases on models.  It suddenly occurred to me that I'd been really stupid and should just use the matt varnish for the shading washes.  Nowadays, I use a mix of equal parts ink, matt varnish and water which works very well.  Vehicles tend to get their base colours, followed by a floor polish glaze to seal the surface, then waterslide transfers, then a matt shading wash over the top, with a final dusty drybrush.  Some of my older vehicles are being upgraded with polish and washes to bring them to the same standard.

Old Crow Lancer IFV with black ink wash.

I've tried to learn new techniques along the way.  I started sculpting my own stowage for vehicles from milliput and I'm very pleased with the results I can get now, especially when I mix hand-sculpted tarpaulins with 3D printed or purchased items such as Jerry cans.

Hand sculpted tarpaulin and purchased stowage.

My first experiments with trying a water texture from toilet paper also yielded satisfying results, so I'll be working with that technique again in some of my scenery.

Toilet paper water effects.

Talking of scenery, this was something that I knew I needed to work on, so in 2020 I decided to try and improve my disparate and somewhat variable in quality collection of terrain.  I have learnt a huge number of new techniques, mainly from watching Geek Gaming Scenics and other channels on YouTube.  Luke showcases an amazing variety of techniques and money saving tips for terrain making and it has really inspired me.

Some of the new terrain I've made.

For 2023 I hope to finish off several part complete groups of models.  My 15mm Action Force project has received a new lease of life thanks to a Patreon with files of some of the more unusual characters. I have a large amount of MDF scenery that I have been enhancing in preparation for making a multi-level ruined urban board in 15mm.  I have several starships to be modified and repainted as scenery for 15mm games.  There are a lot of vehicles I'd like to print for AK-47 Republic, and I need to get some extra figures to build a couple of armies.

We have a major house extension currently under construction and the end result should yield a large new dining/living area (suitable for wargames) and larger garage (suitable for making more scenery and a better 3D printer setup).  I'm excited to see how things progress from late Spring/early Summer when the work is all finished.

Thank you to all those who read and comment on my blog.  Hopefully you'll find a few more items of interest over the coming year!