Showing posts with label conversions. Show all posts

Sunday, 16 August 2015

Matchbox repaints - Frost Fighter

A few months ago I finished repainting a couple of Matchbox "Frost Fighter" vehicles.  These are presumably inspired by some of the various tracked Land Rover versions which have appeared over the years.  They'll be ideal vehicles for pioneering explorers on low-tech colony worlds.  They have already appeared in the background of one or two of my battle reports.

The yellow one is your basic exploration model, brightly coloured so it's easy to locate.

Decals from GW Space Marines and an old Italeri "F19 Stealth Fighter".

GZG Ravager for scale.

Additional stowage in the form of a resin crate, Brigade Models jerry cans and a hand sculpted stowage roll.
I'd imagine the orange vehicle being some sort of mining survey, hence the explosive warning marking on the back door.  Must be carrying geological survey charges or something similar.

Brigade Models jerry cans, The Scene ammo box, hand sculpted canvas roll and a short piece of chain.

Another GZG Ravager for scale.

Decals from random model kits plus Veni Vidi Vici hazard markings.

The 2 repaints plus an original model.


Headlamp detail.

Rear view.  Brigade Models jerry can, Chieftain stowage bin from a now-defunct 1/72 company.
At some point one or other of them will probably be the focal piece of scenery for a game scenario - the expedition has gone missing, leaving behind their vehicle (and perhaps a couple of 15mm.co.uk's wrecked tents), search the surrounding area and rescue them from whoever (or whatever) has captured them...

Wednesday, 14 August 2013

Armoured Transport part 5

 Progress on my APCs has slowed to a halt while I try (and fail) to find the stencils I was going to try and use for their camo scheme.  In the meantime here are a few pictures of them in their Vallejo reflective green base coat.  They look rather scuffed at the moment, probably need another coat - and they've been gathering dust and bits of fluff for a couple of months now!  Treadplates, tyres and lower hull areas had a splash of brown paint before I roughly applied the green, this has left dirty patches in the nooks and crannies where ingrained dirt will have collected.

APCs on parade.  What a scruffy bunch.

A little bit of stowage added to the back.

Modified Scimitar turret.

Missile pod from Mechwarrior clicky tank.


But wait!  What's that rumbling noise...


Reinforcements arrive.


Yes, it's another 4 APCs plus a load more vehicles, courtesy of e-bay and the local model railway shop. 


Oh dear - another land mine victim?
Time to get the plasticard out for some more conversions!

Tuesday, 30 April 2013

More Stoats - painted!

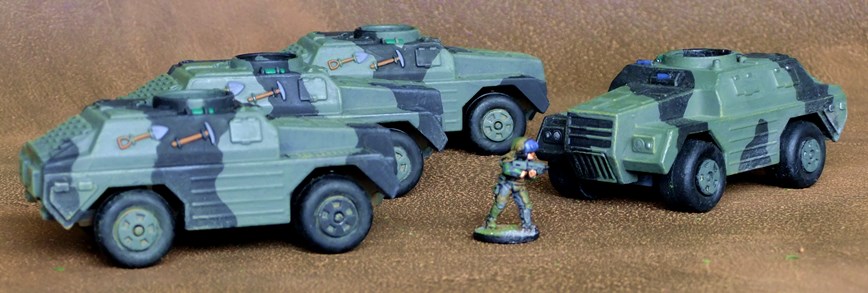
 My 3 new Stoat armoured cars are ready for action.  This time I gave them a scrub with a brillo pad (steel wool) instead of dunking them in paint stripper.  It gives a key for the paint and it's much quicker, which suits my lazy way of working.

Undercoated.
I've used a black undercoat this time.  Hopefully any chips in the paintwork won't be as noticeable as with a grey undercoat (as used on the first Stoat).

Driving through the forest.
The more observant among you might have noticed their sneak preview in yesterday's post!

GZG trooper for scale.
I've used the same colour scheme as the first Stoat.  Humbrol 75 bronze green with a Humbrol 86 drybrush.  Vallejo matt black camo stripes drybrushed with Humbrol 32 dark grey.  A dusting of Humbrol 93 desert yellow to finish off.  Tools are Vallejo stonewall grey heads with Humbrol 186 brown handles.  Fire extinguishers on the top of the hull are GW woodland green (a pot from the early 1990s!).

I think some Peter Pig Hummer 50 cal or TOW Hummer ring-mounts might finish them nicely.

Saturday, 27 April 2013

Armoured Transport part 4

 My vehicles are undercoated, I've used flat grey car primer.

Undercoated and ready for camouflage.
I added a small rectangle of plasticard next to the jerry can before I painted them,this will be a first aid kit when they're painted.  The grey paint shows up the detail much better than my previous photographs.

Roof detail.
Since taking these photographs they've received a coat of Vallejo reflective green.  Now I just need to decide on what extra colours will be used for their camouflage pattern and how I'm going to apply it.

Saturday, 13 April 2013

Armoured Transport part 3

With 5 personnel carrier bodies to play with, I decided to upgrade one with a weapons turret.  I bought a small plastic Gepard SPAA tank a while ago, the Leopard tank body was rubbish but the turret had possibilities.  Sadly I couldn't find it, but luckily I had a couple of old Airfix CVR(T) Scorpion tank kits handy, so I decided to go with one of them.

Fire support vehicle.
The turret has been built in the Scimitar configuration with a 30mm RARDEN cannon. I've added a few extras in the form of corrugated plasticard, a bit more treadplate, a map pin sensor sphere, the end of an MG34 mounted coaxially with the main gun, a couple of Italeri jerry cans and the missile pod from a Mechwarrior clicky tank.

Rear detail.
 The APC body has a fire extinguisher added next to the forward stowage area and a small hatch nearby.  I imagine this hatch is for munitions loading.  The turret is slightly offset to one side to prevent the missile pod protruding over the side of the vehicle.  With a hole drilled through two layers of 1.5mm plasticard, the turret fits snugly in place and doesn't wobble as you turn it.  After completing the turret, I discovered that the slight overhang of the jerry cans on the back of the turret bustle/stowage bin was going to leave them too close to the top of the hull, they'd end up rubbing a line in the paint.  An extra circle of 1mm plasticard has lifted the turret enough to avoid this problem.

APC top plate mounting.
 I've found that Mechwarrior clicky vehicles are an excellent source of missile pods and the like and are still fairly easy to get hold of on e-bay.  You can see the missile pod donor on the right here.  As well as the tanks seen here, I have a the Jes II missile carrier which comes with loads of missile pods - some will be finding their way into my forces very soon.

Weapon donors.

Thursday, 11 April 2013

Armoured Transport part 2


With the rivets drilled out, the body shells are all ready for the next stage of their treatment...

Body shells separated and ready for cleaning.

A steel file takes care of any obtrusive mould lines and a quick once-over with fine grit wet & dry paper finished them off.  I took particular care to ensure the top edges of the troop compartment were free of paint and had a good key for gluing.  After this they get a good rub-down all over using a brillo pad (ie. steel wool), then a scrub with an old toothbrush and some washing up liquid to give a good surface onto which I can glue/paint.

After filing, sanding and steel wool

 I've used 1.5mm thick plasticard for the roof of the troop compartments.  I held this in place, flipped each one over and ran a bead of superglue along the inside.  The glue gets drawn into the join by capillary action and I don't end up with any unsightly blobs on the outside.

Basic plastic rectangles trimmed to size

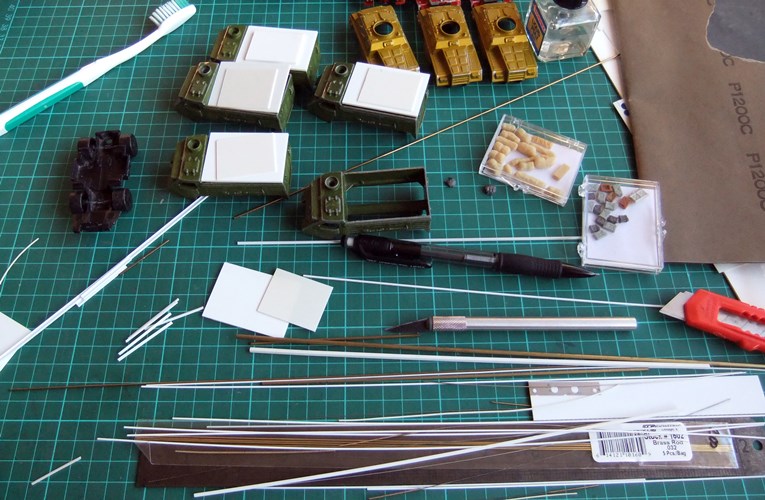
I'm using all sorts of bits for this project.  Behold my construction table - A2 cutting mat, a couple of craft knives, razor blade, heavy duty 60cm aluminium ruler, an assortment of 1mm and 0.5mm brass rod plus several different sizes of brass tube, plasticard, square section plastic rod (in various sizes), polycement, wet and dry paper, toothbrush, assorted plastic angle sections (H-beams, I-beams, T-section and L-section), a couple of plastic boxes containing jerry cans and general stowage.

An assortment of the stuff I use.

 My APCs will need some sort of top hatch, I've fashioned these out of 0.5mm plasticard apart from the one at the back which has 1.5mm - but more on that later...

The APCs take shape...
Now is the time to experiment.  I thought that some of my various vents and grilles from The Scene's building accessory range might be useful.

Trying a couple of The Scene's vents.
He also makes nice hatches and chunky air conditioning / extractor fan units.

More from The Scene - vent, hatch and A/C unit
Hmm... let's see just how much stuff we can add...

OTT stowage and bits.
This now has the following: The Scene hatch, vent and A/C unit, Continental Model Supply Company stowage bundles and modern UK ammunition boxes (7.62mm and 120mm), Italeri jerry cans, Airfix M2 Browning (in CMSC gun mount).

OTT stowage and bits rear view.
I know it looked good but I haven't got enough spare parts to do all my APCs!  So it's on to something simpler.  I've used some treadplate in what seems like a logical place where someone will be clambering out of the top hatch.

Some more details added.
 T-section girders form the edges of a stowage area in the middle, L-section girder hides the join between the plasticard and the back of the cab.  Brass rod will be the hinges for the top hatch.

The hatches now have hinges.

 I found a couple of old metal backpacks in my bits box.  I don't know where they came from but they'll make some nice extras for a couple of the vehicles.

Some backpacks as extra stowage.
Finished!  Jerry can added in the stowage area (actually, I think I might need to add a rectangle of thick plasticard too, to serve as a first aid kit).  I've engraved a line to separate the doors of the top hatch and added handles.  There are vision blocks made from 1mm square plastic rod added around the edge of the roof.

Finished (until I think of something else to add...)

Here they are in formation. More on the turreted one at the far end next time!

Ready for painting.

Tuesday, 9 April 2013

More Stoats

More Stoats...
It looks like my post about the Stoat scout car was quite popular.  My e-bay lot containing the Weasels armoured car also includes 3 more Stoats for me to convert.  I'm thinking that Peter Pig Hummer weapons mounts might be a nice addition to a couple of them, replacing the little man with binoculars.

Sunday, 31 March 2013

Armoured transport


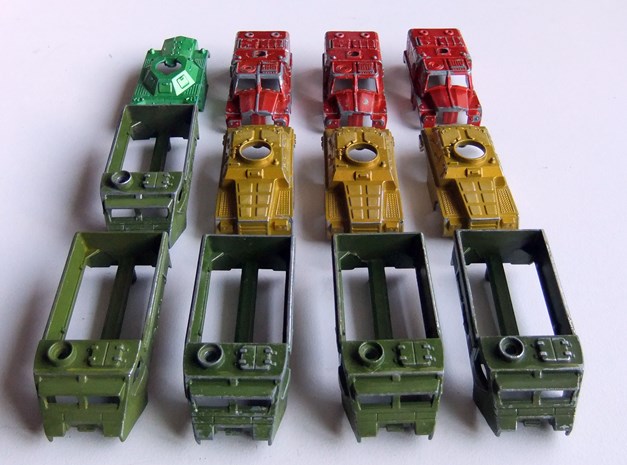
 I've been accumulating a number of old toy cars over the last 6 months, mainly Matchbox (military stuff) and Hot Wheels (racing cars of a futuristic design).  The Hot Wheels have all come from charity shops, usually 15-20p each, the Matchbox mainly from e-bay for 50p-£1 each (often in bulk groups).

The 5 Personnel Carriers ready for action.

Here's the first I'll be working on, the old Matchbox Personnel Carrier. I'd forgotten about this vehicle, I never had one as a lad but once my memory had been jogged I did remember a couple of friends having them.  We used to sit in the classroom at lunchtime, playing with 1/72 scale Airfix and Matchbox soldiers, we must have been about 10 or 11 years old.  Happy days...

15mm GZG OUDF troopers for scale.

Anyway, I digress.  These vehicles are going to be modified by enclosing the rear troop compartment with plasticard.  I was inspired by the article on Glue in the Carpet (which it turns out was inspired by one of my previous articles - all part of the joy of blogging!).

Rivets drilled out and vehicle separated into component parts.


 I've drilled out the rivets and the next stage will be to give them a scrub to get rid of the mud and fluff...

This one had obviously seen action - witness the bullet-holes!

Tuesday, 23 October 2012

New cars

 These 3 cars came from the local charity shop for about 10p each.  Though I'd initially disregarded them because they're pretty poor quality pressed (not die cast) body shells, I reconsidered and decided to splash out.


My thinking is that they'll make good grav-cars for a futuristic city.  The wheel arches aren't flared and the bodies just pop apart so the plastic wheels fall out.  Should be easy to fill the gaps with milliput or another epoxy putty then repaint and mount on a stumpy flying base to lift them 3 or 4mm off the ground.

Another advantage of being cheap and non-specific in terms of make, no-ones going to look at them and say "Oh, that's just a dodge charger with the wheels removed" or whatever. Plus if I screw this up completely, it's no great loss!

Tuesday, 21 February 2012

Desert APC conversion

 My latest conversion is this armoured personnel carrier, more cheap but useful goodness from Poundland.  There's another recent article about it on the Glue in The Carpet blog which I'm sure many of you will have seen, GJD is obviously much quicker at turning around his buys as I've had mine for several weeks and have only just got around to finishing it!


As has been mentioned on other blogs, this is a French VAB personnel carrier which comes in 2 flavours, 4-wheel and 6-wheel, the latter being primarily an export model.  I've already got a 4-wheeled version which featured on my blog in March last year, I've decided to go for a different colour scheme with this one.


The first thing to change was the weedy missile launcher turret which had a strangely positioned pair of skinny little tubes on each side.  After removing the screws to take the whole thing apart, I disassembled the turret and got rid of the missile tubes.  The replacement pods come from a Mechwarrior clicky figure (might have been a Jes II missile carrier or something like that - an excellent source of satisfyingly chunky missile pods!).  They were drilled & mounted on a cocktail stick that fitted snugly in the pivot-point of the turret.  Why use a cocktail stick instead of a bit of brass rod?  Because I can't find where I've put my pack of incredibly useful bits such as rod, wire, plastic girders etc, that's why!!


With it's huge wheels, I thought that this would be a suitable vehicle for desert operations on sandy terrain.  Colour scheme matches my recently painted NSL Power Armour, in fact I thought of it for the APC first but took so long to complete it that I felt compelled to try the scheme on the infantry while I was waiting.  Base colour is Humbrol 93 desert sand, Vallejo reflective green mixed 50/50 with the sand colour for the main camo stripes, plus Vallejo cold grey patches here and there.  The whole thing received a wash of Vallejo sepia ink with base colours drybrushed on top, followed by an all-over drybrush of Vallejo bonewhite to give a dusty finish.  Wheels have been left the basic sand colour rather than trying to tie in the camo - if you have stripes across a wheel it tends to engender a stroboscopic effect as it rotates, drawing the eye towards it rather than helping it blend in.  I know that out little model vehicles don't actually drive around and get shot at, but I still try to follow the principle if I can.


The last photograph shows a GZG armed colonist to give an idea of scale.  I only got one of these APCs at the time because I wasn't sure how it would look with the huge wheels.  I think it probably works OK (though I wouldn't like to try and squeeze out of those driver's compartment doors in an emergency), but as Pounland didn't have any left when I last visited, looks like this one is destined to be lonely!