Thursday 30 December 2010

More colonists

A couple more GZG colonists completed, in this case a both female.

On the left we have a GW blood red jacket, shaded with Vallejo sepia ink. The collar is Humbrol 29 matt dark earth with a matt 64 light grey drybrush. Trousers are Humbrol 25 blue with a dash of white added for the highlighting. Hair is Humbrol 93 desert yellow with a Vallejo sepia ink wash and Vallejo bonewhite highlights.

The other has Vallejo charred brown trousers and Humbrol 93 desert yellow jacket, both washed with Vallejo sepia ink. At this scale, the original result was too subtle and just blended into an overall brown when viewed at normal gaming distances, so the jacket received a lot of brybrushing with desert yellow and then with Vallejo bonewhite. The collar is Humbrol dark grey with a light grey drybrush.

Wednesday 22 December 2010

Predators


When I saw these little chaps, I just had to have them - they're so cute! OK, that's perhaps not the most important criterion when you're after some figures to represent fearsome headhunting aliens, but I don't care!

These are LKM/QRF pack SF08 Skullhunters - or Predators to you and me. For your £2.25 (about $1.50?) you get 8 figures, all different poses. Some poses aren't as good as others, and the sculpting is fairly basic in places (they all tend to have hands like bunches of bananas), but for value for money they're fantastic! I'd say that the good poses definitely outweigh the poor. They come equipped with a variety of weapons as seen in Predator and Predator 2. Most have the shoulder-mounted plasma caster, a couple have the extending spears, 2 have their helmets off to reveal their cute little roaring faces. They required very little cleaning up, virtually no flash and only very small mould-lines. The bases were nicely rounded and pretty smooth underneath, so no need to re-mount them on washers.


This skull-gripping, roaring guy has to be my favourite. OK, the hand gripping the skull is the most banana-like of the lot, but he has so much character!


This one has a nice extending spear, and you can see his shoulder-mounted plasma caster.


Not too sure about this pose. It looks like he's queueing for a bus.


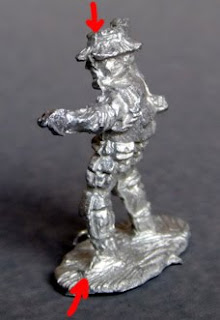
Another of the not-quite-so-good poses. I assume he's in combat, but could just be closing a door.


I think this might be the boss. He looks very cool and collected, contemptuous of the pitiful humans that he is about to hunt...


It's a nice touch to have one using his wrist-comp. Perhaps he's re-setting his camouflage field...


This one might be aiming his plasma-caster. The helmet isn't quite as good as some of the others (very large nose!?) and he's a bit club-handed on his right side. This looks like a minor casting problem rather than poor sculpting though, and it isn't very noticeable. It's a pity that there isn't a pose lunging the other way with extending wrist blades out.


This is a great pose too, the plasma-caster is very prominent, and the whole figure is very aggressive.

Painting notes: After a black base coat, I painted the flesh first, as I knew it would be pretty messy. Humbrol 93 desert yellow provided the base, followed by a wash of Vallejo 72.091 sepia ink, drybrush of Humbrol 93, then a final highlight of Vallejo 72.034 bonewhite. Armour and helmets were painted with a mix of GW chainmail and Humbrol matt75 bronze green to give a fairly dark finish. This was followed by a highlight of chainmail/mithril silver. Their hair was painted with Vallejo 72.045 charred brown. Those with their helmets off received a dab of white on the end of their teeth, and a tiny dab of watered down red in their mouths.

Overall grade for these figures: B+

A good range of figures with more hits than misses. Sculting isn't as impressive as some manufacturers, but clean casting gives a good result when painted, and value for money is fantastic.

Saturday 18 December 2010

SWAT Team


I recently got around to painting my Rebel Minis SWAT team. Overall I was rather disappointed with these figures. Although most of the poses are nice, with good detail (even down to a cross-hatched texture on the handgrips of holstered pistols!), the quality of the castings was poor, and some of the weapons are unidentifiable. For sci-fi figures this isn't such a problem, but for someone using modern small arms, I do think you should be able to see what they are holding.


There are a couple of odd choices - I think that the sniper figure would have been better in a kneeling position and the commander appears to be wearing a sun hat! I think that this was the LA SWAT team pack, but although it is sunny in LA, it's a bit out of keeping with the rest of the team.


Although there was little or no flash, several of the figures suffered from very bad mould lines - see the commander below, with the mould-lines highlighted with red arrows. The bases were also very large and rather scruffy compared with most of the other Rebel Minis that I have.

I felt that I couldn't use the commander as he was, so a head swap with a GZG separate head was required. I decided that a breather mask looked quite good, and was a suitable size match. The pistol was trimmed down, the original having been so thick that it looked like he was holding a brick, and the base was cut down and filed thinner before gluing onto one of my usual M6 washer bases. Here you can see the modified figure alongside a fresh-from-the-packet friend.

A rear view of the commander - is that supposed to be an M4 assault carbine slung over his shoulder?

Three other members of the team. Left to right they have MP5 (?), M4 or M16, unidentifiable weapon (possibly some sort of shotgun?). Humbrol matt 33 black basecoat was followed by Humbrol 32 dark grey drybrush over assault vests, helmets, weapons, boots and kneepads. Trousers and sleeves are Humbrol 105 Oxford blue with Humbrol 25 blue drybrush. Flesh is my own flesh mix with a GW flesh wash to shade. Visors/goggles are GW enchanted blue (I have 2 post from many years ago when their colour matching was very poor - these are so different that I can use one as a base and the other to highlight!).

SWAT in action against some LKM Skullhunters (ie. Predators).

Overall rating for these figures: C-

Great poses and detail, but let down by poor casting and unidentifiable weaponry. A good result when finished, but they required a lot of work to get there compared to most other figures I have.

Final note: I have had a check on Rebel Minis site more recently, and it looks like the figures that I bought are no longer available. I think that they have changed the castings for both their LA SWAT team and their standard SWAT team - in fact it looks like some of the same figures appear in both.

Thursday 25 November 2010

Musings on paintbrushes...

A few days ago, I decided to have a bit of a sort out. My paintbrushes were scattered between at least 5 different boxes, so I thought that I should try and rationalise them. I came up with these candidates for disposal...

I haven't a clue what happened to the bristly end of the middle brush! Why on earth did I even keep this bit? The ferrule on the bottom one snapped during cleaning, so it ended up being used to stir paint. The second from bottom has no bristles left -again, why did I keep it?

The top couple of brushes (Humbrol Senator) aren't really any use now. I'm not sure what happened to the top one, and the bottom one has been drybrushed into oblivion.

At the opposite end of the scale is this lovely little brush, an Inscribe Series 2000 size 00. This has been my primary figure-painting brush for well over 10 years, originally dealing with 40K Space Marines and Imperial Guards and Epic scale armoured vehicles and infantry. More recently it has been responsible for the majority of my 15mm figures. I've always found Inscribe brushes to be fantastic, easily the best of all the different types that I have tried over the years. This particular brush is only used for acrylics, which is probably why it has survived so long. The other brushes have been used for Humbrol enamels, and cleaning them in white spirit or turps really shortens their lifespan.

My latest find is cheap artists brushes from the local £1 shop. They come in a pack of 12; 4 decent quality gold taklon suitable for figures/vehicles, 4 coarse bristle suitable for large-scale scruffy scenery painting and 4 soft brushes (maybe squirrel or something?) which are ideal for undercoating or drybrushing when the bristles are cut to half length. Each type generally includes a couple of wide, flat brushes for covering large areas, plus a pair of smaller round brushes for detail.

Now all I have to do is get a move on and finish some of the many projects I have on the go - moon buggy, Eagle, dropship, armoured vehicles, SWAT team...

Tuesday 9 November 2010

Moon Buggy

My new HEEV (Hostile Environment Exploration Vehicle) nears competion...


This started off as a Matchbox "Battering Ram" Police vehicle. It is supposedly 1:86 scale, but parts of it seem more like 1:200 judging by the size of hatches and windows! I could see that with a little modification to re-scale it to closer to 15mm, it would make a great exploration vehicle for travelling through moonscapes.

After drilling out the rivets and disassembling the parts, I discarded the battering ram into my bits box, along with the turret (not right for this, but could come in useful on another project if I replace the gun barrel...) Next, I attacked the out-of-scale upper cabin section with a pair of side cutters, removing all the window frames. A hacksaw was needed to cut through the solid rear section, and a large file smoothed all the cut areas flat. A new plasticard roof covered up this gaping hole, superglued in place. The cut-off top of the cabin featured a nice vent, so rather than throwing it away, I filed the underside flat and superglued it to the new plasticard roof. The remaining flat areas of plasticard were dressed with a plasticard hatch, vent and a couple of bits of guitar string to represent hinges and help hide joints.


A washer helped cover the hole where the turret used to fit, and a plasticard scrap glued underneath it blocked off the hole in the middle. Into this I added a couple of tiny watch parts, with a few more arranged around the turret mount to fill up some of the empty space. A couple of extra plasticard rectangles were added to the rear of the superstructure, one of which had a small piece of mesh glued on to make it look a little more interesting.

Although the rear of the vehicle featured a couple of small hatches, I decided that something larger was needed - after all, the occupants could be entering the vehicle wearing bulky EVA suits which certainly wouldn't squeeze through! I filed away the existing hatches and replaced them with a large plasticard hatch, suitably embellished with some old watch parts, guitar string hinges etc.
There was a large hole in the front of the vehicle which had housed the battering ram shaft. This was filled with epoxy putty and filed smooth when set. A small watch cog finished it nicely, perhaps some sort of equipment attachment point or power connection?

As it's supposed to be surveying airless worlds, I decided that jerrycans, wooden crates, bedding rolls and other stowage probably weren't appropriate on this occasion! The one thing I did add was a pair of ranging rods made from brass rod, the end of one being filed into a point.


Tuesday 26 October 2010

Unwelcome Visitors

Jones thought he heard something down in the storage bays. Being a cautious bunch, the crew grabbed their weapons and went to investigate. An eerie purple glow emanated from one of the hatchways, but as they approached...


I've had these models for over 15 years. They were bought at a games show in Plymouth, and I just never got around to painting them. I was rummaging in my old tool/paint box the other day and came across them, and thought they'd make ideal 15mm monstrous aliens.


They are small Citadel Miniatures Tyranids, which later became known as hunter-killers, then as termagants. They show the characteristic early Tyranid shape: large head with 2 main eyes, plus an additional pair of eyes on small stalks partway along the head, and the holes in the neck are the ear canals. They follow the usual centauroid Tyranid pattern (as seen in Zoats and Genestealers), with a pair of arms, followed by webbed claws (aids moving around in the microgravity environment of a hive ship), with hooves at the rear.


The figures had their slottabase tabs snipped off and were araldited (epoxy resin) onto 1p pieces. To add a little variety, the second one had the tail curved upwards and the rear hoof lifted into a running pose.

After a grey primer spray undercoat, they had a base coat of GW/Citadel "Rotting Flesh". The weapon hoses are GW "Worm Purple", and the guns are GW "Woodland Green". The backpacks are Humbrol matt 29 dark earth. The whole model was given a wash of watered down Humbrol 33 matt black, with undiluted black painted into the deepest shadows. Highlighting generally involved a drybrush of the base colours, followed by lighter drybrushing with a little white added. Teeth were finished off with GW "Mithril Silver".


"Raaaargh!"

Tuesday 5 October 2010

Gruntz playtest

Having just received a copy of the Gruntz rules for playtesting, I decided to try them out at the local games club, the Old Buckenham Bone Crushers.

Crusties have invaded a small colony world, and those colonists that survived the assault have been gathered together in a ruined building in order to further the Crusties nefarious plans. Are they to be a food source for Crusty larvae, or will they be hostages for ransom - who knows? Several Crusties remain on guard in the building to make sure that they do not escape.

A small force of Marines has been landed nearby. Their mission: rescue the colonists! Their APC slips past the industrial 'mech in the foreground, while the Marine commander directs operations from the cover of a storage container in the distance.
One of the Marine squads moves round the right flank, taking cover behind some piles of stores. A SAW gunner and his companion climb into the back of a truck for a better vantage point.
Uh-oh - looks like the Crusties have moved into the ruined building nearby, blocking the Marines' route of advance. The Marines fall back to reconsider their options...
On the other flank, the APC makes a double move and the infantry debus and open fire on the closest squad of Crusties, killing over half the unit. Being tough and fearsome, the Crusties shrug off the casualties and pass their morale test with ease.
The Crustie commander uses his once-per-game "spawn a prawn" ability and regenerates the squad to full strength. The squad instantly assault the Marines, slaughtering over half the squad! This is too much for the Marines, who break and try to flee. As they run, the crusties strike down two more, leaving only a single survivor.
The sound of heavy gunfire and explosions booms through the woods - the Marines' heavy grav tank has destroyed one of the Crusties' defending tanks. Worried, the Crusty commander pulls back all his squads to the ruined building, ready to defend it to the last...
The Marines' missile tank comes gliding forward and attempts to overrun the Crusties' position. Sadly for the Marines, the driver miscalculates the height, and the tank crunches into the rubble instead. 23 Crusties fire on the tank with their rifles, but all to no avail - it takes no damage!
The remaining Marine squad has moved round to the left flank, rejoined the commander, and is preparing to follow the tank in.
In a daring move, the Crusties' remaining tank makes its move - first it ploughs through the Marine squad, killing several before slewing to a halt. The survivors stagger into the APC and move towards the Crustie stronghold. The Crusties start to feel hemmed in as armoured vehicles surround them...

The Crusty tank makes its presence felt once more, destroying the APC with a well-placed shot through the rear doors. Only the Marine commander survives the explosion.
The Marine's missile tank resorts to brute force, ploughing through the walls of the building, squashing Crusty and colonist alike into a single giant gooey smear. If they can't rescue the colonists, they can at least end their suffering quickly!
Meanwhile, the Crusty commander and several of his faithful minions beat the Marine commander into a bloody pulp.

Victory to the Crusties? Sadly, no colonists survived, but as the Marines were all eventually killed, the Crusties have lived to kidnap colonists another day...
Models:
Old Crow Gladius medium grav tank with missile turret
Old Crow Sabre heavy grav tank (out of sight in the woods)
Old Crow Glaive grav APC
GZG Crusties
QRF Skullhunter (used as an easily recognisable commander for the Crusties)
GZG NAC marines
GZG New Israeli (used as officer for Marines so he could easily be identified)
GZG Civilians/colonists
Plus numerous toy cars painted as burnt out wrecks, Mechwarrior construction 'Mech etc.

Thursday 23 September 2010

Conversions and head swaps

A couple of recent conversions...


The elderly gentleman on the left started off as a GZG civilan/colonist, the one on the right is a GZG armed civilian/colonist with a ZG gasmask conversion head.


I decided that the population of my colony are in need of a patriarch of some sort. I started with a GZG colonist, added a beard sculpted from epoxy plumber's putty and a walking stick from a guitar string.


I also wanted to use some more of the GZG conversion heads which I've had for a while. A couple of my armed colonists have lost their heads and received replacements. The middle figure's head was carefully sliced off (may re-use it elsewhere), the figure on the right had his head removed with a pair of cutters as it was too difficult to do with a knife. Both had holes drilled with a pin-vice, and the heads (with about 4mm of stalk still attached) araldited into place.


The elderly gent out for a stroll with a fellow colonist - possibly a son judging by the familial resemblance!


Before & after - an armed colonist and his rather sinister gas mask wearing friend.


A rear view of the elderly gent and the masked gunman.