Friday 28 October 2022

Rebel Minis VIPER Suit 3

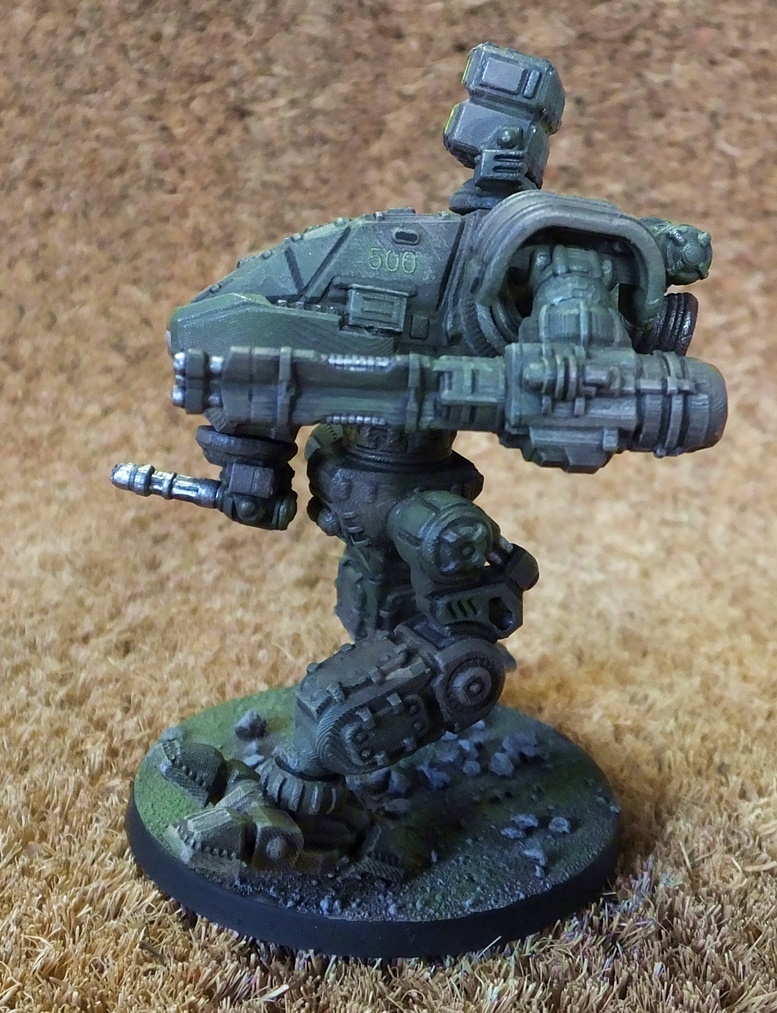
This civilian model of the VIPER comes without weapons or a set of jump jets and also lacks the up-armoured cockpit canopy. 

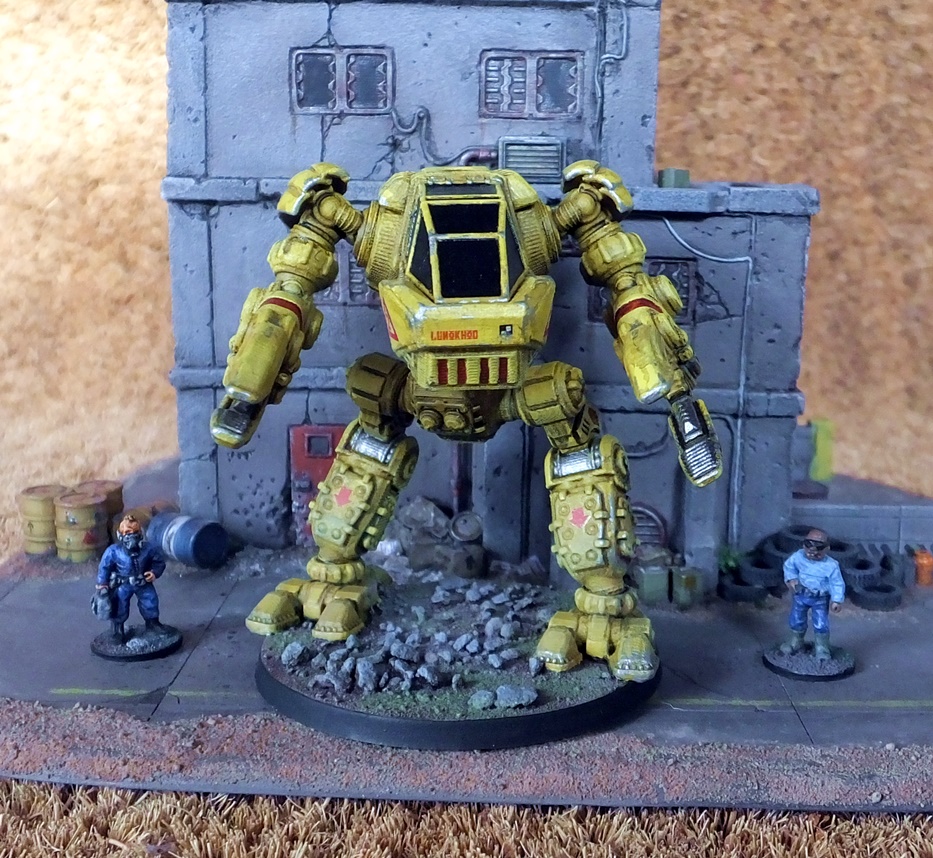
The large claws seemed ideal as load-lifters on a civilian work-mech.  These come in 3 pre-set poses that vary the angle of the pincers.  There are also finer manipulator claws which come pre-posed or with individual fingers for maximum flexibility.

A small hexagas cannister was added to the rear of the hull.  It probably powers a built in cutting torch or something similar.

I opted for a different set of shoulders to further differentiate this from the military versions.  They also have the benefit of a larger flat area suitable for applying a transfer or two (in this case an ID number).

I've always been rather disappointed with the various yellow model paints I've had, they're often quite translucent or lacking in density.  I think I've found the ideal one now - this has been painted with a Wilko "Bumblebee" latex emulsion tester pot!  The coverage was far better than any craft or model paints I've had and at £1 for a pot containing about 3 times the normal amount it was great value.  It didn't obscure the detail as I had feared it might, so I'd strongly recomend this one.  Because the pigment is so dense, it's also really good for stencilling markings directly onto black or grey tarmac/concrete without having to apply a white undercoat first.

After base coating, the model was varnished with Future floor polish and an assortment of waterslide transfers applied from GW, WWII tank kits and Infinity.  The arrows on the legs are cut from an 8-pointed star of Chaos from an old GW transfer sheet, the ideal scale for 15mm vehicles.

After the decals had a few days to dry, I applied a thinned black ink & matt varnish wash across the mecha, wiping it off quickly to avoid staining the raised areas.

When I acquired a pot of Army Painter blood red speedpaint, I was eager to give it a try and adding a few coloured accents to the VIPER added a bit of extra interest.

I gave the whole model a dusty drybrush, plus some silver chipping around the feet, claws and front of the hull.  This has given it a suitably beaten-up look for a well-used civilian loader/utility mech.  I've avoided rust stains, assuming that sci-fi mecha like this will probably have been built out of stainless steel or various composites.

I also painted on a few lubricant leaks around some of the joints.

The cockpit got an extra coat of Future to give the canopy a shiny finish.

As with the combat VIPERs, this printed pre-supported without any difficulties.

Along with the armoured cockpit and weapons, all parts for this model are also included in the base package for the Rebel Minis Earth Force VIPER, making it even better value for money.  If you play sci-fi in 15mm and have a 3D printer, you should go and buy this now!


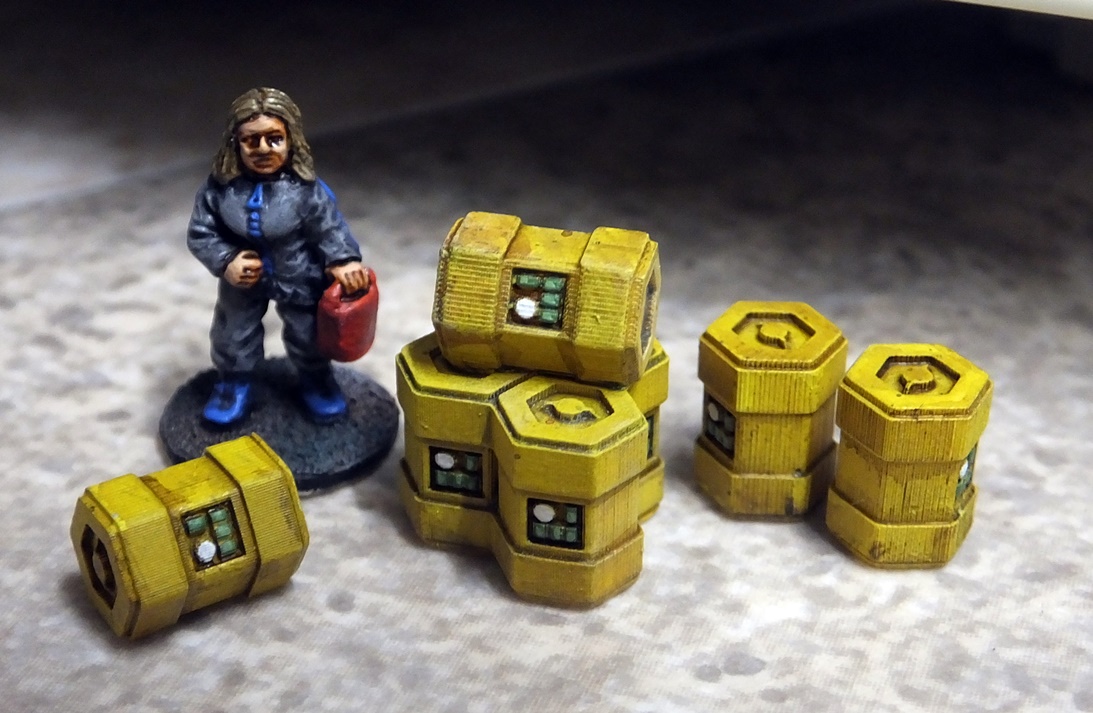
This will be an excellent piece of scatter scenery for my 15mm games and might double up in some games as either a repurposed rebel mecha in Tomorrow's War or possibly something for the survivors to try and hotwire in my Escape from Zombie Planet games.

Wednesday 26 October 2022

Rebel Minis VIPER Suit 2

VIPER suit 501 is an anti-armour specialist, equipped with 14 guided missile pods as the primary armament and a chin-mounted point-defence gatling as the secondary weapon.

As an alternative, it could be an artillery or heavy anti-aircraft unit.

I added a small storage cannister to the side of the cockpit.  This is actually a re-scaled WWII German gas mask case.

This pose has turned out better than the first VIPER.

Painting was exactly the same as the first VIPER.

As with the first VIPER, this one has a Jerry can of extra drinking water attached to the main hull.

Water slide transfers were applied similarly to the previous VIPER, though the numbers are obviously slightly different.

I added an extra "NO STEP" transfer to the arm missile pods.  Don't want anyone standing on those!

Don't stand on the missile pods!

Taking advantage of 3D printing, these 3D sculpts are much bigger than the original physical Rebel Minis VIPER suit models, towering over a 15mm figure.

15mm figure for scale.

Wednesday 19 October 2022

Barricades and more crates for the cargo bay

Continuing from my cargo bay scenery, the first of these Star Wars Legion barricades come from Sablebadger, resized to 50%.  I added a small ammo box and triangular can from a stowage set too.

Star Wars Legion barricade from Sablebadger

ImperialTerrain make this hasty defence position, again resized to around 50% and with a small triangular can added on top.

Hasty defence position from ImperialTerrain

Other side of Hasty defence position

I tried a couple of different colour schemes on these crates (printed at 50%).

New crates.

Battered, dirty, rusty old crates.

Ribbed suitcases from Sablebadger

I can imagine these barrels being HDPE plastic chemical drums with a metal screw ring around the top to secure the lid, so I've painted in appropriate colours.

Barrels from Sablebadger

This mixture of crates includes some from Sablebadger, some from Lordogre (as mentioned in my previous cargo bay scenery post) and some from Lord_Farzenbobble.  All were resized to between 45% and 56% original size.  I keep a notebook so I can note down which sizes in case I want to print more to match.  More recently, I've started re-saving the stl files with the size inculded in the filename, eg. "barrel3-56.stl" for barrel 3 at 56% original size.  This avoids having to dig out the notebook each time!

Crates from Lordogre (one on left), Lord Farzenbobble (metal crates in centre) and Sablebadger (blue ones)

Crates from Lord Farzenbobble (top left), Lordogre (stacked top right) and Sablebadger (front)

6 barrels from Sablebadger resized to a smaller 40%.  I thought that these could serve equally well as ventilation units or other gubbins on the roof of a building, to help "sci-fi" my Middle Eastern style houses.

Barrels from Sablebadger

 With all these different crates, barricades, barrels and so on, I have enough scatter terrain for a good sized board now, be it inside a complex of buildings, out in a supply dump or sprinkled around outdoors in a settlement.

Tuesday 18 October 2022

Rebel Minis VIPER Suit 1

My Rebel Minis VIPER (Variable Payload Raider) suits are about as finished as they're going to get for the moment, so I thought it was time to show them off, starting with my general combat VIPER, armed with a pair of tribarrel energy cannon, missile pods and chin-mounted point-defence gatling.

Weapons twisted to keep on target.

These are 3D prints from files purchased from Rebel Minis Digital Direct, the 15mm (1/100th Scale) Earth Force VIPER Suit. Due to the recent drop in the GBP/USD exhange rate, they're more expensive now than when I bought them, but still less than you'd pay for a physical model.  I actually paid slightly more than the current cost, but the price dropped shortly after I bought them and the designer (the highly talented and all-round splendid chap Mr John Bear Ross) refunded me the difference, which was very kind of him.

Note jerry can of spare drinking water on the hull.

The hips, upper and lower legs are all available as separate parts for extra poseability, but for a quick first experiment, I just grabbed one of the 3 preposed sets of legs to speed things up.  Shoulders, lower arms, missile launcher, chin gun and jet pack all come as separate items.  Feet are available in various fixed poses or as an "unfused poseable" version.  The main hull comes as either a single fused block (with armoured or plain options) or as the hull base, canopy and separate ejector seat if you want to produce a detailed interior.  All parts are available in plain or pre-supported formats.  I used the pre-supported versions and they all printed without any problems.  The mecha was assembled using gel superglue (cyanoacrylate) and the snug, positive fit of all the parts made it a breeze.  The feet and weapon arms are ball-jointed, providing a wide degree of poseability.  Other parts use a round peg and socket fitting.

Pose doesn't look too bad from this angle.

I tried a walking pose with all the weapons twisted to face a target. I'm not sure this has really come off, it does look a bit awkward!  A few extra items of personal crew equipment were added, a jerrycan on one side of the cockpit and an ammo box on the other.  I'll add more items to further VIPER suits such as tarpaulins, spare reaction mass tanks for the jump jets etc.

Jet pack detail.

After a Wilko grey spray primer, the VIPER was painted with Humbrol acrylic dark green, with sand brown camo patches on top.  Engine bells on the jump jets were a mix of burnt umber and burnt sienna with a gentle silver drybrush.  A few smaller details such as the leg pistons, gun barrels etc. were picked out in silver.

Stomp stomp!

The whole model was varnished with Future floor polish to give a good surface for waterslide transfers.  The canopy has the main ID number (yellow with black edging), a set of old GW Space Ork transfers provided the dog-tooth pattern on the front. A WWII British tank ID number in white sits on either side, just above the chin-mounted gun.  The missile pod doors were edged in white, then overpainted with yellow.

Note the spare ammo box below the ID number.

 A dilute wash of Vallejo black ink & matt varnish was applied over the whole model, then dabbed off in places.  A few silver chips were added around the feet and a dusty yellow/brown drybrush finished ff the model.  As you can see, the markings are pretty much invisible, so larger pure white transfers will be a better bet for future models.  The green and brown base camo pattern is much more visible in real life, it looks fairly grey in these photographs and I couldn't get it to show up much better no matter how I adjusted saturation, contrast or gamma levels.  Despite these little issues, as a first trial model this has turned out great, printing easily and assembling with great ease.

Thursday 13 October 2022

Cargo bay scenery

Some more 3d printing of scenery for a cargo bay or supply dump, this excellent selection of crates and barrels is from Lordogre's Sci fi station colony staceport scatter terrain set.  All were resized to 45% original size, though with 15mm figures they'd look fine anywhere up to about 60% original size.

The Hexagas containers have a nice sci-fi look and come individually and in small stacks.  All received a basic paintjob of base coat, sepia wash on the yellow ones, black wash on the grey endcaps only of the blue ones.  An extra wash was dabbed in around the readouts, then the details were added in with white & green.


The "colony scatter barriers" can be used as barricades, or just to line the walls of a storage building.  They include a mixture of different storage cubes, hexagas containers etc.  I added a couple of extra small cannisters from a stowage set to the top of the first one shown.  Haxagas cannisters were painted as mentioned above, the storage cubes were a mix of reds with red/sepia wash and yellows with sepia wash.  The larger blue crates were dark blue with a black wash.  The large oval tank is orange with a sepia wash, drybrushed pale orange, then given an orange wash using my 30 year old Citadel "Expert Paint Set" inks.  Some of the crates were given grey lids/openings, these had a very pale wash of black with neat black ink used to line in the interlocking lid sections.  Buttons/readouts were carefully painted in with white & green.  There are a couple of dumpy metal kegs too, these were just painted silver with a black wash.


These are a quick and easy way to fill out a cargo bay or storage area.  I will probably mirror the designs in my slicing software and print some more sat some stage, to give me 8 different designs.  Adding one or two individually printed crates from the set will increase the variety even further and I'll add some pictures of the individual crates in my next blog post.

Sunday 9 October 2022

Crates

I've done a few quick print runs recently to produce lots of crates.  Some wooden crates will be equally at home in any setting from fantasy to sci-fi.  After a taupe craft paint base coat, I washed some with black ink and some with sepia ink to get different effects.  The hinges and hasps were painted in with GW chainmail.

The next 3 sets of crates come from REKKINSIMPLESTUFF who makes a wide range of scatter scenery.  These have a fairly simple but effective sci-fi styling and print well flat on the build-plate of my printer.  I printed them at 56% to convert to 15mm and set them all at 45 degrees on the build plate.  This seems to give a more even finish than printing them straight and with something small like crates, you can still fit the same number on a single build plate.

After a quick Wilko rattlecan grey primer undercoat, I edge highlighted them with a white drybrush, then tried out my new Army Painter Speedpaints on them.  The Blood Red works really well, especially with the pre-highlighting technique.

Cloudburst Blue hasn't worked quite so well but it's still OK for some background scenery. More importantly, it is indeed faster than painting the crates in my normal style!

Camo Cloak Green has been something of a disappointment, leaving pale, streaky patches but it's possible that I just need to apply it more thickly.  I have some more crates printed so I'll give it another try.

 My cargo bay will grow ever more crowded with all these, but is there ever such a thing as too much scatter scenery?

Friday 7 October 2022

A load of rubbish

While I still need to find a few wheelie bins, I already have an assortment of other rubbish printed and painted, ready for use.

First of all some individual rubbish bins with various contents, plus a closed bin, separate lid, spilled bin and some bags.  These were all rescaled to 56% from TommyGMC's 28-32mm Trash & Garbage.


Secondly this pile of rubbish. I printed 2 copies at 56% original size, one mirrored so they aren't identical.  Unfortunately I can't find the original file now, so am unable to credit the creator, but my thanks to whoever you are!


These will be ideal scatter scenery for the more run-down areas of any modern or sci-fi settlements in my games.