Thursday 22 September 2022

Some beds for the dungeon.

In addition to my recently printed library cupboards, I thought a few beds would be useful for my dungeon.  These are designed by Curufin, there are 5 different designs but I just printed one of them as designed, plus a mirrored version.

The "red bed".

I used burnt umber on all the wood areas, then drybrushed with burnt sienna on the headboard and footboard and taupe on the uprights.  Pillows and sheet were white, with some Vallejo bleached bone for shading.  I bought a couple of Army Painter Speedpaints recently and thought I'd try them out.  I used Blood Red for the blanket on the first bed.

A chance to test out speedpaint.

As with the library cupboards, I hollowed the object with a 2mm shell and punched a number of holes in the base for resin drainage.
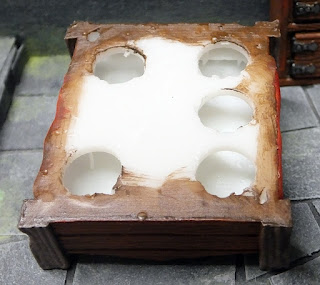
Holes for resin drainage.

I used the Speedpaint Cloudburst Blue on the blankets for the other bed.  I'm not sure how good an experiment this was, they'll probably work better on more textured clothing but they still look OK on the beds. You can see the colour graduation anyway, though I should have been more careful to avoid the dark pool on the blue bed cover!

The "blue bed".

I was lacking any double beds in my dungeon furniture, so these are a good addition that will certainly come in handy.

This is a mirror-image of the red bed.

Curufin also created these more rustic beds, suitable for a barracks or perhaps a more luxurious prison cell.  He has included straw palliasses to fit on the beds, but I'm going to scratch build some instead.  I painted them using Wilkinson's latex emulsion tester pots, Java Bean for the base, drybrushed with Nutmeg Spice or Coffee.

More beds.

The beds come with either long or short posts, so you can use them as normal beds or bunk beds.

Obviously warped!

These were printed a few months ago and they've clearly warped over the intervening period, though some more than others.  I've since worked out that this happens to objects printed flat on the build plate, therefore including the longer-cured base layers.  As the upper layers cure more over time, they presumably contract more, thus causing the curving.  Lifting the object off the build plate seems to help, and it also gives the space for the hollowed objects to drain freely.

Bunk beds rather less warped.

Curufin also makes more luxurious single beds similar to the double beds, but I already have a few in the dungeon.

Scratch built from balsa and milliput.

I have a couple of beds I scratch built from balsa wood and milliput.  I was particularly pleased with the animal skin covering I sculpted on one of them.

Hirst Arts plaster cast bed.

 Hirst Arts mould #59 Unique Inn Accessories includes a plaster bed which is designed to fit perfectly into a Hirst Arts cast dungeon, I have a few of these.


Tuesday 20 September 2022

Library cupboards

One of the designers that I regularly admire items from on Thingiverse is Ecaroth.  I decided to try printing the sample items from his library set to see if would be worth purchasing the entire pack.

Cupboards in the corner.

The sample includes 3 cupboards, one of which is a corner unit.  I painted them with a burnt umber base coat and a heavy drybrush of burnt sienna to give a richer, warmer tone than my existing dungeon furniture.

Cupboards separated.

To save on resin, I hollowed the cupboards leaving a 2mm shell.  I punched holes in the back and base to assist with the resin drainage during printing.

Printed hollow with plenty of drainage holes.

They match well in size with my Mantic Terrain Crate scenery, so I could easily print some more and paint them to match those.  By mirroring each design, you could have a total of six different cupboards.

Comparison to Mantic Terraincrate shelves.

In summary, I think these cupboards have turned out great and I will certainly be purchasing the full set from Hero's Hoard in due course.  They'll be a great addition to my Hirst Arts Heroquest dungon.

Saturday 17 September 2022

A few more art supplies

The Works recently had a 50% off art supplies sale, so I took the opportunity to stock up on a few items.

£7 of goodies.

I've used a few of The Works' "Crawford & Black" paints before, the pigments have been nice and strong and they've covered well.  I often use Sap Green and Burnt Umber in my scenery work to dye foam flock or to apply a base colour before flocking.

Good range of colours for £4.

I have some plans for an alien world and although I've got the flock finished already, there will be plenty of opportunities for painting tree trunks etc in unusual colours.  I've also been thinking of building some more sci-fi buildings in a rounded, pre-cast concrete style with coloured accents, for which these will come in useful.

One of these must be wrong - can't quite put my finger one which one...

Extra brushes always come in useful and this set has a great assortment for £3.  Some will be good for figures and vehicles, possibly for drybrushing, the biggest will be great for scenery.

Good range of brushes for £3.

All in all, a good haul for £7 and I'll look forward to using these over the next few months.

Thursday 15 September 2022

Lynx Recce vehicle

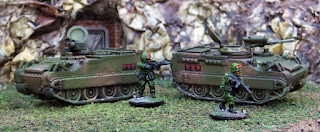
These M113-CR Lynx reconnaisance vehicles from m_bergmann will act as scout units for some of my mecha forces.  They're a neat, compact little vehicle that isn't as familiar as its ubiquitous big brother the M113.

Lynx recon vehicles with Peter Pig US troops for scale.

 These had a base coat of Humbrol 242 dark green with Humbrol 249 sand brown patches.  After a coat of Future/Pledge floor polish, I added the decals, including some ID numbers and triangular unit markings.  Once they were sealed in with another coat of polish (essentially a thin acrylic varnish), I gave a shading wash of black ink/matt varnish, then a dusty drybrush.

Top view.

Looking at the pictures now, I realise that I didn't paint in the vision blocks of the lights, so I'll have to go back and do them another day!  There are lots of neat details sich as the Jerry can, shovel and kinetic recovery cable, some of which I also need to finish off.

Rear view.

These will take a fireteam in each and be useful for reconnoitering ahead of the larger mecha.

Sunday 11 September 2022

Autoprotetto S.37

 The Italian Autoprotetto S.37 is a suitably distinctive-looking vehicle to give some character to my army.

On patrol.

As usual, this is one of m_bergman's excellent models. The AS.37 was used by Italy during WWII and this version sports the additional armoured shields on top that were used to try and give the occupants of the roofless rear compartment some additional protection.

Side views.

These were very easy to print & paint, I didn't bother to hollow out the models (which I did with the BTR-40Bs) because the open top means they don't use much resin anyway.  As with my other 3D printed models, the print lines show up when viewed from an inch or two away, but at tabletop distances they're absoliutely fine.

Front & rear views.

I'm imagining that these were probably left over in a former Italian colony, maybe somewhere in North Africa, and have made their way into the armed forces of one of my imagi-nations.

Friday 9 September 2022

Z Force Armoured Troop Carrier

One of the earliest 15mm vehicles I 3D printed was for my Action Force project, the Z Force ATC.  The toy was a repainted version of the GI Joe Amphibious Personnel Carrier, but with a slightly different turret and a new interior.   The "Armoured Troop Carrier"was a re-coloured version of the US GI Joe APC, but with a different interior arrangements and a revised turret with missile rack.  I had been looking for a suitably scaled version of the French VAB upon which I assume this was based, but the more common 4-wheeled version tends to crop up most often. The only 6 wheeled version I found had very chunky wheels and didn't seem quite right.

Z Force ATC.

There is a great selection of GI Joe models on Thingiverse including this one by Jabberwock. His vehicles are produced at the same size as the original toys, which makes them 1:18 scale for 3 3/4 inch action figures.

Peter Pig infantry for scale.

I printed the ATC standing on end at 18% the original size.  Comparing it against a French VAB in 1:100 scale (on which the original appears to be roughly based), the width and length seems about right.  In hindsight, angling the hull at 20-40 degrees would have been better because it would have avoided so many support scars on the back of the vehicle, but that's one of the many things I've learned about 3D printing over the last 22 months. 

Support marks visible on rear.

Painting is detailed further down the page, but this particular vehicle is only part finished, needing a little more detailing such as stripes on the sides, black striping on the front red section and general tidying up all over.

Interior detail.

Because of the changes from the GI Joe APC, what I've printed doesn't quite match the Z Force ATC, but it's close enough for a first attempt.  I've been modifying the file slightly, attaching more detailed wheels to the design so that they don't have to be glued on afterwards.  There is more work to do, for instance adding a pick axe, axe and sledgehammer to the rear hull.  I'll print a few more once I've got the design right, to form the carrier allowance for an AK47 Western intervention force.

ATC blueprints.

The August competition for the AK47 Republic Facebook page was to create a waterborne model of some sort, and it was a chance to revisit the ATC and try a few new techniques, inspierd by the Z Force Jungle Terror story.

Jungle Terror comic strip.

Jungle Terror includes a section where the ATCs use their amphibious capability to try and evade an enemy attack, not entirely succesfully as it turned out.  This provides some good reference for my model.  The ATCs in the comic omitted the missiles to the rear of the turret, so that's a feature that I didn't need to worry about creating.

Amphibious ATC swimming.

I split the ATC model horizontally in an editing program and removed the bottom half, leaving a waterline model.  The existing turret was fairly basic and I rescaled an M60 tank cupola to 80% original size to use as an alternative.

Water effects from toilet paper & PVA/varnish.

A suitable sized base was cut from a piece of self-adhesive vinyl floor tile and after peeling off the backing, I stuck the ATC down in the centre.  I tore up a sheet of toilet paper and stuck this down around it.

I mixed some brown into the water colour at the rear to try and simulate churned up sediment.

I mixed up some PVA and Pledge/Future floor polish and dabbed it onto the toilet paper until it was well saturated, then used a stiff brush to dab and pull it into some rippled shapes to simulate water.  I've wanted to try this technique for a while and this was an ideal opportunity.

Rescaled M60 tank cupola replaces the original turret.

The APC was painted in Vallejo acrylics, medium olive for the hull and canvas load cover (never understood why you'd make an armoured vehicle with a virtually unprotected troop area), with black camouflage pattern and windows.  Z Force insignia, side stripes etc were carefully hand painted in white then overpainted in red where required.

Some extra coats of varnish gives the water some shine.

The water was painted in a variety of acrylic craft paint blues, with a little brown mixed in to the rear to try and show where the props have churned up some of the river-bottom sediment.  Some white was mixed in with the blues for some highlights in the ripples.  After drying for a couple of days, I gave it  acouple more coats of the Pledge/Future floor polish to give a gloss finish.  I also applied some patches to the hull to show where water had splashed, it looks quite good in reality but doesn't really show up in the still photograpsh where you can't see the change in the way the light reflects as you move it.  The various windows receives some of the gloss varnish too.

Overhead view shows the camouflage well.

The AK47 competition required the model to have a Peter Pig figure included somewhere but unfortunately I couldn't find the pack of seated figures that I intended to use, so I didn't get to enter the model after all!  I'm not disappointed though, because it gave me a chance to try some new techniques and pushed me to solve a few problems I'd had with the original ATC design. I'm in a better position to finish editing the model and printing some superior vehicles, and I'm very pleased how the water turned out.  I shell definitely be using that technique again on some future projects.


Monday 5 September 2022

BTR 40B

To go with my new T-55s I have some BTR-40 APCs.  This version is the BTR-40B reconnaisance vehicle which has an armoured roof in place of the open-topped troop carrier version.


BTR-40Bs with Peter Pig professional infantry for scale.

M_bergmann is responsible for these lovely models too and I can highly recommend them.


Top view.

These have the same colour scheme as the T-55s.

Left side.

There are a few extra details to pick out such as the pioneer tools on the sides and the fuel can on the rear.

Right side.

Headlights were added in silver in this instance.  The exhaust under the right side was painted in suitably rusty burnt umber & burnt sienna.

Front and rear views.

 2 or 3 more and I'll have sufficient transport for a unit of infantry.  M_bergmann has also produced the BTR-40A with twin machine guns which could add some fire support to the unarmed versions.

T-55 tanks for AK47 Republic

 Some armour for use in AK47 Republic in the form of a couple of T-55s.  These are from m_bergman's excellent collection of 1:100 post war/modern vehicles.  Peter Pig professional infantry give an idea of the size.

T-55s and suporting infantry.

The turrets for the tanks printed fine but the hull caused problems.  The first 2 attempts, printed flat on the build plate, ended up up with some flat blobs on the bottom of the resin vat where it had pulled off the build plate.  All my Epic scale 40K tanks printed fine on the build plate, but the T-55 is far larger which no doubt caused the problem.  Fortunately it didn't use much resin and I re-supported the tanks at an extreme angle which meant I could squeeze them both onto a single build plate instead.

This wasn't quite how I expected them to turn out.

I've used a Vallejo Khaki base coat, Humbrol 249 sand brown camouflage patches, then Humbrol dunkel grun / dark green edging between the other 2 colours. Tracks were painted brown, then drybrushed silver, the pintle-mount HMG was also painted silver.  A coat of Pledge/Future floor polish sealed it all, then I used a thinned black ink/matt varnish shading wash.  Giving it the gloss varnish first makes the shading wash pull away from the flat surfaces and settle into the recesses more, though enough still remains to dull down the shiny finish.

Left side detail.

Black details wree added - the caps over the smoke dischargers (R side of turret) and the various lights - in the reference photographs that I've looked at, they generally seem to appear black rather than silver.

Right side detail.

A sandy drybrush finished the tanks off, or so I thought.  After a couple of days though, I decided I wasn't happy with the tracks and wheels, so gave them another coat of shading wash which darkened the tracks nicely.  The wash was just dotted into the holes in the wheels rather than completely across them.  Job done!

Business end.

These have come out well, I shall definitely be adding a few more to my forces once some of my other printing projects have been completed.  I'll add some more stowage to the next ones.

Showing some top detail.