Friday 18 December 2020

2020 Autumn of Architecture - Part 4: Bricks! Linka part 4 - finished building.

3 years ago I started work on a Linka building and I realised that I never published the final update with the completely finished project!  I got as far as part 3 which was the painting but after that I made a small base out of foamex, attached it with UHU glue and added some basic groundwork.  I wasn't completey happy with the end result but never got around to improving it until now.

Following the Summer of Scenery, I've added some extra foam flock and tea leaves from the scenic materials I've made with the kids.

The base is finished with the standard Wilko tester pot emulsion paints.

The tuft of grass comes from an old paint brush.  Paving slabs were marked into the surface with the back of a knife blade.


The doorway is still slightly wonky but unfortunately that's something I can't easily fix without shattering the entire front of the building!

Tuesday 15 December 2020

2020 Autumn of Architecture - Part 3: Desert shrine

My desert buildings are all fairly plain so I fancied making something a bit more interesting, a small shrine.  The basic structure is foamcore with half a foam sphere for the dome, cereal packet card for the archways and triangular roof edging.  The stars are a couple of small sequins.

The whole building was textured with filler/paint.

I made it with 3 sides open so that I could include a detailed interior.  The floor is a single plaster-cast Linka wall section, trimmed slightly for neatness.  The shelf is just a few small balsa scraps.  The pots are 28mm scale plaster cast items from Hirst Arts mould #59.

Some string creeper with green dyed tea-leaf leaves plus home-mad clump foam vegetation finishes the building.  When I find where I put them, I also have some 6mm artillery crew who will be painted gold as litle statues to go on the shelf.


 Quick, easy and small but will make an interesting addition to my desert village.

Saturday 12 December 2020

2020 Autumn of Architecture - Part 2: Desert ruin

 Number 1 son mentioned that he'd like to help me make one of my "ruined buildings" so we set to work on one for my desert town.

The basic structure is 5mm foamcore attached to a foamex base using no-nails.  Assorted grit was added using PVA.  The walls had a coat of paint & filler, then a top coat of Dulux weathershield.


Monday 7 December 2020

2020 Autumn of Architecture - Part 1: Large desert building

 As the 2020 Summer of Scenery belatedly dawdles to a close, so we gently transition into the Autumn of Architecture (also now somewhat belated, but it's taken me a while to write them up).

I fancied making a few more desert buildings, including one which will be suitable as an objective for various scenarios.  It includes 4 open fronted bays suitable for a range of purposes - storage areas, tank bays, maintenance bays, shop units.  I may build some drop-in inserts for the open bays with tools, refuelling pods etc so it will work for modern or for sci-fi.


Finished building.

The main structure is 5mm foamcore on a foamex base.  To ensure the walls stayed in the right place, I drilled holes in the foamex and pushed glue-coated cocktail sticks up into the foam in the centre of the foamcore.  This held it all straight and prevented any warping while the no-nails dried.

Tank bays...

Or storage areas?

We had some number hole punches in one of our craft boxes, I stacked up 2 or 3 punches of each number to get a good thickness and glued them over the bays.  It adds a bit more interest to the front of the building and also makes it easier to tell instantly which is the front!

Wait! Was that movement back there?

Doorway to the rear access road.

The tank/storage bays all have doorways leading out to a rear compound.

Rear access.

Aerial view.

That tank seems kinda old...

Roof lifts off for figure placement inside.

Plenty of space out the back.

A few weeds out the back.
The base was finished with sand painted the obligatory Nutmeg Spice, Coffee with Desert Sand drybrush.  A bit of foam and tea-leaf scatter plus some not-very-good string trees finishes it off.

Friday 13 November 2020

2020 Summer of Scenery - Part 11b: More hedges!

Well, this is my second try at writing this post - I was just about to publish it when something happened to Blogger and the whole thing irretrievably vanished! 2 hours work lost but hopefully this re-written version won't prove too disjointed and rushed...

Hammer's Slammers patrol moving through the countryside.

My initial batch of hedges are extremely neat but I'd like some rougher ones for more rural scenery.

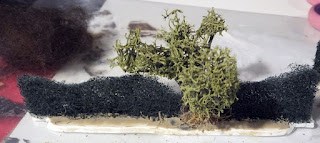
 I started by cutting strips of pan scourer the same size as the original hedges.  These were then cut into a wavy shape but keepng the ends the original height.  This will ensure they all fit together neatly and will also enable me to incorporate the neat hedges should I need them.  I chopped out the top from a variety of angles so it isn't completely flat.  I also pulled tufts out from the sides so that the width is a bit more variable.

I wanted a few trees to break up the hedgeline, these are all Woodland Scenics armatures from their small-medium tree pack.

 Bases were cut from 2mm foamex and shaped at the ends so they'll fit together either straight on or at right angles.  Edges were trimmed slightly wavy and then bevelled.  Trees and hedge strips were hot glued into position and brown acrylic caulk smeared on to provide a good base for painting.

 I trimmed the hedge down either side of the trees to make it easier to attach branches and foliage.

 Reindeer lichen (Cladonia rangiferina) was glued onto the tree armatures to create the branch structure.  This is the first time I've tried this but it seems to have worked well. Patches of brambles were created with finely chopped coir/coconut fibre from hanging basket liner.

 Additional bits of clump foliage were glued onto the hedges here and there to break up the shape a bit more.

 The base received a coat of textured paint, then Nutmeg Spice and Coffee brown with a Desert Sand drybrush (all Wilko tester pots).

 The hedges were slathered in watered down PVA which I squeezed through them before I sprinkled with fine green foam turf.  A few patches were given some extra drops of glue and some darker brown-green flock was added.

 The trees were painted a variety of cheap acrylic craft colours, mainly taupe, grey and burnt umber.  Reindeer lichen was painted in the same colours but with equal amounts of PVA added.  The paint/glue mixture was applied using a sponge which allowed me to coat the lichen well but without damaging it.  The sponge also drew off the excess so that the fine detail of the structure wasn't obscured.

 After the trees had dried, the paint/glue mix had added a fair amount of rigidity to the Reindeer lichen.  PVA was dabbed over them and a range of different flocks were used: foam flock in various sizes; green-dyed tea-leaves; green-dyed finely ground garden leaves.  The real leaves seem to have worked best.

 More watered down PVA was dripped trough the trees to fix the flock firmly in place and add even more rigidity to the branch structure.

 I took a few pinches from all the different colours of foam clump foliage I've made and mixed them all together.  PVA was dabbed along the bottom of the hedges and little sprinkles of this mixed foliage attached.

 A few bits of Reindere lichen were also glued into the sides of the hedges, these were painted and flocked the same as the trees to create smaller shrubs.

 The coconut fibre brambles were coated in PVA and green dyed tea-leaves of very fine dark flock used for their leaves.

 A few patches of green tea leaves were also PVA'd along the bottom of the hedges.

 The finishing touch was a sprinkling of static grass here and there at the base of the hedge.

 These hedges have turned out pretty well, if I do some more I'll probably try to vary the width slightly more and I need to make at least a couple of sections with gates in them.

 I'm particularly pleased with the Reindere lichen, it has turned out to be surprisingly rigid once coated with paint & PVA so I'll definitely be using that more when I build trees in the future.

The hedges will be excellent for blocking line of sight for infantry but are still low enough for vehicles to see over.

Now I just need to fit in a game or two to make use of them!


 This is the last part of my Summer of Scenery.  Yes, I know that it's Autumn now but these projects all got started in the Summer.  Various circumstances delayed publication but I have more plans that should come to fruition over the next few weeks...

Tuesday 10 November 2020

2020 Summer of Scenery - Part 11a: Hedges!

Several years ago (was it really 2013?!) I started on some hedges and the other day I came across them in a box and decided I should probably finish them.

 Forgive the duplicate photographs fom the original posts but this was the project so far:

Hedges cut from large green pan scourers in approx 4 inch long sections.

Hedges cut in 2 different heights.

Some tall enough to block LOS and movement.

Others shorter to provide partial cover.
 
I got as far as flocking the hedges (squirted with PVA then squeezed through to coat all sides before sprinkling with fine foam turf flock), but then the project stalled as I wondered what would be the best thing to use for basing them.
 
Hedge with flock.

Tall hedge flocked.
 
MDF seemed a bit too awkward to cut to a suitable size and I was worried about warping or delamination of the edges and whether it would be so chunky that it would overwhelm the hedges. I also considered a more minimalist approach, just using a large washer 1/4 of the way from each end but I wasn't sure how to fix them securely.
 
Tall hedge.

Short hedge.

7 years of prevaricating is long enough so I've finally pulled my finger out and got on with it.  2mm foamex sheet was easy to cut in thin strips and is not so thick that it is particularly noticeable.  It won't warp when textured and painted.  I cut the strips to about 15mm so that the 5mm hedge will occupy the central 1/3.  The edges are trimmed slightly to a bevelled, wavy finish and the ends are cut down to allow hedges to fit end-on or with a right angle corner.

Hedges were hot-glued in place, then the top of the bases received a thin smear of brown acrylic sealant.  Once that had dried, brown texture paint (brown paint, ready-mixed filler, sand & PVA) was daubed all over the bases.

Hot-glued and caulked.

Caulk helps fill the join and hide hot glue.

Base showing cut down ends and wavy edges.

The usual Wilko emulsion Nutmeg Spice/Coffee was painted onto the base and drybrushed with Desert Sand so that they'll match my usual gaming mat.

Hedges complete.

Trimmed ends allow right angle corners.

Only the tall hedges done so far.

These are all very neatly trimmed.

15mm figure for scale.

These have turned out fine, so next up will be some slightly rougher countryside hedges in contrast to these neatly trimmed ones.  If I made a few more shorter sections of neat hedge too, I could make a nice maze, perhaps with a topiary sculpture in the middle...