Showing posts with label Photography. Show all posts

Monday, 3 April 2023

Spring of Scenery 2023 - Part 6: Scenic Photo backdrop - flocking

I used my home-made foam flock on my photography backdrop.

To fix the flock, I painted on PVA, sprinkled the flock, then spritzed with isopropyl alcohol.  To seal it on, I drizzled a thin PVA/water/matt varnish mixture over the whole thing.

The flock was mainly a very fine mixture, including 2 or 3 different shades of green.

Drenched thoroughly, the PVA would seal everything into a solid layer which should avoid bits falling off every time I use it.

There are a few bigger clumps of foam to give the impression of larger plants growing.

The thick application of the sealing mixture also ensured all the rock rubble along the edge of the cliff was very securely fixed in place.

I was careful to use a stiff brush to move some of the flock around to blend it into the edge of the rocky areas and also to keep the stream clear.

This stage was left for 2-3 days to dry thoroughly.  This is another part of the process that requires plastic sheeting or lots of old newspapers to protect your work surfaces.  Old plastic cereal packets work well for this, something like a giant box of cornflakes will have a huge bag that covers a very large area once opened out flat.

Once dry, the matt varnish in the mixture ensured there was no glossy shine on the cliffs or the flock.

The flock crept into the edges of the rubble in a way that I thought was reasonably realistic.

Although the photo backdrop could be used in this condition, there were a few more finishing touches that I wanted to add and I'll cover these another time.

Tuesday, 28 March 2023

Spring of Scenery 2023 - Part 5: Scenic Photo backdrop - painting

For the next stage of my photo backdrop, I painted the main ground surface with brown texture paint (burnt umber craft paint, fine sand, pre-mixed filler and some PVA).

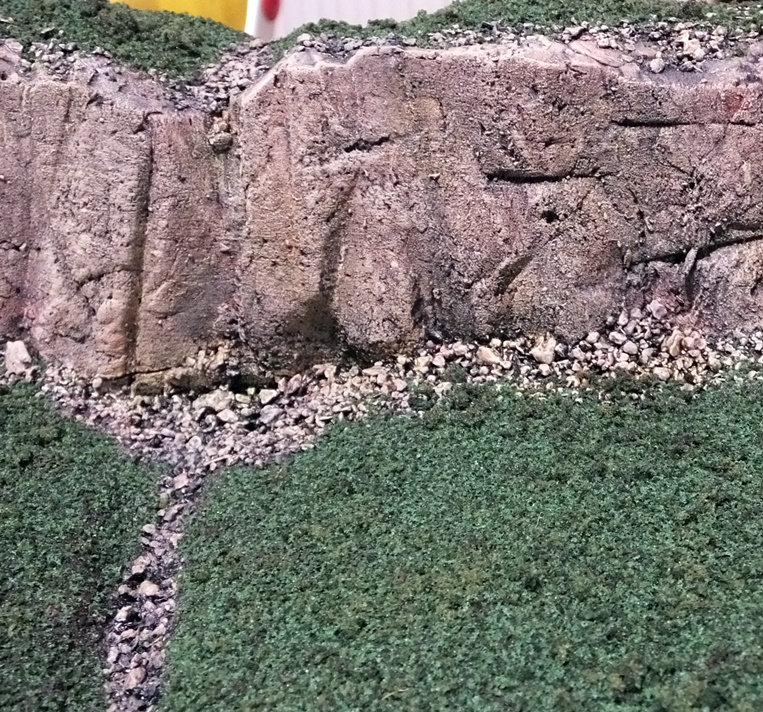
I sprinkled some cat litter along the bottom of the cliff face to represent fallen rock rubble.  This was all painted white to match the cliffs.

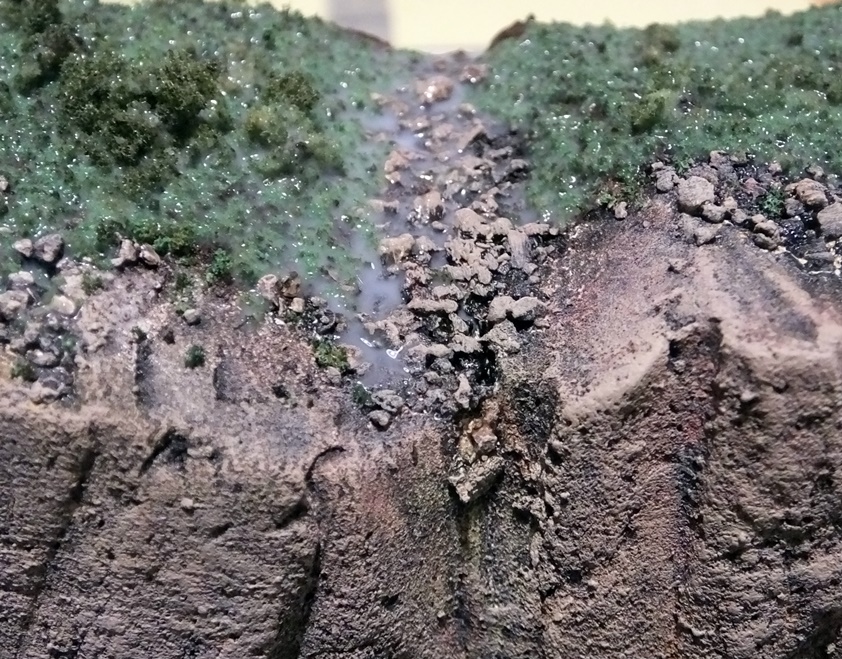
I also filled the stream bed where the flow of water will have washed away the sediment, leaving the larger rocks behind.

I sprinkled a small amount of the cat litter along the top of the cliff too.

The cliffs were painted using the "Leopard Spot" technique using watered down craft paints.  I started with a caramel colour and some burnt sienna.

The caramel was applied first, covering around 1/3 of the cliff face and rubble.

Next, the burnt sienna was applied over a similar proportion of the cliffs and rubble.

This always looks very garish at first!

I used a variety of greens to simulate the growth of algae and moss.  These were heavily thinned to provide little more than a green tint.

The greens were applied down the cliff where the stream will be flowing.

With the base colours completed, the scenery was left for several hours to allow the paints to fully dry and cure.

Next it was time for some washes.  I used acrylic matt varnish, water, a dash of isopropyl alcohol and some black and peat brown inks.

The ink wash was applied liberally across the whole piece of scenery.  Always ensure you have your work surface protected, you end up with runs and drips, so a layer of plastic sheeting or lots of old newspapers are essential to avoid accidents!

The ink wash immediately improves the appearance of the rocks, toning down the bright colours and enhancing the texture.

It was at this stage that I decided never to use cat litter ever again.  I know that some people say it's the best thing for rubble, but I found that it absorbed so much of the ink wash that it took almost an entire week to dry completely, especially in the bottom of the pool at the base of the cliffs.  I think I'm happier just using sharp sand and other less absorbent materials.

Once the terrain had finally dried, I gave the cliffs a drybrush of taupe craft paint.

I overdid this stage and a lot of the subtle shading and colour variation seemed to disappear from the cliffs.

Looking more closely, the variation was still there, and it looked really good, so my initial worries were unfounded.  It’s only meant to be a background anyway, so it is supposed to be fairly neutral.

The green staining around the stream down the cliff face had all but vanished, so this would need more attention later.  The rubble looked good though, and blended in well with the base of the cliff.

I was also pleased with the loose rocks along the top of the cliff.

The stream bed looked just as intended, a bit bare along the edges but those would get hidden later when the base was flocked.

With the main painting completed, it was time to apply the finishing touches with some flocks…

Sunday, 26 March 2023

Spring of Scenery 2023 - Part 4: Scenic Photo backdrop - basic construction

I like to try and have a suitable background for photographing my models.  I sometimes use a sheet of neutral grey card, but it's nice to have something more interesting or atmospheric sometimes.  I wanted to put together some textured ground cover and a rocky backdrop to test a few new techniques and materials.  This was actually made back in January 2021, so predates the landscaped gaming boar and tree covered rocky hills that I've previously covered in this blog.  I somehow misplaced the photographs and only recently rediscovered them...

Basic shape carved.

I carved out a section from some 4 inch thick insulation foam sheet.  I cut some angular cliffs about 2 inches high to make the backdrop with a flatter area in front where the figures would stand.

Angular cliff detail carved in.

I cut a stream bed into the foreground and a small pool at the base of the cliff.  This is set off to one side so it can provide a bit of extra visual interest if desired, but can be kept out of frame if I don't need it.

Stream bed.

I used a chunky, fractured piece of flint from the garden to texture the surface of the rock face.

Texturing the cliffs.

I mixed up some wet, pulped toilet roll with casting plaster and smoothed it on to create the ground surface.  The cliff face was painted with white masonry paint to create a good surface for the next stages of decoration.

Ground surface applied.

The polyisocyanurate foam I used (the foil-faced insulation type) turned out to be more springy than extruded polystyrene.  Most of the texture I applied with the flint has returned to its original form, so the cliffs look quite smooth again now.

Cliff painted with white masonry paint.

 In the next post, I will cover the painting of the scenery.