Showing posts with label Leaves. Show all posts

Sunday, 4 October 2020

2020 Summer of Scenery - Part 8: [tea] leaves

There are several videos out there on making flock from sawdust but I don't have any sawdust to hand.  On the other hand, I do have lots of old dried tea-leaves saved with scenery in mind.  I've used them as ground cover in forest scenery (what better to represent dried dead leaves than... dried leaves?) and have a large supply.

Tea leaves

Ingredients and materials / tools

The naturally dark brown colour of the leaves means you may need more paint than you would with sawdust, but the exact quantity always varies depending upon what sort of paint you're using anyway.  I've used acrylic craft paint as the base colour then added yellow and light green emulsion.  The batch pictured below also included a bit of white to try and produce a lighter batch than a previous lot I made.

Green and white paint to start.

Doesn't look much to start...

The paint is rubbed through the tea leaves.  It looks fairly awful to start but you need to persevere for a minute or two until the colour is evenly distributed and any sticky clumps are broken up.

Needs more green.

Getting there.

Could do with being lighter & more yellow.

Just a little bit of each.

That looks good.

Pour it out to dry in the sun.


 It seems to work pretty well when sprinkled on around foam flock, helping blend it into the base.

Tea-leaf flock in use.


Tuesday, 1 September 2020

2020 Summer of Scenery - part 2b: Leaves

As a small addendum to my original post on leaves, I've noticed a few sellers on ebay offering "natural leaves".  Rather than paying £5 or more for a bag, these can be collected for free from the female catkins of Birch trees.  Silver Birch are particularly easy to identify with their lovely pale trunks.  The female catkins mature through late Summer and I collected these in early-mid August.

Silver Birch catkins.

I collected the catkins when they were still fairly compact and green, this makes them easier to handle.  If you pick them too late, they just disintegrate in your hands!

Crumbling the dry catkins.

After leaving them in the sun for a few days, they go brown and slightly fluffy looking.  Gently crumbling them between your fingers releases all the seeds (small and brown with ultra-thin "wings" on each side).

A spacer from within the catkin.

What we want are the little "spacers" that make up the structure of the catkin.  They're too large for 15mm but work pretty well for 28mm scale, if you squint a bit they look vaguely like sycamore or maple leaves, albeit with 3 lobes rather than 5.

A lone adventurer approaches the entrance...

They look good scattered in small numbers to add a bit of character to scenery.  You don't need many to give a good effect.

An ancient bronze statue.

Taking a few photographs gave me an excuse to get some of my dungeon out for a play.
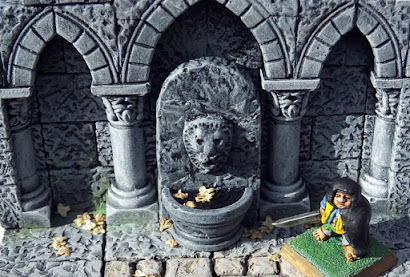
The halfling isn't sure he wants to drink from the stagnant fountain.

Number 1 son hasn't seen my dungeon before so he was eager to put a few pieces together and get out lots of the smaller objects to dress the scenery, especially all my treasure piles!

You can never have too much treasure...


Sunday, 23 August 2020

2020 Summer of Scenery - part 2a: Leaves

I used dried tea-leaves for leaf-litter in the woods I made for the local games club but I wasn't entirely happy with the result.  Following the foam shredding, Number 1 & Number 2 sons assisted with gathering a few nice dry leaves from the garden - mainly Hazel, Sycamore and Rose, all of which had a nice crisp crunchy texture.  There were plenty of lovely dry, crumbly Foxglove leaves too, but it would have been a bad idea to use them! Always think about the toxicity of anything your going to use in your scenery projects...

Materials - leaves!

Equipment used comprised assorted jugs (as purchased for the foam flock-making), some sieves and a tea-strainer, an old oven tin and a blander (also from the flock-making).
 

Equipment.

The leaves were blended to a fine texture by Number 1 son, a very satisfying process, if a little dusty.  (Number 2 son was absent for this stage - no way I'm letting a 1 year old loose with a blender!!)

Ready to blend!

The end result was sieved to remove all the larger pieces and bits of stalk etc.  Somewhere I have a finer sieve which I'll use at some point to grade the leaves.  At the moment they're quite large for 15mm, something akin to scale sycamore and the like.

Leaf litter.

I was initially disappointed that some of the leaf veins had come through the sieve but actually I think it looks OK on the ground - they give the appearance of small twigs and in-scale leaf stalks.

Leaf litter with undergrowth.

To store the leaf litter I have a handy plastic pot from Tesco that contained those little orange and lemon jelly slice cake decorations.  The label peeled off easily, the lid screws on firmly and I can instantly see exactly what's in it.  Ideal!

Useful storage container.