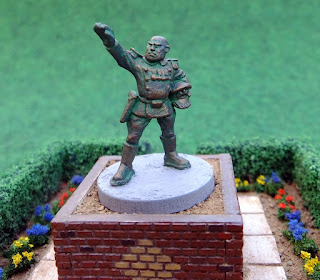
My statue required a rather different base than the rest of my objective markers, so I saved one CD for this. I had a pretty good idea of how I wanted it to turn out, but time would tell whether I could find all the materials that I wanted and assemble it to my satisfaction.
 |
| The plan. |
I couldn't find my Hirst Arts blocks to build the plinth for the statue, but I did manage to locate some Linka low wall sections that would do instead. Everything else I needed was easily sourced from my scenery supplies, and I decided to leave out the bench because I didn't want things to end up too crowded on the CD-sized base.
I drew a grid onto the CD in pencil and glued cereal packed card paving slabs down with UHU for a strong, waterproof bond. I used some pieces of Linka to make a holow square for the statue base. At the time I couldn't find my pan scourers to make a hedge, but I did find some hedges I'd made previously. I trimmed these down to the required size and fixed them in place with UHU. Needless to say, I found the pan scourers and the box of Hirst Arts blocks the next day...
The card slabs were textured with a chunk of concrete I found in the garden.
The brickwork was painted starting with a taupe base coat, followed by a burnt umber overbrush that picks out the brick faces but leaves the cement colour in the recesses. I decided to add an ornamental pattern with a different coloured brick in the centre of each panel, using Vallejo khaki. A few bricks were picked out with red oxide and burnt umber with some black added.
I applied a watered down coat of taupe to the paving slabs to tone down their brightness and bring out the texture from the concrete. The bare CD was coated with texture paint.
A grout/soil mix was applied over the texture paint, making sure I got it right into the gaps under the hedges. 2mm Autumn grass was applied over the soil areas outside the hedges, leaving the flower beds bare.
Small pieces of home-made clump foliage were added along the flower bed. I added some blue "flowers" from foam I dyed in preparation for making alien trees.
I wanted some brighter flowers too, so I quickly whipped up a batch. I tore a couple of small pieces of foam about 15-20mm in size from a handy car-washing sponge. One had bright red paint squeezed through it, the other had "Bumblebee" yellow squeezed through it. Both were cheap Wilkinson's emulsion tester pots. After the bits of sponge had dried in the sun for a day, I dropped them both in a coffee blender together and shredded them finely.
I sorted through the foam for the tiniest fragments to use as flowers. Fine tipped forceps are essential for this! I made the mistake of trying to do it at a camp table outside in the sunshine but the occasional gentle breeze kept blowing away the little foam shreds I had ready. The work bench in the garage proved to be a much safer location.
I applied small blobs of PVA to the plants and dipped each flower into the PVA as well before fixing it in place.
 |
| Placing the flowers. |
Once everything was in place, I sprayed the flower beds with isopropyl alcohol, then dripped dilute PVA on with a pipette.
 |
| Flowers completed. |
I sprinkled some more tile grout over the paving slabs, then used a wide, soft brush to gently guide it into the gaps between the slabs and along the edges of the paths. After another spray of isopropanol, I carefully dripped dilute PVA between the corners of the slabs and let capillary action draw it along the gaps to fix the grout in place.
The edges of the base were touched in with taupe acrylic where necessary to hide the CD shine. I had intended to do something else to the paving slabs, maybe a lighter drybrush, but I was pretty pleased how they looked so decided to leave them alone.
 |
| Paving finished. |
I cut a square section out of some rigid insulation foam and trimmed the height down so it fitted neatly inside the Linka plinth. I put the statue in place (painted as detailed in my previous post), then glued some more grount & soil in the corners to finish it off. Done!
This
fine statue is a place where subjects can reflect on the greatness of
his Excellency, Dictator for Life and Champion of the Common Man (When
Convenient), Aloysius M'Bemba, leader of Kalembeland.
This turned out better than I expected and is pretty close to what I originally had in my head when I came up with the idea. It will be a fine objective marker to use in a game of AK47 Republic and I'm sure that it will be useful for many other games too.
May the blessings of Aloysius M'Bemba go with you!


He is a very inspiring man of Bronze! :D
ReplyDeleteYes indeed. When I saw the model, I just knew I had to have one!
DeleteI made 2 versions of these, one while in power, and one after the Revolution. If I could only remember where the models are, and the pics are long gone in the Photobucket Massacre. Maybe it is time to make a new set :)
ReplyDeleteSounds great! Was the post-revolution one lying on its side with the ankles broken off?
DeleteYes indeed :)
DeleteExcellent!
Delete