Monday 19 August 2013

More dungeon adventures with the Scouts...

Sunday was one of our regular Scout Games Days.  Several Scouts of varying ages descended into my latest dungeon.  Warriors includes "Honeydew" the Dwarven Trollslayer (presumably the name is what made him so angry...), "74 Hour Amed" the master of swords (Pratchett readers will realise that this should have been 7 Hour Ahmed!), Mandreu the halfling, "Elfy" the Elf and finally "Majestic Butter Squirrel" the wizard.  Needless to say, much chaotic slayage of monsters ensued, the Scouts proving far easier to lure into traps than the regular crowd from the wargames club!

"Honeydew" the dwarf trollslayer takes on 4 goblins and 2 orcs.

The halfling thief confronts a goblin.

"74 Hour Amed" (should be Ahmed) the master of swords is set upon by a goblin and a skeleton.

Honeydew the trollslayer shortly before he was hacked to pieces and eaten,.

One of several bodies discovered in the dungeon (with useful equipment!)

Dark Elf and wizard prepare to fight a beastman.
The dungeon proved to be so popular that I had to run it twice, so my carefully prepared "Escape from Zombietown" game (using USE ME 15mm.co.uk rules) will have to keep until next time!

Saturday 17 August 2013

Mad Mecha Guy buildings

 I ordered these buildings from Mad Mecha Guy some months ago but they were packed away ready for my Birthday.  The service was fantastic as usual - I received an e-mail the day after I ordered to say that everything had been freshly cut and was about to go in the post.

This will be a fast food takeaway with entrance and exit doors.
I've already reviewed the watch towers (I had a couple of them before the rest were packed away) so here are some photographs of the shop units.  This is just the basic paint job, they're not finished yet, they need some weathering and additional details.  Several flat walls are crying out for some posters or notices and the odd vent or ducting.  They come with 2 designs of roof, tiled and panelled.  I've left them as they came but it would be easy to add extra detail by sticking a sheet of textured plasticard on top.  There are loads of different combinations of walls you can use.


I've smoothed over the interlocking cut corners with filler.  Rather than use water, I've used paints to mix up the filler, this seems to give a better texture for application and sands to a good finish.  I've used Wilko emulsion tester pots which I've found to give excellent coverage.  Each building received a couple of coats of white MDF sealant, then a very gentle sand with a fine grade foam sanding block.  After wiping off the sanding dust (I just use a big, soft brush) I've followed this with a couple of coats of my chosen colour, again sanding between coats.  This gives a nice smooth finish and helps conceal any grainy or fibrous texture from the MDF.


There are a number of other web sites out there with nice examples of painted buildings from MMG, my two favourite so far are Marja's Miniature Adventures and Dropship Horizon.


Here are a few of the storage containers I got in the same order.  These are fantastic value, just what I need for filling up table space with large objects to provide cover.  I've assembled some with the doors open, these can act as objectives for certain scenarios.


Wednesday 14 August 2013

Armoured Transport part 5

 Progress on my APCs has slowed to a halt while I try (and fail) to find the stencils I was going to try and use for their camo scheme.  In the meantime here are a few pictures of them in their Vallejo reflective green base coat.  They look rather scuffed at the moment, probably need another coat - and they've been gathering dust and bits of fluff for a couple of months now!  Treadplates, tyres and lower hull areas had a splash of brown paint before I roughly applied the green, this has left dirty patches in the nooks and crannies where ingrained dirt will have collected.

APCs on parade.  What a scruffy bunch.

A little bit of stowage added to the back.

Modified Scimitar turret.

Missile pod from Mechwarrior clicky tank.


But wait!  What's that rumbling noise...


Reinforcements arrive.


Yes, it's another 4 APCs plus a load more vehicles, courtesy of e-bay and the local model railway shop. 


Oh dear - another land mine victim?
Time to get the plasticard out for some more conversions!

Tuesday 13 August 2013

Star Wars AT-TEs

As usual, last weekend found me haunting the toy basket at the local charity shop.  I was very pleased to pick up these two Star Wars All Terrain -Tactical Enforcer walkers for 50p each.

AT-TEs with some GZG 15mm power armour for scale.

Although probably closer to 1:200 scale and rather primitive in some areas of sculpting (they are, after all, freebie McDonalds toys), I think they'll do as heavy troop transports for my 15mm gaming.  The detail on the legs is very nice and there is some good relief panels that should drybrush well.  A few additions to improve the weapons and they'll be ready to go.

Off to stomp on some enemies...
They'll receive a repaint of some sort.  I was thinking about a camouflage scheme but now I'm thinking that they might be a suitably intimidating form of transport for my Red Shadows.  They could look rather nice with a red base colour and some black/dark grey detailing.

As a bonus they have wind-up motors inside that will send them stomping (at very slow speed) towards the enemy!

Monday 12 August 2013

Red Shadows

Something I've been planning for a long time is the recreation of the Red Shadows in 15mm.  "Who are the Red Shadows?" many of you may ask.  Red Shadows are brainwashed troops who selflessly devote themselves to the service of their mysterious master, Baron Ironblood.  They were the enemies of Action Force (which later merged with GI Joe) and wore a sinister red uniform with black accoutrements.


My standard troops will carry an assault rifle, squad leaders an SMG, special weapon troopers a machine gun or a missile launcher (slightly larger and more powerful than a standard LAW). All carry grenades as standard. Because of their brainwashing, Red Shadows are fearless in battle, they have high confidence and high morale, rarely retreating - and only then because of reasons other than their own safety.


As you will no doubt have guessed, there are WWII German infantry, late war troops with the MP44/StG44 assault rifle.  I've modified the helmet with some fine white milliput epoxy putty.


 The original Red Shadow figures used a "German stormtrooper" as their basis, the only difference being the altered helmet design and the new colour scheme.  They still carry the stick grenades, canteen and cylindrical gas mask case of the original figure.

With his big brother...


I've opted for a GW red gore base coat with Vallejo sepia ink wash for shading.  The black parts (boots, webbing, weapons) have been drybrushed with Humbrol 32 dark grey to make the details a little more visible.  Other markings have been painted very carefully in white using an extremely thin brush.  I wasn't sure how well the skull and crossbones marking on the helmet would come out but it's worked fine (even if I missed out the black eye sockets).

Skeletron robots add extra firepower

The skeletrons that appeared in a previous article will form expendable robotic auxiliaries for my Red Shadow army.

Skeletron with little friends.

I have 3 packs of troops to paint as Red Shadows, firing and advancing poses with StG44s plus officers with MP40s.  I shall add some support weapons with another order.  All I need to do now is decide on some vehicles.

More Peter Pig ready for painting.

Sunday 11 August 2013

Peter Pig AK47 professionals

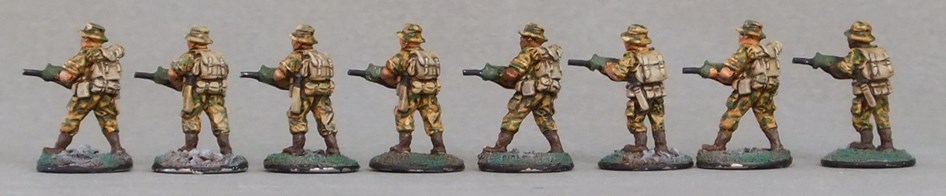
 It's taken me a very long time but I've finally managed to get some Peter Pig stuff painted.  I liked the look of the professionals from Peter Pig's AK47 Republic, this is pack 160 "Professionals standing" which I bought to sample the range.  As always, click on the pictures for a larger image.


 I'm really impressed with the level of detail on these figures.  They're all armed with an FN FAL rifle, you can see the little carry handle folded over the side of the weapon.  All have a variety of pouches and backpacks with bed rolls attached.  Some even have grenades strung on their webbing.  I think they'll be ideal for a 1970/80s set "imagi-nation" campaign in Africa or South America.


 I've opted for a 2-tone camo scheme for desert/grassland.  Paints are a mixture of Vallejo model and game colours.  Base colour is 70977 desert yellow with 70850 medium olive camo splodges.  Webbing and backpacks are 72061 khaki, boots are 72045 charred brown.  Flesh is dwarf skin, charred brown or beastly brown.  The rifles are black with 70890 reflective green furniture.  The whole figure has a wash of diluted sepia ink.  Drybrushing is desert yellow for the fatigues and khaki for the webbing, the webbing received an extra highlight of 72034 bonewhite.


Little details to note in the last photograph, from left to right:
Figure 1: Detail on the straps and webbing.
Fig 2: General view of the camouflage, also a grenade on the chest webbing on the right (hard to see!)
Fig 3: Knife and webbing pouches.
Fig 4: More webbing, bellows pockets on the legs.
Fig 5: Backpack detail, also water container on the webbing.

I shall certainly need to get a few more of these!

Saturday 3 August 2013

Budget aerospace fighter

Found this nifty little F16 kit in the local "around the £" shop this morning.  To be honest, I wasn't expecting much but I thought it might be useful for construction a crashed aerospace fighter objective marker.

"Based on" the General Dynamics F16 Falcon

 I was pleasantly surprised by the contents, a neat injection moulded styrene kit.  The instructions obviously haven't be written by anyone who has actually seen the kit (let alone assembled it - if followed, correct assembly is actually impossible!) but hey, it only has 8 parts so it's not actually very hard to work out.

Assembly step 1: throw away the instructions!

 It comes on 2 sprues (or "sheets" as the instructions refer to them!).  No mould release marks or sink marks, very well cast.

Assembly step 2: open packet and throw away awful stickers!

A couple of minutes with cutters and a craft knife and it's all assembled.  No undercarriage or other small details but it has got engraved panel lines which I thought was quite impressive for such a cheap kit.

Assembled and ready for action.

I'm very pleased with the end result, a great little fighter for a tiny price.  It won't need much work to "sci-fi" it up and turn it into a crashed 'plane.  If you wanted to create an airfield for games, these could cheaply and easily provide some extra scenery over which to fight.
 
15mm figure for scale.