Saturday 30 January 2010

Caverns nearing completion...


Well, the caverns are coming along nicely. Here is a view of the whole lot cut out, stuck down and with the tunnels all widened to the required width. You can see a selection of extra polystyrene bits which can be used to add interest to the tunnels, eg. rockfalls to block tunnels, extra tunnel walls to break up large caves if desired etc.


"What's round this corner - do I hear something breathing heavily...?"


A test for my idea of marking movement spaces onto the tiles. Tunnels will mainly be 1 space wide, but with larger caverns and some wide tunnel sections.


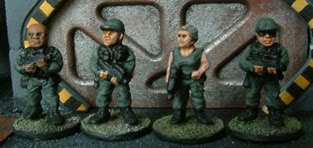
Xenomorph and NAC marine test the tile out...


The tiles after painting the base coat. Although I'll want to work on some shading at a later stage, the tiles look pretty good as they are - the dark matt paint brings out the texture very well.


I have a few loose sections of cavern wall that can be used to divide up larger caverns if desired, so I have a choice of more tunnels, or just a large chamber (a Xenomorph egg chamber perhaps...)


A test piece for painting the movement spaces. This has come out much darker than I intended, so more experimentation is required before I achieve the desired result.


A cavern pool. This was made with paper stuck underneath a hole torn through the cork base sheet. A couple of the cork fragments make stepping stones across the pool. The paper cockled slightly when painted, but this actually adds to the effect, creating an interesting rippled texture. I think a slightly lighter purple may be better. I probably won't create water areas in any of the other tiles I've made so far. I shall leave that for a future project, creating a small set of water caverns to add to this basic set.


I may leave the caverns at this stage for now, concentrating on preparing the figures & rules I need for the Old Buckenham Bone Crushers meeting nect weekend.
TTFN
Paul

Tuesday 26 January 2010

Cavern Scenery Stages 3.5 & 4

Cavern Scenery


Stage 3.5 – Tidying the tiles
After gluing all the tiles down, I decided that a little tidying was in order. Some needed a slight trim on the edges where the polystyrene was slightly mis-aligned, and I wanted make all the openings on the edges of the tiles line up a little more closely. Some of the tunnels are too narrow. They will need to be wide enough that it is easy to reach in and move the figures without knocking the whole cave system out of kilter.
The edges of the tiles were just trimmed with the Stanley knife, the new blade fully extended to give a good, clean cut in a single pass.
I used my soldering iron polystyrene cutter for the tunnel-widening and cave entrance aligning. The cutting wire was bent into a “U” shape of the desired width, and this was dragged through most of the tunnels to ensure a uniform minimum width. The slight curve on the corners of the “U” helps blend the base of the polystyrene tunnel wall into the cork floor.


Some of you might be wondering why I didn’t just stick the whole sheet of polystyrene directly onto the tiles and carve the tunnels in from scratch; well, I did consider this, but rejected it for 2 reasons…
1) PVA might not have stuck as well with large sheets of something non-porous like polystyrene – it would take a very long time to dry in the middle of a 30cm square! I thought about using double-sided tape, but that would have involved quite a lot of hassle, and I wasn’t sure how it would react with the hot wire of the polystyrene cutter.
2) More importantly, I didn’t have enough expanded polystyrene! I only had a couple of oddly-shaped sheets, and closer inspection revealed that both had ripples which would have made it difficult to stick a large section in place. By cutting out and sticking smaller sections, I was able to discard the rippled areas. The cutting took a while (3 one hour sessions - out in a cold garage to avoid molten polystyrene fumes making the house stink!), as I tried to cut in the most economical way, matching up the shapes for the minimum amount of wastage. In the end, I had just enough left over to add a couple of extra 10x10cm cave tiles, using up a cork off-cut at the same time.


Stage 4 – Painting


A little hunting in the garage finally located the pot of "cochineal red" matt emulsion that I was after. I used a 10x10cm cave tile as a test piece, and once dry I was very pleased with the result. The paint dries to a brick-red colour, and really helps to bring together the cork and polystyrene. The polystyrene in particular looks much better when painted, as the darker red shows shadows more and brings out the texture created by the polystyrene cutter. This had been much more difficult to see when the polystyrene was in its reflective and slightly translucent natural state.

I’ve been thinking about how the caverns will be used, and have decided to try and mark some sort of measurements onto the cavern floor to help resolve movement and weapons fire. It will be impossible to get a tape measure into the tunnels, and I have some ideas brewing for an action point based game along similar lines to Space Hulk. The caverns will be shaded or highlighted as appropriate by mixing a few drops of black or white poster paint with the cochineal red. I can also use these colours to paint in the individual movement spaces along the corridors and caverns. I’m thinking dark corridor edges with approx 5mm thin dark divisions every 10mm or so, followed by a lighter highlight in the middle of the space. The spaces will be slightly splodgy circles, and a quick test using the CD marker to draw circles on one of the as-yet unpainted corridor sections has convinced me that this should work OK. Once the basic red coat has been applied to all the tiles, I will try the marking method on a 10x10cm cave tile as a test piece to see how long it takes, and whether it gives the desired effect.


On with the painting!


TTFN
Paul

Saturday 23 January 2010

Cavern Scenery - Stages 2 & 3

Cavern Scenery

Stage 2 – Cutting the polystyrene
Out to the garage for the this stage, making sure I leave the door open – breathing in melted polystyrene vapour indoors is not a good idea! With a new blade in the stanley knife, I cut straight edges onto the polystyrene sheets. The openings are marked onto the styrene with the CD marker, using the cork cave tiles as a template. For cutting the curves, I’m using a home-made polystyrene cutter. This has been made from a mains-powered soldering gun with the soldering bit replaced with a section of power cable. This is thick enough that it will hold any shape that you bend into it. I have used it before for cutting a 28mm scale trench system into 2” polystyrene sheet – very handy!


After I started cutting, I suddenly realised that I wouldn’t know which pieces fo styrene go with which cork cave tile, so quickly labelled each tile alphabetically, and gave all the styrene chunks matching letters as they were cut.

Stage 3 – Glueing the polystyrene
With the polystyrene chunks arranged with their respective cork cave tiles, I can start glueing. Each polystyrene chunk receives a squirt of PVA which is then spread with an old, coarse bristled brush. Some more glue is spread onto the appropriate section of the cork tile to ensure a good bond to both surfaces, then the polystyrene is pressed into position. At the end of the evening, all the completed cave tiles are places on an A2 cutting mat, with another cutting mat on top, then several large, heavy books (Times atlases work especially well!). This keeps the polystyrene under pressure as it dries, and will hopefully prevent the cork warping.

Stages 2 and 3 have been tending to run in tandem. I’ll spend an hour in the garage cutting the polystyrene, then come indoors and spend another ½ hour or so doing the glueing whilst watching an episode of Angel or Stargate. This gives me just the right amount of cave sections to fit under some nice heavy atlases. I’ve completed 2 sessions so far, and will probably need only 1 more session to finish.


TTFN

Paul

Cavern Scenery - Stage 1

Cavern scenery

Chatting with my friend Howard at our local games club, the “
Old Buckenham Bone Crushers”, we were thinking about making a set of 28mm scale sewer or mine tunnels for use with Necromunda, Mordheim or the Occult Wars rules. Although this project hasn’t got off the ground yet due to other commitments, I’ve always fancied making a set of tunnels. Having started to do more in 15mm, this seemed an ideal opportunity to create a set of caves and tunnels that will be small enough to pack away easily, but still have enough variety to remain useful for some time. Seeing some sheets of polystyrene left over from having our loft insulated got me thinking…

Initial ideas
The old polystyrene water tank insulation will form the basis of the caves. At about 25mm /1 inch thick, it will be above head height for my basic 15mm infantry. Some cork floor tiles (originally bought to try out the cork building method described in
Matakishi’s Tea House) will form the base onto which the styrene will be stuck. Each tile if 1 foot square, or 30.5cm. I will therefore work on a 10cm grid for my caverns, producing a range of tiles – 10x10cm, 10x20, 20x20, a few large caverns 30x30, and perhaps an “L” shape too. We have an old pot of dark red paint in the garage, so these will be given a few coats of that to become martian-style caves. I might break out the odd piece of cork flooring, stick a piece of paper over the underside of the hole then paint & varnish it for a pool. I’m thinking that purple water might make an interesting contrast to the red rocks.

Some basic plans are sketched out whilst watching TV one evening and I’m ready to go.


Stage 1 – Planning the caverns
First, I gather my equipment together: cork tiles, steel rule & smaller plastic ruler, stanley knife, A2 cutting mat, plus the rough plans I drew up.

First of all, I mark the 10x10cm grid onto the cork floor tiles using an old CD marking pen.


As they are 12” square tiles, they will all have a 5mm section to trim off 2 edges. Some tiles don’t get the full grid, as they will be 20x20 or 30x30 cave tiles.


Next, the entrances are marked on. Each 10cm of edge will have a 2cm wide opening in the middle. I put marks down the edges of the tiles at 4 & 6cm, 14 & 16cm, 24 & 26cm. This is repeated as necessary on every edge so that the cavern tiles can be put together in any combination and all of the openings will still match up.


I have several brave volnteers (GZG Xenomorph, NAC Marine and 3 Vacc-suits) on hand to check the width of corridors as I draw them in, conecting up all the openings between tiles.


Once all the lines have been drawn in, the tiles are cut up with a stanley knife into their individual cave tiles.
Next stage - cutting the polystyrene to size!
TTFN
Paul

Saturday 16 January 2010

Mechwarrior re-paints


Whilst hunting for ideas for my 15mm forces, I came across some good ideas on The Special Corps blog. I particularly like his re-use of a Star Wars miniatures Crab Droid, re-painted as a mining droid.


Browsing e-Bay, I came across some of the Mechwarrior clicky game stuff. Although this is in 10mm scale rather than 15mm, I decided to buy a few vehicles and a 'Mech or two to see how they'd fit in. Even if the tanks didn't look quiet right with 15mm figures, they'd still be useful as super-heavy tanks for some of my 6mm games such as Classic BattleTech games, Dirtside, or GW Epic.
When I told the seller "Nelson's Underpants" what I was intending to use the models for, he kindly threw in some other broken bits which he thought I might be able to use as scenery.

A construction 'Mech was the item that immediately grabbed my attention. Although pre-painted in green and grey colours, I could picture it in my mind's eye in standard yellow "JCB" style colouring.

Once it arrived, I got busy by trimming off exhaust pipes, the cockpit hanging under the front and cleaning off the mould lines all over. A pair of jury-rigged machine guns on the right arm were removed, as this is going to be a civilian demolition robot rather than a fighting machine. At some point I will get around to adding something to this arm - possibly a pneumatic drill fitting or a demolition ball on a chain.

The 'Mech received an undercoat of Humbrol Matt 34 white enamel, followed by a base coat of matt lemon yellow. Some old GW "Spearstaff Brown" acrylic was used for some basic shading (despite the name it's actually a sandy yellow colour), and then the piston casings were painted black. Exposed metal areas on pistons etc. were painted with Humbrol metalcote aluminium for a nice shine, and red warning stripes added where appropriate.

Finally, the whole thing received a wash of watered down brown acrylic to give a suitably "used" appearance and to bring out the detail.

Thursday 14 January 2010

Yet another 15mm Sci-Fi blog!

Well, I thought it was about time that I joined in the fun and started a blog of my own. I've been meaning to sort out a web site for years but never got around to it, but the inspiration from all those other blogs out there has finally overcome my inherent laziness.


Although I'll try to add things at least once a week, this blog won't be updated as often as many out there - mainly because anything I want to add will involve a trip to the library in the next village in order to use their computers!

I'll be covering mainly 15mm sci-fi miniatures & modelling, though the odd 1/300th ("Epic" scale item might creep in, as will a few starships...


What's a blog without a few pictures? Here are a few snaps of the start of my 15mm army, along with some home-made scenery:


First, some GZG NAC marines.


Then a familiar looking team of space adventurers...


Light Vac-suits from GZG


A new use for a repainted Mechwarrior construction 'Mech (10mm but fits in nicely as a big robot for 15mm!)


Next time, I'll try and get a few close-ups of my NAC marines along with some notes on how they were painted.

TTFN

Paul