"Why is always nasty aliens attacking poor innocent humans?" asked one of the Explorer Scouts when we were getting out the scenery at our latest games day.
Thus was born the villainous human attack on the poor innocent alien settlement of Llah Ega'lliv...
 |
| The battlefield... |
A Neo-Colonial Commonwealth strike force is attacking to seize the "alien maiden" and the settlement's supply of "alien yoghurt" located within the target building. Don't ask why, they just are.
Aliens are scattered across the town in small groups. Despite being "innocent" they are nevertheless well armed and by no means defenceless. Most are regular Crusty troops but some have plasma guns and a few are equipped with power armour, representing a greater threat to the attackers.
 |
| Commonwealth Lancer IFV moves into position. |
Commonwealth forces comprise 2 Glaive APCs, 2 Lancer IFVs and 4 Outrider scout vehicles plus associated infantry fire teams. They move in a 3 pronged attack from the North West, North and North East.
 |
| Crusty infantry unit fire ineffectually at Commonwealth Lancer IFV. |
Crusties open fire against the NE prong but their fire bounces off the Commonwealth Lancer's armour. Return fire is more effective and the first Crusty goes down.
 |
| Lancer IFV opens fire. |
The Lancers are armed with twin rotary chain guns and have up-armoured hulls, giving them excellent protection.
 |
| Commonwealth APC decides to strike fast! |
Rather than pause to deploy infantry to breach a Crusty compound, a Glaive APC takes a more direct route from the North. At this point, the Commonwealth teams receive orders to deploy to an alternative target nearby. While they try to sort out the contradictory instructions and verify the original orders, vital seconds are lost and initiative passes to the Crusties.
 |
| Crusty plasma gun fire rips into the APC. |
By lifting over the compound wall, the APC has exposed itself to plasma gun fire from several Crusty units scattered across the town. Numerous shots are narrowly deflected but one penetrates the hull and the APC crashes to the ground, flames billowing from the hatches.
 |
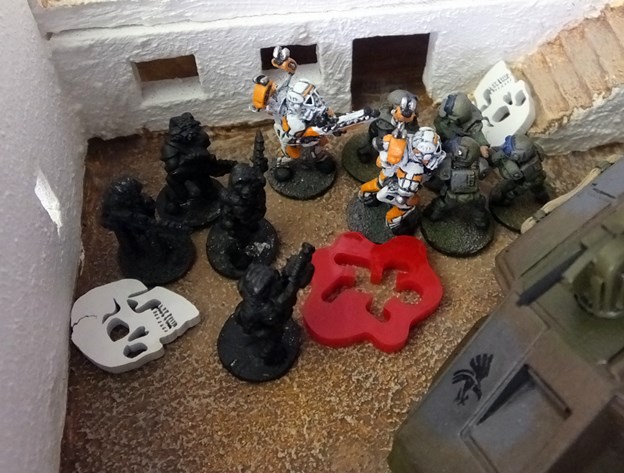
| Comonwealth APC survivors come out fighting. |
The Commonwealth fire team stumbles from the burning wreckage. Between shrapnel from the APC crash and the firepower of the dazed but still effective Commonwealth troops, all but one of the stunned Crusties in the compound go down.
 |
| Commonwealth recon troops cautiously approach. |
To the NW of the compound, the Commonwealth recon unit moves in cautiously. The confusion over their orders means they are actually lagging behind the main elements of the strike force.
 |
| Crusty reinforcements strike from behind Commonwealth lines. |
Crusty reinforcements start to trickle in from nearby settlements. One catches a Commonwealth fire team at the Northern entry point from behind. Surprising the Commonwealth troops they take out one trooper.
 |
| Crusty reinforcements don't last long! |
Despite their surprise, the Commonwealth unit rapidly switches their focus and effectively eliminates the entire Crusty reinforcement squad. But back in the compound with the crashed APC, things are about to take a turn for the worse...
 |
| Crusty Power Armour leaps into combat with Commonwealth troops. |
Crusty Power Armour troops leap down from a nearby building. Despite this shock entrance, the tough Commonwealth troops take down one of the power armour Crusties in the first round of combat. While the fighting rages, the surviving regular Crusty manages to rouse its comrades, one of whom is badly injured.
 |
| Crusty Power Armour grind down the Commonwealth survivors in close combat. |
Maintaining pressure on the Commonwealth troops, the Crusties' tougher armour and enhanced firepower begins to take its toll and the humans start to fall.
 |
| Commonwealth troops succumb to Crusty superiority. |
Finally the Crusty power armour overwhelms the Commonwealth troopers and the compound returns to Crusty control.
 |
| More Crusty power armour in cover. |
More Crusty power armour takes cover in a building to the East of the town. They fire on a nearby APC...
 |
| Crusty fire ignites a nearby building. |
Their fire misses the APC but hits something flammable in a nearby building and flames quickly take hold. Commonwealth troops won't be able to take cover in there!
 |
| More Crusty fire hits the nearby APC. |
More Crusty fire streaks in, this time impacting against the armour of the APC itself.
 |
| Lancer moves up in support. |
The Lancer moves in from the East, its firepower should help support the APC and suppress the Crusty power armour in the domed building.
 |
| Aerial view of the East flank |
Crusties on the roof of a building down the street risk a look... and one falls under the stream of shells from the Lancer's twin chain guns.
 |
| Recce unit prepares to move. |
On the opposite side of town, the recon unit prepares to move. Crusty reinforcements are spotted coming down the road from the West.
 |
| Crusties use a burned out car for cover. |
In the centre of town, a Crusty unit lean their shoulders into pushing a burned-out car along, providing street-crossing cover from the Lancer's guns.
 |
| Recce troop springs into action to assault a compound. |
Back to the West, the recce troop act quickly before the Crusty reinforcements can link up with existing units in the town. 3 Outrider scouts skim over a low hill and pour missile and machine gun fire into the nearest compound, wiping out all the occupants.
 |
| Suspected IED! Alternative route required! |
A second Lancer is moving cautiously in from the North. The vehicle commander calls an IED warning against a suspicious oil drum and all Commonwealth units will need to avoid that area in future.
 |
| Crusty power armour proves surprisingly vulnerable! |
Nearby, the victorious Crusty power armour from the APC crash compound leaps across to the Commonwealth back-stop unit - but are gunned down before they can act! The Commonwealth casualty was only stunned and the team are back to full firepower.
 |
| Crusties and Commonwealth trade fire. |
To the East, more Crusties flock towards the damaged APC. Fire from the APC eliminates one Crusty but the overwhelming firepower destroys the vehicle. The Commonwealth troops bail out of their stricken transport, one of them injured and unconscious.
 |
| Now that's a bad armour defence roll... |
On the West flank, a Crusty plasma support weapon from the reinforcements fires at the reserve Outrider scout vehicle. It obviously hits a weak spot in the Outrider's armour, going through it like tissue paper!
 |
| Commonwealth recce troop suffers a casualty. |
The Outrider brews up catastrophically. The nearby infantry fire team ducks away from the explosion.
 |
| Kaboom! |
The Outrider eliminated, more Crusty reinforcements move down the road into the town. Crusties are starting to move more clumsily now - rumours of a Commonwealth chemical agent attack are spreading and the Crusty regular troops are donning protective filters which restrict their vision and reduce their fighting efficiency. Fortunately the power armoured troops are unaffected by this.
 |
| Lancer vs Crusties |
On the Northern route, the Lancer is moving along an alternative track to avoid the suspected IED. More Crusties gather in the buildings ahead.
 |
| Outriders approach the objective building. |
The remaining 3 Outriders leapfrog over a compound and find themselves facing the objective building.
 |
| The "Alien Maiden" and yoghurt barrel. |
In the tower atop the building lies their target, the "Alien Maiden" and a barrel of her legendary yoghurt.
 |
| Close up of the maiden. Isn't she lovely? |
She roars her fury to the heavens... or perhaps she's calling in more reinforcements?
 |
| Crusty reinforcement, an alien mercenary. |
On the East flank a new threat emerges, an alien mercenary. A ferocious warrior armed with a powerful weapon, it represents a threat to both infantry and light vehicles.
 |
| Alien mercenary threat to the rear of the Commonwealth unit. |
The mercenary moves in behind the Commonwealth unit, endangering the entire flank. It prepares to charge and eviscerate the humans in close combat... but thinks better of it at the last moment and remains at a distance.
 |
| Medic!! |
Commonwealth troops are in no position to intervene, administering medical aid to their injured comrade. The mercenary prepares to charge once more... but again changes its mind and the Commonwealth troops remain unhindered.
 |
| Power armour Crusties get to their feet. |
On the North flank, the Crusty power armour med-systems go to work. Auto-injectors pump the occupants with stims and painkillers and all three troopers rise to their feet once more.
 |
| Commonwealth recce squad move in. |
To the East, the foot recce squad infiltrate forwards into some ruins that overlook the road. Can they see the Crusties that took out the Outrider from here? They are now the only unit covering this flank against Crusty reinforcements.
 |
| Brrrrapp!! Chain guns mow down Crusties. |
Crusties make a dash across the track to another building nearby - but the Lancer's twin chain guns mow them all down before they reach safety.
 |
| Brrrrapp!! And two more! |
In a near-repeat, another unit of Crusties rushes in from the South. Once more the Lancer opens fire, once more Crusties fall to the ground, though on this occasion two manage to make it to the building. The other Lancer is moving in from the West.
 |
| Commonwealth infantry help out. |
The Commonwealth foot recce squad open fire, eliminating two more Crusties.
 |
| Crusty revenge takes out an Outrider. |
Unfortunately, Crusty weight of numbers is telling and from a nearby building, a Crusty plasma-gunner sends his shot through the thin rear armour of one of the Outriders.
 |
| Power armour proves effective at last. |
Although one of their number is injured, the re-animated Crusty power armour wipe out the Commonwealth rearguard unit. The Commonwealth rear is now undefended against Crusty reinforcements.
 |
| Crusty reinforcements building... |
Meanwhile in the centre of town, more Crusties swarm into buildings overlooking the street. Time for the Lancer to move on.
 |
| Objective building reached! |
The Lancer moves up the street and reverses into position against the target building. Time to begin the final phase of the operation!
 |
| Still more Crusties attack. |
Crusties move into the street and open fire from the East but Lancer return fire knocks three to the ground.
 |
| Anti-tank missile versus Crusty infantry... |
The Crusty reinforcements approaching from the West treat their casualty caused by the recce squad. Another reinforcement unit is completely wiped out by a missile from one of the remaining Outriders.
 |
| Supporting fire from Commonwealth recce squad. |
The Commonwealth recce squad assist by firing on the Crusty plasma gun team which destroyed an Outrider moments before. One of the Crusties falls.
 |
| Crossfire! |
A Commonwealth sniper team has infiltrated Llah Ega'lliv and chooses this moment to reveal itself. They catch the Crusties in a crossfire and the remaining three are also out of action, temporarily removing the threat of attacks against the rear of the remaining Outriders.
 |
| Aaaaagh! |
The Commonwealth troops come under attack themselves - having eliminated the rearguard unit, the Crusty power armour leaps onto the roof of the compound and their shots knock down one of the sniper team.
 |
| More Crusty casualties. |
The second Lancer moves in to secure the street. Crusties spill out of a building and are mown down like wheat. Only one survives the hail of bullets.
 |
| Commonwealth troops cover the advance. |
The lone survivor falls victim to the fire team from the wrecked APC to the East. They've taken cover behind a burned-out car to provide covering fire down the street.
 |
| Commonwealth troops storm the target building. |
With the Lancers in position, one of the Outriders lands on the roof of the target building. Commonwealth marines debus and secure the structure.
 |
| The final power armour Crusty is hit again. |
A single suit of power armour from the carnage in the street has survived. The auto-med systems revive the Crusty just in time to be gunned down again.
 |
| Additional reinforcements join the Crusties. |
More Crusty reinforcements start to gather in a building overlooking the street.
 |
| Recce squad eliminates more Crusties. |
To the West the Recce team trade fire with a Crusty squad. As the smoke clears, only the Crusty plasma gunner remains standing.
 |
| And more... |
Crusty reinforcements move in along the road but half immediately fall victim to the Recce team.
 |
| Commonwealth forces guard the objective building. |
A Lancer and one of the Outriders fire down the street at the reinforcements already mauled by the Recce team. Now only one of the original eight Crusty reinforcements is capable of continuing.
 |
| Reinforcements are visible to the North. |
With the Commonwealth rear wide open, more Crusty reinforcements pour in from the North.
 |
| The two surviving members of a Crusty unit are killed. |
Two Crusties had somehow survived their earlier near-suicidal charge down the street. Risking a shot at a Lancer from the cover of a building, their luck finally runs out.
 |
| Weight of Crusty fire begins to tell on the Lancers. |
Despite having limited anti-tank firepower, the quantity of plasma fire raining down on the Lancers starts to inflict damage. Nothing crippling yet, but both are taking hard hits.
 |
| More Crusties swarm in from the North. |
The Crusties move down the street towards the Commonwealth centre. An Outrider hopefully drops a missile into their ranks but causes only a single casualty.
 |
| Crusties continue to build up. |
Having given up trying to charge the Commonwealth team to the East after three consecutive failures, the alien mercenary gallops across towards the centre of the town.
 |
| Commonwealth forces prepare to extract. |
Despite the building Crusty reinforcements, the Commonwealth strike force has inflicted severe casualties and has obtained its objectives. With the rather dubious "Alien maiden" and the barrel of yoghurt safely ensconced in one of the transports, the Commonwealth grav armour is ready to lift clear of Llah Ega'lliv.
A fun game of Tomorrow's War played with 3 Commonwealth players and 2 Crusty players while I was GM. Normally used to playing 4K and its ilk, they adapted quickly to the reaction mechanics of the new game.
Commonwealth started with the initiative but quickly lost it thanks to a fog-of-war card. They never regained the initiative. The Crusties suffered from drawing the
Gas! Gas! Gas! fog-of-war card twice in a row which dropped their regulars from troop quality D8 to D6. The Commonwealth player ended up with both
All Clear cards which they certainly weren't going to play any time soon, so the Crusties were at a disadvantage for much of the game. The alien mercenary failed its troop quality roll to try and close-assault the injured Commonwealth fire team nearby, not once, not twice but
three times! This meant that effectively played no part in the game! The Crusties were also hampered by one player who wasn't paying full attention and rushed two squads of Crusties straight into the guns of the Lancers, with predictable results.
So, victory to the Neo-Colonial Commonwealth who have shown Humanity's worst side to the inoffensive local Crusty population.