Wednesday, 8 February 2023

Palm tree improvements

 I've added a bit of static grass to the bases of my palm trees.  These trees are a mixture of cake decorations (small) and cheap chinese ones (large).  All were finished with a sand base but when finishing my Blotz fences I decided to improve these trees too.

I had a small scrap of Reindeer Lichen and foam flock which I placed on the base of one.

I added little dabs of PVA and a sprinkle of static grass to all the bases.  The grass doesn't photograph very well but it's a fairly pale type that works well on desert type scenery and looks much better in reality.


I have another bag of palm trees which I will work on bases soon.

Monday, 6 February 2023

Fences

I got these Blotz fences several years ago, assembled a few and then promptly lost the rest when tidying up my modelling cupboard.  The assembled ones did make it into a few games such as my "Escape from Zombie Island".


Fences in use.

Fast forward to late 2022 when I was sorting out the loft in preparation for building work and I uncovered the missing fences.  I have 2 sets: Fences - planked (15mm) and Fences - planked/damaged 15mm, which can be intermixed if required.  They had already been undercoated with black spray primer to try and seal the surface and I quickly built them.  As with other Blotz MDF terrain, they come on a sheet with small connections to hold them in place.  These are easily cut with a craft knife and they were fixed together with PVA.  They are very easy to assemble, the frame and fence panels just glue into slots on base.

Lots of fences.

 The lower section of the fence panels were painted green to simulate algae and moss, then the upper part was painted taupe.  The base was coated with PVA, with mix of sharp sand & tile grout sprinkled over.  A pipette was used to drip on watered doan PVA/matt varbish to seal everything in place.  Some more dabs of PVA and I applies some patches of static grass, then a few small bits of Reindeer lichen with foam flock for larger plants.

Foliage detail.

These fences are excellent for creating a few barriers on your battlefield.  The standard sections are 4inches/10cm in length and the gate sections are 2 inches/5cm.  As mentioned above, the standard planked fence has some variation in height which means that the damaged sections fit perfectly with the undamaged ones. The bases are fairly thin and don't take up too much space.  Most figures can get close enough to poke their gun barrels over the fence if desired.

Showing fence size compared to 15mm figures.

The only real drawback with these fences is the lack of specific corner pieces.  The style of the bases means that there will be a small gap at the corner.  I've seen some from othet manufacturers (4-Ground?) where the bases have incorporated a small cut-out in one corner that enabled them to be fit together at ritha angles.  This is a small grumble though and overall they're good value and will be useful on all sorts of battlefields.  My next task will be to locate the previously assembled fences and texture and flock the bases to match the new ones.

Sunday, 22 January 2023

Dark Force Comics

There is a new comic and model shop in the next town, Dark Force Comics, run by the friendly and helpful Steve.

He has a great range of Humbrol paints, both acrylics (in their new dropper bottle format) and enamels. The kids bought me a few bottles of paint for Christmas, I've always found that Humbrol have the best range of military greens of any manufacturer.  I was in need of some Matt 75 Bronze Green for my Epic scale models and had all but given up finding somewhere local to buy it.

He also stocks various board games - including the new Heroquest!

Alongside it we have Imperial Assault and a few Warhammer bits.

There is a wide assortment of Star Wars merchandise including X-Wing game packs, jigsaw puzzles...

...Star Wars figures and lots of Funko Pop bobble heads.

Back to the model-making side, there are a good range of  model railway scenics, ranging from trackside accessories and figures to grass tufts and other landscaping items.

Of course, the main feature of Dark Force Comics is the comics!  There is a huge range of titles, both current and back issues going back many years.  In addition, Steve sells gloves, protective comic sleeves, binder, display cases and boxes.  There are also autographed prints, art work and more.

The shop is located on the main street, only a few minutes walk from the main town car park.  I should also mention the new craft shop Made to Craft, located through the archway just behind Dark Force Comics, which has a fantastic assortment of art and craft supplies.

If you live in the area, do pop in and show your support if you're able!  You can also order online for mail order.


You can find Steve at Dark Force Comics, The Street, Long Stratton, Norwich NR15 2AH,just next door to the Queens Head pub.

Thursday, 19 January 2023

Combat droids

 These Robotic Soldiers are 3d printed from Dutchmogul on Thingiverse.  I printed them at 56% original size to reduce them from 28mm to 15mm scale.

I mirrored the pose to give me 2 different versions.  It's also available as the A-TACC combat robot (separate torso, legs & arms for poseability) and in storage mode as Folded Robotic Soldier, which lends itself to a few different scenarios where characters might need to activate or prevent activation of them.

I only printed a couple as a test to see how they would come out and they have a fairly quick paint job. I will print a few more and experiment with different orientation to see how I can reduce layer lines and improve the poses.  They could probably do with red eyes too!

These are ideal for 5 Parsecs from Home or Rogue Stars and when I print a few more, they will also be useful for Tomorrow's War and other larger scale games.  I see that there also some remixes by Forgemoon which include alternative weapons arms (40K heavy bolters, flamers and chainswords) to add even more variety.  I could probably substitute some different weapons for the arms, such as rescaled versions of John Bear Ross' meltas or gatings, or even a rotary autocannon.


I've tried to reduce the appearance of the print lines on these by re-painting some of the base colours after the shading wash.  Drybrushing highlights would enhance the ridged texture of the print lines, but blocking in the panels can help hide the lines to some extent.

Tuesday, 17 January 2023

VIPER canopy repaint

After upgrading my other VIPERs with a few extra details, I thought I'd try repainting the canopy on my civilian version in the same way as I did on my Land Rovers.

It didn't work quite as well, but it's still better than the gloss black I started with, so I'm happy.  I'm sure I'll improve over time the more I practice.


The canopies received a coat of gloss medium afterwards, for a nice shiny finish.  I picked up the tube of gloss medium just before Christmas and I've used it on a few things now, either giving a sheen on canopies, or improving the appearance of the water on my amphibious APC.  It will certainly come in useful when I make a larger wargame board later this year which will have a few patches of water on it.

Sunday, 15 January 2023

AEC Command Vehicle

Ever since I first saw an AEC 6x6 Command Vehicle, I've loved the design.  I'm not aware of any models having been produced in the past, but 3D printing has changed all that.  As with so many of my models, this comes from M_Bergman on Thingiverse.  I hollowed the model leaving a 2mm thick shell and punched drainage holes to avoid using too much resin.  As always, you can see the print lines in these photographs but viewing the vehicle from a couple of feet away at gaming distances they disappear.

With mecha and troops for scale.

The vehicle came in low power and high power versions with different radio sets, this is the HP version with additional parts on the sides of the rear hull.

My vehicle has been painted to match my VIPER mecha forces and will serve as a command vehicle for them.  I've always thought that it has a slightly sci-fi appearance.

Can you see the paint chipping detail? Not really.

I added some waterslide transfers to match the mecha and my Lynx recon vehicles, including ID numbers (I-94 WWII British BR119 & yellow with black outline NY101), black/red "teeth" and an axe with lightning flashes (GW Space Orks).

"Red tooth" vehicle marking.

After the decals had dried & set, I gave the whole vehicle a black wash and then a drybrush of taupe around the lower part of the hull.  A few silver paint chips were added using a tiny scrap of sponge held in a pair of tweezers, masking around the edges of doors and panels with a scrap of paper where required.  They're not really visible in the photographs but are much easier to see in reality by the way the light reflects as the model moves.

Note the first aid kit on the rear.

This might appear in one of my AK-47 Republic armies too, an ideal ride for a warlord or a general with delusions of grandeur...

Friday, 13 January 2023

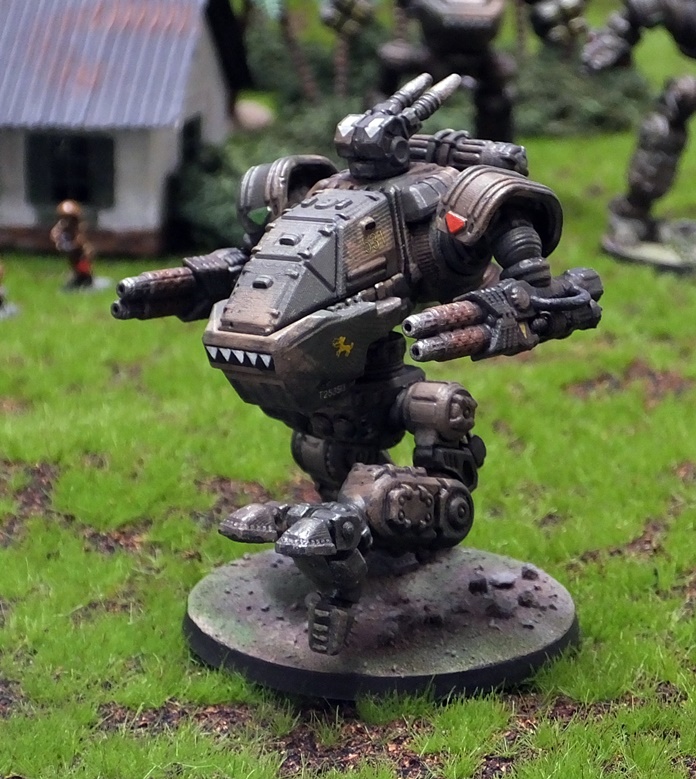
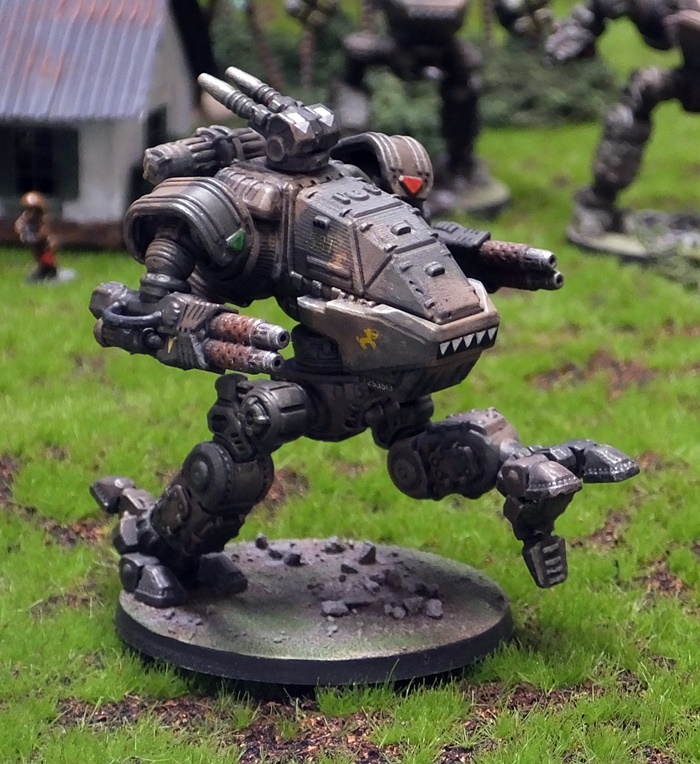
Rebel Minis VIPER Suit 4

My latest VIPER suit has been built in a more dynamic pose than the previous ones.  I reposed the feet and assembled the legs from individual sections rather than using a pre-posed set.  I used gel superglue to ensure a strong bond, there's a lot of weight suported on that back ankle joint.

I used the same paint scheme as the first 2 VIPERs.

The main weapons are a "Suturus Pattern - Project Good Dog Heat Spear".  These are designed by John Bear Ross, designer of the VIPER and therefore a good match in style.  They were resized slightly, though the Imperial Knight ball joints on the original were not the exact same size anyway. Regardless of this, gel superglue fixes them in place well.

Fast moving mecha.

I re-purposed the chin-mount weapons from the Titan Marine VIPER as a light anti-aircraft gun on top of the hull.  The sensors were painted in like gems, which was a bit fiddly between the weapon barrels.

Anti-aircraft guns & sensors.

This VIPER has been printed hollow with an removable canopy and a pilot with ejection seat.  I have also printed an empty seat as an alternative option.

Pilot.

There is space inside the back of the hull for some stowage, ammo boxes, food, tent, weapons.  I have the stowage set so I have various options available once I get them printed.

Pilot.

The running pose was inspired by various BattleTech 'Mechs such as the Locust and various Clan OmniMechs.

Having the top mounted weapons rear-facing gives it a sleeker, faster appearance, and will help ward off pursuers.

Strong glue was needed for this pose!

The altered feet work particularly well with this pose.

Rear facing wepons on top look "faster".

I also added some additional detail to my existing VIPERs.  All had red/green port and starboard markings on the shoulder armour triangles.  The first one had some lenses painted on the teeny lenses alongside the chin gatling.

Sensor lenses on gatling just visible if you zoom in.

I also painted some lenses on the little sensor bubbles to either side of the main guns

Weapon sensor lens.

The ammo box at the side of the cockpit has a small transfer to turn it into a first aid kit.

First aid kit detail.

This VIPER will be the fast recon unit for my Mecha forces, hence the lighter weight weapons and the rear facing guns to discourage pursuit.

Mecha attack!

I can see this VIPER striking behind enemy lines, or flanking them, using its fusion guns to destroy supplies and spread havoc, then outdistancing any pursuit.