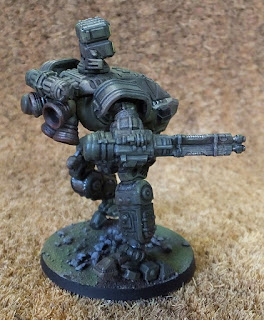
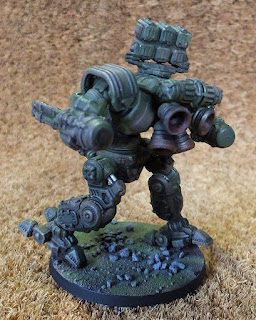
My Rebel Minis VIPER (Variable Payload Raider) suits are about as finished as they're going to get for the moment, so I thought it was time to show them off, starting with my general combat VIPER, armed with a pair of tribarrel energy cannon, missile pods and chin-mounted point-defence gatling.
 |
| Weapons twisted to keep on target. |
These are 3D prints from files purchased from Rebel Minis Digital Direct, the 15mm (1/100th Scale) Earth Force VIPER Suit. Due to the recent drop in the GBP/USD exhange rate, they're more expensive now than when I bought them, but still less than you'd pay for a physical model. I actually paid slightly more than the current cost, but the price dropped shortly after I bought them and the designer (the highly talented and all-round splendid chap Mr John Bear Ross) refunded me the difference, which was very kind of him.
 |
| Note jerry can of spare drinking water on the hull. |
The hips, upper and lower legs are all available as separate parts for extra poseability, but for a quick first experiment, I just grabbed one of the 3 preposed sets of legs to speed things up. Shoulders, lower arms, missile launcher, chin gun and jet pack all come as separate items. Feet are available in various fixed poses or as an "unfused poseable" version. The main hull comes as either a single fused block (with armoured or plain options) or as the hull base, canopy and separate ejector seat if you want to produce a detailed interior. All parts are available in plain or pre-supported formats. I used the pre-supported versions and they all printed without any problems. The mecha was assembled using gel superglue (cyanoacrylate) and the snug, positive fit of all the parts made it a breeze. The feet and weapon arms are ball-jointed, providing a wide degree of poseability. Other parts use a round peg and socket fitting.
 |
| Pose doesn't look too bad from this angle. |
I tried a walking pose with all the weapons twisted to face a target. I'm not sure this has really come off, it does look a bit awkward! A few extra items of personal crew equipment were added, a jerrycan on one side of the cockpit and an ammo box on the other. I'll add more items to further VIPER suits such as tarpaulins, spare reaction mass tanks for the jump jets etc.
 |
| Jet pack detail. |
After a Wilko grey spray primer, the VIPER was painted with Humbrol acrylic dark green, with sand brown camo patches on top. Engine bells on the jump jets were a mix of burnt umber and burnt sienna with a gentle silver drybrush. A few smaller details such as the leg pistons, gun barrels etc. were picked out in silver.
 |
| Stomp stomp! |
The whole model was varnished with Future floor polish to give a good surface for waterslide transfers. The canopy has the main ID number (yellow with black edging), a set of old GW Space Ork transfers provided the dog-tooth pattern on the front. A WWII British tank ID number in white sits on either side, just above the chin-mounted gun. The missile pod doors were edged in white, then overpainted with yellow.
 |
| Note the spare ammo box below the ID number. |
A dilute wash of Vallejo black ink & matt varnish was applied over the whole model, then dabbed off in places. A few silver chips were added around the feet and a dusty yellow/brown drybrush finished ff the model. As you can see, the markings are pretty much invisible, so larger pure white transfers will be a better bet for future models. The green and brown base camo pattern is much more visible in real life, it looks fairly grey in these photographs and I couldn't get it to show up much better no matter how I adjusted saturation, contrast or gamma levels. Despite these little issues, as a first trial model this has turned out great, printing easily and assembling with great ease.


No comments:
Post a Comment