Tuesday, 14 March 2023

Spring of Scenery 2023 - Part 1 : Forest test base preparations

My forests currently consist mainly of small coniferous trees mounted individually on coins.  I do have a box of Woodland Scenics tree armatures and several tubs of flock/clump foliage ready for making some more detailed trees.  Although the results are very good, the disadvantage is that it's quite time-consuming to make them.

My existing coniferous trees.

 A trawl of e-bay provided me with 180 trees for under £20, postage free from China.  170 are a mixture of 4 different styles and colours of deciduous tree.  The remaining 10 were palm trees to bulk out the smaller ones I made from cake decorations for my desert gaming mat.

Now that I have lots more trees, I need to think about how to use them all.  Time to experiment with some woodland!

Although it's nice to have individually based trees, it will be more practical to make patches of woodland with several trees on each.  I want larger forest areas that I can easily drop on the table in one go.  This will also give me the opportunity to add more in the way of ground cover such as bushes and other undergrowth, fallen trees, pools/streams, piles of cut logs and small buildings or sections of ruins.  It will also be easier to define what counts as forest for line-of-sight and movement purposes if there is a base which clearly delineates the edge of the terrain feature. Fiddling around making a mound of putty to help secure each tree trunk used to take ages and with a patch of woodland it will be quicker and easier to build up the base and drill holes into which I can glue the tree trunks.

All those trees take a while to set up!

The occasional Woodland Scenic tree can be added as a focal point as desired, and I will leave some open areas or removable sections to enable me to swap out special features.  My forests will be used for both 15mm and 6mm gaming, so buildings in particular are likely to be made modular so that I can use the appropriate scale for the game I'm playing.  I'm thinking of using the same size hole saw for all, making the special features 100% interchangeable between the woods.

My woodland base is made from 5mm Foamex.  As mentioned previously, this is an expanded PVC, mainly used for sign writing, display mounting etc.  It's easy to cut, very light, pretty rigid in this thickness, and it's waterproof, so won't warp the way plywood, MDF or foamcore can when you use a thick layer of paint or PVA.  It's also something you can often get free if you ask a local signwriter or exhibition display company if they have any offcuts.  Pieces that are too small to be any use to them can still provide bases for several buildings or other pieces of scenery.  One drawback is that because it's waterproof and non-porous, it isn't easy to stick.  PVA doesn't adhere and superglue can peel off, but something thicker like no-nails, UHU or Gorilla glue works very well.

For this test piece, I made one large base, then a smaller section to add on the top.  It was coated in brown acrylic caulk, which seems to stick fairly well and provides a good key for the next stage which was painting with various browns and greens.  Holes were drilled to insert the trees.

Test fitting the trees.

Coming back to this a few weeks later, I wasn't really happy with the look, so I re-painted it with textured paint (sand, ready-mixed filler, PVA, burnt umber acrylic).  This gave a much better result.

Textured paint.

Wilko Nutmeg spice and coffee emulsion tester pots were used to paint over the textured paint.

Base colours applied.

A drybrush of desert sand helped blend the different base layers together and completed the first stage.

Drybrushing complete.

Stage 2 will involve some improvements to the Chinese trees...


Saturday, 4 March 2023

Sci-Fi Walls

These 28mm Z.O.D. Sci-Fantasy Walls by Dutchmogul were scaled down to around 56% original size for printing as 15mm scenery.  They're designed to print upright (Z.O.D. = "Z-Axis Optimised Dominion") and I managed to squeeze this entire set onto a single build plate.  Given how small the Photon Zero build plate is, I was very impressed with this result!  I positioned them all diagonally on the build plate to try and reduce the vertical pixel lines which has worked reasonably well.

Look out!

They interlock using tabs and slots.  There are three main wall panel designs, a gateway and a number of connectors to allow angled or dividing walls.  Because these are resin printed, I had to do some sanding to remove the "elephant's foot" around the base that closed up the bottom of the slots.

A build plate's worth of walls.

I printed 3 of each of the main wall panels to give me plenty of variety when putting together a structure.

Wall A.

The panels were base coated burnt umber, then some patches of burnt sienna were dabbed on.

Wall A reverse.

The whole of each panel was drybrushed silver, then given a coat of Pledge/Klear floor polish to seal it for the next stage.

Wall B.

I masked various areas with toothpaste, applied using a small scrap of sponge.  I tried to vary it so that some had more than others, and concentrated on the areas where most wear would occur.

Wall B reverse.

Before the toothpaste could dry out, the panels were sprayed with cheap white primer.  Once they were touch dry, I soaked them in warm water and scrubbed with a toothbrush to reveal patches of the rusty metal effect underneath.

Wall C.

The set also includes a decorative gateway.  This includes a chunky threshold to keep the piece rigid and prevent the top from snapping.

Gateway.

A few of the walls had some extra detailing applied with very dilute sepia ink to enhance the detail.  I'm not sure about this yet, so I've only painted a few so far, including the gate.

Gateway.

The paint chipped effect has worked as planned, and these will work with either my desert buildings or with various other sets of my sci-fi scenery.

Gateway - reverse.

The connectors have been painted in the same way as the wall panels.  They include angled joints, end sections and 3-way connectors in both 90 and 120 degrees.

Spacers & cappers.

The circular objects on the panels were painted gem-style in blues, reds and greens.  The small gems came out just as I wanted.

Gem detail.

The blue didn't work quite so well, they were more awkward to paint because they were much larger, but they aren't too bad.  All the gems were given a coat of gloss medium to give them a shiny finish.

Gem detail.

Although I don't think I'd build an entire complex out of these walls, they will be ideal for enhancing some of my scratch builds.  My desert buildings are all very generic so far, but I'd like to build a few more definitely sci-fi ones.  These walls would be great for making some small compounds attached to the main buildings, or to enclose a yard between a couple of buildings.

Tuesday, 28 February 2023

Star Wars Mini-Rigs 2: Ground vehicles

More Star Wars Mini-Rigs... a couple of types of ground vehicle this time.

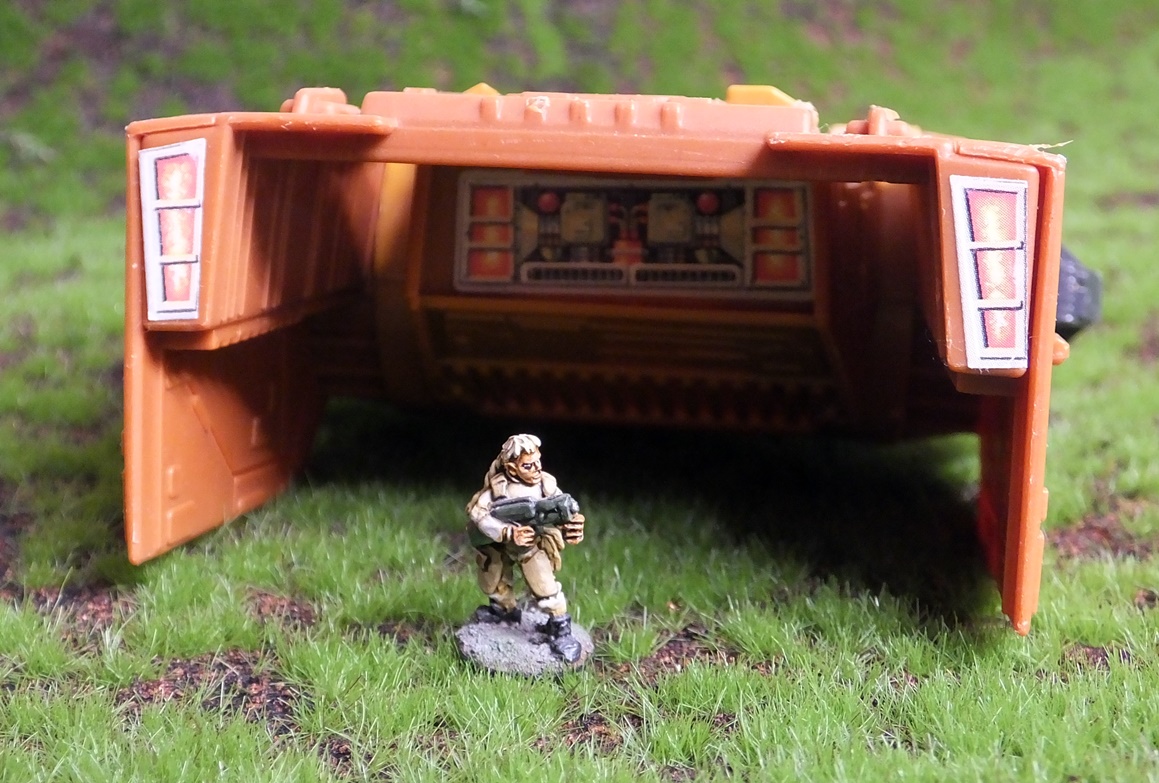
The MTV-7 Multi-Terrain Vehicle towers over 15mm figures.  With the seat area closed in to form a cabin, this could make a great transport vehicle.  As with the flying Mini-Rigs, there is lots of great panel detail which should paint up well.

The spring-loaded wheels move when you push the hull down.  I'm tempted to glue it with the legs at about 45 degrees.  The laser cannon is missing from the front, but it might make a nice civilian transport/exploration vehicle anyway.

The MLC-3 Mobile Laser Cannon is missing a clear dome from the top, but it might look even better with a turret there as some sort of heavy tank.

The top opens up, so I could put in some internal detail. Or more likely just use it to transport a few figures, then forget about them until the game has finished.

I have 4 of these (all missing their domes) plus at AT-AT hull.  Another option would be to combine all of them into a Sandcrawler type vehicle with 4 big track units underneath.

Whatever option I choose, I'm not likely to get a chance to do much with them until our building work has finished in the summer.  Most of my modelling supplies are packed away at present, these vehicles are only out because I thought they might help distract the kids one weekend.  I'm not sure whether I'll be able to get them all back into my gaming stock now though!

Friday, 24 February 2023

Star Wars Mini-Rigs 1: Aerospace vehicles

 I have a few Star Wars Mini-Rigs which I will be converting into 15mm vehicles and starships.  These can be found for as little as £3-4 each if you get a job lot for spares and repair.  The batch I got back in 2020 (which included the Rebel Transport that I'm turning into a crashed starship) include 3 AST-5 Armoured Sentinel Transports.

These have 2 different modes, the first being a flying craft which will be a very fine shuttle for a small group of 15mm figures.

They have excellent panel detail which will paint up well.

The engines are just stickers but I can add in some extra features here before I paint them.

The second mode is an alternative landing pose.  The guns swivel to allow it to engage ground targets.

The cockpit is substantial enough to fit a  3.75" Star Wars action figure, so loads of space for a 15mm crew.

Some 3d printed starship bridge stations will fit into the front of the space and maybe some seats along the sides.

The detail under the rear wing section is even better than the detail on the top - it's a shame it's all hidden away underneath where you can't see it most of the time!

The Imperial Shuttle-inspired ISP-6 Imperial Shuttle Pod is the second type of airborne mini-rig I have.  Mine are all missing their canopies, so will need a fair bit of extra work to prepare them for 15mm use.  The wing guns are also missing, but it will be easy to trim off the mounting points.

The wings fold up and down thanks to a little switch underneath.  I'll try to preserve this function in the rebuilt model.

The cockpit on this one isn't quite so easy to fit anything inside, so I'll need to have a think about whether to try and fit anything in it.

Next time I'll look at some of the ground vehicles I have.


Wednesday, 22 February 2023

Zurg Fighter

The Hyperspeed ships from theLightyear film have appeared across a number of FaceBook groups recently for use with 15mm and 28mm figures for games like 5 Parsecs From Home.

Because the film did so badly at the box office, these have been gradually falling in price.  This one is on sale in Argos for only £5 - so I got two!

They come with neat flip-down tripod landing gear and very detailed engines which should look great shaded and drybrushed.

I was surprised how large this ship is, about 10" or 26cm long, twice the size I expected.  It's a beast of a ship.  Instead of the small shuttle I was thinking, this would do as a light freighter, or an assault lander carrying 15-20 troops.  These are Alternative Armies Beotan Werewolves for scale, which stand head and shoulders above standard 15mm figures.

There is space in the cockpit for a pilot.  I recently purchased the starship bridge terminals set from the talented Evan Carothers which includes a couple of good pilot seats which should fit.

 I could add a few weapons if I want to go for the military lander option.  There is space for a dorsal mount cannon.

There are also some excellent potential hardpoints on the underside of the hull.

These are weapons from the VIPER mecha I recently purchased and fit in very neatly.

As a bonus, Mattel have thoughtfully placed metal fixings in these locations.

A quick test shows that these are ferrous, so I will be able to magnetise a range of alternative weapon options which can be tailored for mission-specific purposes.  I'll have to try and find some missile pods and bomb racks too.


 I don't think this will need much work before I paint it, so I'll just need to decide on a suitable colour scheme.  I can't decide whether to go for camouflage (possibly grey/grey above and pale grey/blue underneath) or just a functional grey with some sort of coloured stripes.

The Zurg Mothership weighs in at a hefty 20" long and is very tempting, though the cheapest I've seen it so far is about £20.

Saturday, 18 February 2023

Red Shadow motorcyclist

One of my Peter Pig orders included a pack of WWII German motorcyclists (pack no 193).  I am converting these into Red Shadow outriders for my Action Force project.

Minor alterations were made to the helmet with Milliput, adding the front visor and a small box on the back.


The motorcyclists are equipped with normal rifles instead of StG-44 assault rifles, but a tiny blob of Milliput added the distinctive curving magazine which makes it look close enough from 6 inches away.

The Red Shadow has been painted GW red gore with a sepia ink wash. The remaining areas are black with a dark grey drybrush.  The various markings were carefully hand-painted.  It probably needs a skull-and-crossbones emblem on the fuel tank but I didn't feel my brush skills were up to it at the time!

Wednesday, 15 February 2023

Sherman Tanks

A few years back I spotted some Flames of War vehicles in the second hand part of the local toy and model shop.  I bought 4 resin M4 Shermans and a resin/metal Sherman Firefly with its upgraded 17 pounder gun.

Shermans

The tanks had all been painted in a basic but effective green drab colour scheme, though this was partly obscured by a layer of dust.  The easiest way to clean them seemed to be a quick wash with some hot water and an old toothbrush (a baby toothbrush, so very soft).  Once in the water, a strange pale residue started to appear all over them, gradually giving the models a cloudy grey-white tint.  I can only assume that they had been covered with some sort of strange varnish, possible even a layer of PVA or Mod-Podge.  I had to give them a fairly hard scrub in the hot water, soapy water to get it off but eventually they all came out undamaged.

Stowage detail

I also ended up with an M10 tank destroyer.  I want to remove the cast-on base because I prefer my vehicles unbased.  It's pretty tough resin so I'm not sure how easy this will be!

M10 tank destroyer

I added a few extra details, painting in the tool handles and some other bits of stowage.  A dab of gold on the shell cases in the M10 turret also helps.

Some internal detail painted

These will be used for both AK-47 Republic and also for my Action Force "Desert Strike" project.  Z-Force liberated several former Dunan army tanks from the Gibli fanatics and used them for their counter-attack.  There was obviously a bit of mis-translation or confusion somewhere, because they are referred to as "Centurions" in the text, but are clearly Shermans in the illustrations!  Ignore the lead Z-Force tank - that's a modified version of the GI Joe MOBAT tank.

Desert Strike!
 These will probably get a full repaint at some point but for now they'll do fine to provide the main punch of an AK-47 Republic army.