Tuesday, 18 October 2022

Rebel Minis VIPER Suit 1

My Rebel Minis VIPER (Variable Payload Raider) suits are about as finished as they're going to get for the moment, so I thought it was time to show them off, starting with my general combat VIPER, armed with a pair of tribarrel energy cannon, missile pods and chin-mounted point-defence gatling.

Weapons twisted to keep on target.

These are 3D prints from files purchased from Rebel Minis Digital Direct, the 15mm (1/100th Scale) Earth Force VIPER Suit. Due to the recent drop in the GBP/USD exhange rate, they're more expensive now than when I bought them, but still less than you'd pay for a physical model.  I actually paid slightly more than the current cost, but the price dropped shortly after I bought them and the designer (the highly talented and all-round splendid chap Mr John Bear Ross) refunded me the difference, which was very kind of him.

Note jerry can of spare drinking water on the hull.

The hips, upper and lower legs are all available as separate parts for extra poseability, but for a quick first experiment, I just grabbed one of the 3 preposed sets of legs to speed things up.  Shoulders, lower arms, missile launcher, chin gun and jet pack all come as separate items.  Feet are available in various fixed poses or as an "unfused poseable" version.  The main hull comes as either a single fused block (with armoured or plain options) or as the hull base, canopy and separate ejector seat if you want to produce a detailed interior.  All parts are available in plain or pre-supported formats.  I used the pre-supported versions and they all printed without any problems.  The mecha was assembled using gel superglue (cyanoacrylate) and the snug, positive fit of all the parts made it a breeze.  The feet and weapon arms are ball-jointed, providing a wide degree of poseability.  Other parts use a round peg and socket fitting.

Pose doesn't look too bad from this angle.

I tried a walking pose with all the weapons twisted to face a target. I'm not sure this has really come off, it does look a bit awkward!  A few extra items of personal crew equipment were added, a jerrycan on one side of the cockpit and an ammo box on the other.  I'll add more items to further VIPER suits such as tarpaulins, spare reaction mass tanks for the jump jets etc.

Jet pack detail.

After a Wilko grey spray primer, the VIPER was painted with Humbrol acrylic dark green, with sand brown camo patches on top.  Engine bells on the jump jets were a mix of burnt umber and burnt sienna with a gentle silver drybrush.  A few smaller details such as the leg pistons, gun barrels etc. were picked out in silver.

Stomp stomp!

The whole model was varnished with Future floor polish to give a good surface for waterslide transfers.  The canopy has the main ID number (yellow with black edging), a set of old GW Space Ork transfers provided the dog-tooth pattern on the front. A WWII British tank ID number in white sits on either side, just above the chin-mounted gun.  The missile pod doors were edged in white, then overpainted with yellow.

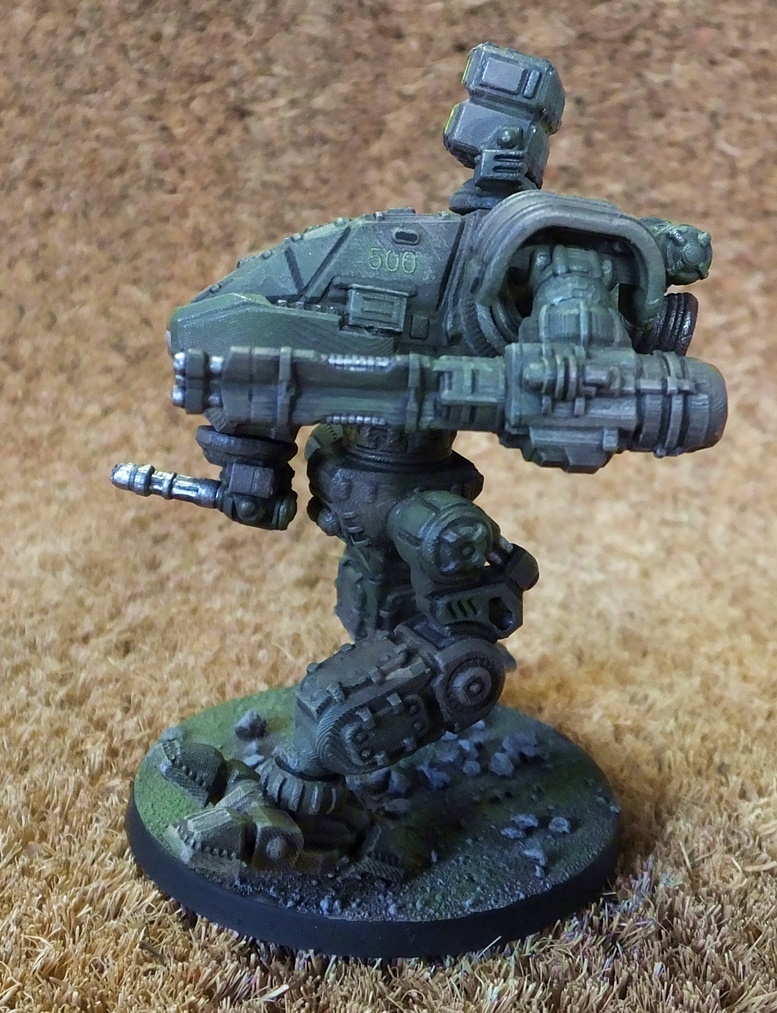
Note the spare ammo box below the ID number.

 A dilute wash of Vallejo black ink & matt varnish was applied over the whole model, then dabbed off in places.  A few silver chips were added around the feet and a dusty yellow/brown drybrush finished ff the model.  As you can see, the markings are pretty much invisible, so larger pure white transfers will be a better bet for future models.  The green and brown base camo pattern is much more visible in real life, it looks fairly grey in these photographs and I couldn't get it to show up much better no matter how I adjusted saturation, contrast or gamma levels.  Despite these little issues, as a first trial model this has turned out great, printing easily and assembling with great ease.

Thursday, 13 October 2022

Cargo bay scenery

Some more 3d printing of scenery for a cargo bay or supply dump, this excellent selection of crates and barrels is from Lordogre's Sci fi station colony staceport scatter terrain set.  All were resized to 45% original size, though with 15mm figures they'd look fine anywhere up to about 60% original size.

The Hexagas containers have a nice sci-fi look and come individually and in small stacks.  All received a basic paintjob of base coat, sepia wash on the yellow ones, black wash on the grey endcaps only of the blue ones.  An extra wash was dabbed in around the readouts, then the details were added in with white & green.


The "colony scatter barriers" can be used as barricades, or just to line the walls of a storage building.  They include a mixture of different storage cubes, hexagas containers etc.  I added a couple of extra small cannisters from a stowage set to the top of the first one shown.  Haxagas cannisters were painted as mentioned above, the storage cubes were a mix of reds with red/sepia wash and yellows with sepia wash.  The larger blue crates were dark blue with a black wash.  The large oval tank is orange with a sepia wash, drybrushed pale orange, then given an orange wash using my 30 year old Citadel "Expert Paint Set" inks.  Some of the crates were given grey lids/openings, these had a very pale wash of black with neat black ink used to line in the interlocking lid sections.  Buttons/readouts were carefully painted in with white & green.  There are a couple of dumpy metal kegs too, these were just painted silver with a black wash.


These are a quick and easy way to fill out a cargo bay or storage area.  I will probably mirror the designs in my slicing software and print some more sat some stage, to give me 8 different designs.  Adding one or two individually printed crates from the set will increase the variety even further and I'll add some pictures of the individual crates in my next blog post.

Sunday, 9 October 2022

Crates

I've done a few quick print runs recently to produce lots of crates.  Some wooden crates will be equally at home in any setting from fantasy to sci-fi.  After a taupe craft paint base coat, I washed some with black ink and some with sepia ink to get different effects.  The hinges and hasps were painted in with GW chainmail.

The next 3 sets of crates come from REKKINSIMPLESTUFF who makes a wide range of scatter scenery.  These have a fairly simple but effective sci-fi styling and print well flat on the build-plate of my printer.  I printed them at 56% to convert to 15mm and set them all at 45 degrees on the build plate.  This seems to give a more even finish than printing them straight and with something small like crates, you can still fit the same number on a single build plate.

After a quick Wilko rattlecan grey primer undercoat, I edge highlighted them with a white drybrush, then tried out my new Army Painter Speedpaints on them.  The Blood Red works really well, especially with the pre-highlighting technique.

Cloudburst Blue hasn't worked quite so well but it's still OK for some background scenery. More importantly, it is indeed faster than painting the crates in my normal style!

Camo Cloak Green has been something of a disappointment, leaving pale, streaky patches but it's possible that I just need to apply it more thickly.  I have some more crates printed so I'll give it another try.

 My cargo bay will grow ever more crowded with all these, but is there ever such a thing as too much scatter scenery?

Friday, 7 October 2022

A load of rubbish

While I still need to find a few wheelie bins, I already have an assortment of other rubbish printed and painted, ready for use.

First of all some individual rubbish bins with various contents, plus a closed bin, separate lid, spilled bin and some bags.  These were all rescaled to 56% from TommyGMC's 28-32mm Trash & Garbage.


Secondly this pile of rubbish. I printed 2 copies at 56% original size, one mirrored so they aren't identical.  Unfortunately I can't find the original file now, so am unable to credit the creator, but my thanks to whoever you are!


These will be ideal scatter scenery for the more run-down areas of any modern or sci-fi settlements in my games.

Tuesday, 4 October 2022

Tyre stacks

 After printing and painting these bits of shanty junk from Terrain4Print, I was tyred out...


Monday, 3 October 2022

Shanty barricades

 To go with my recently completed rundown hab block, I printed some shanty barricades from Terrain4Print.  These were rescaled to 56% to convert them from 28/32mm down to 15mm models.  They're pictured here with a range of figures from GZG, Rebel Minis and Peter Pig.

Shanty obstacle B

Shanty obstacle B (reverse)

When you look closely, they don't completely make sense, including only the front half of fuel drums, tyre stacks etc.  They still look great though, so rule of cool says they'll have a place on my games table!

Shanty obstacle A

Shanty obstacle A (reverse)

They have a good range of textures on both sides and I love the little broken up washing machine!

Shanty obstacle C

Shanty obstacle C (reverse)

Shanty obstacles E (left) and D (right)

Shanty obstacles E (left) and D (right)

These barricades will also work with the hab block to provide some extra cover for anyone on the roof or around the front.

Barricades in use.


Sunday, 2 October 2022

Kore 15mm hab block

I went all-out on this hab block from Kore, scultped by Giacomo Pantalone.  It was a hollow-cast model, filled with expanding spray foam.  It was heavily discounted when I bought it, being slightly warped, but not too badly and so still perfectly usable.  I sawed off the bulge of foam underneath, mounted it on a Foamex base and added various extra details, some 3D printed and some hand made materials.  The Foamex was scored to create a concrete slab effect out to the front.  A few cracks were carved in and some areas shaved to give the effect of subsidence.

"Excuse us citizen, we've had reports of a disturbance."

Everything was sprayed with Wilko grey primer, then touched up with Vallejo stonewall grey until the colour was fairly uniform.  A few extra details were added with silver for the pipes, window shutters and vents. Doors and some other vents were picked out with red and blue.

"We have a warrant to check the premises."

A wash of black ink/matt varnish/water was applied over the whole model, then dabbed off and streaked for weathering.

"What a dump. Looks like he has air conditioning though."

Various extra items of scenery were added, then brown tile grout and sharp sand was sprinkled around the edges of the building to hide the joins and bring everything together.  Some small shreds of my home-made scenic foam flock added a touch of extra colour.


"Not particularly hygienic."

Additions round the back included some 3D printed chemical drums and some scraps of paper. I also constructed some tiny cardboard boxes out of paper.  They were stained with some dabs of heavily diluted ink and matt varnish.

"Nothing round the back."

I added some of Ecaroth's "dungeon sticks" 3D printed wall sections to create a little storage area to one side of the building.

"Does he have a licence for these chemicals?"

Some more scraps of paper and some more 3D printed cans were added, but leaving space for troops to hide behind the walls.


"Hope you're not intending to fly tip these anywhere."

More bottles, jerry cans and a tyre stack add to the rubbish round the front of the building.


"That vent should be kept clear."

The cans were all painted beforehand, then glued in place. A few extra stains and streaks were added to some of them.

"So... you claim rats made all these holes, hmm?"

The front of the building is riddled with bullet-holes.  I crushed up some bits of cast plaster and sprinkled the fine debris on the ground under al the damaged parts of the building, then fixed it in place with a few drops of PVA/varnish and black ink. The ink soaked into the plaster, giving it a grey colour to match the building.  I also cut some tiny bits of stretched sprue and glued them down near the door.  Painted white and brown, they make ideal cigarette ends.  I used some suitable bullet-holed oil drums on the corner of the building too.  The little pile of boxes and cans to the right of the door is all cast as part of the model - fantastic detail!


"I'm not buying it.  I'm checking up top."

A small piece of paper from a magazine became a poster.  This certainly looks like a fun place!

"Fag ends, cards..."

The roof includes lots more cast-on detail such as cigarette-ends (the reason why I added some more out the front), training wires, a tyre, drink can and blanket/tarpaulin.  I added the fuel can and some playing cards.

"Wonder who won the game?"

The cards are just tiny bits of paper glued down, then dotted with red or black to give the impression of cards.  There's a vague attempt at a face card there too!

"Heavy smoker."

The photographs don't really show it, but gloss varnish was used in a few places to show leaks and damp patches, such as under vents and broken pipes.


"Someone's been up here too."

The roof incudes some badly cracked tiles, rubble and a broken TV aerial, plus a few more fag-ends.  I didn't add anything up here, the amount of detail was nice and I wanted to leave plenty of space to position a weapons team or a squad of troops.

"Been keeping a watch from here too."

The broken pipes give plenty of opportunity to experiment with streaks of rust and grime.

"Not much of a view though?"

The yellow lines were stencilled on using a sheet of paper and a Wilko "Bumblebee" yellow tester pot.

This is a really great model, super-detailed with loads of character.  I felt it deserved a proper scenic base to complete the aura of decrepitude and decay.  It was a chance to try out a few new techniques and improve some existing ones, such as the rust-streaking and using weathering washes.  The little sheets of paper, playing cards and cardboard boxes were fun to make too.

The original building, top right.