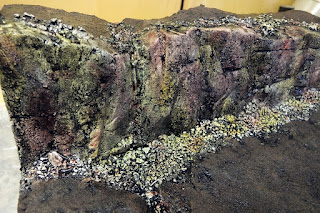
For the next stage of my photo backdrop, I painted the main ground surface with brown texture paint (burnt umber craft paint, fine sand, pre-mixed filler and some PVA).
I sprinkled some cat litter along the bottom of the cliff face to
represent fallen rock rubble. This was all painted white to match the cliffs.
I also filled the stream bed where the
flow of water will have washed away the sediment, leaving the larger rocks behind.
I sprinkled a small
amount of the cat litter along the top of the cliff too.
The cliffs were painted using the "Leopard Spot" technique using watered down craft paints. I started with a caramel colour and some burnt sienna.
The caramel was applied first, covering around 1/3 of the cliff face and rubble.
Next, the burnt sienna was applied over a similar proportion of the cliffs and rubble.
This always looks very garish at first!
I used a variety of greens to simulate the growth of algae and moss. These were heavily thinned to provide little more than a green tint.
The greens were applied down the cliff where the stream will be flowing.
With the base colours completed, the scenery was left for several hours to allow the paints to fully dry and cure.
Next it was time for some washes. I used acrylic matt varnish, water, a dash of isopropyl alcohol and some black and peat brown inks.
The ink wash was applied liberally across the whole piece of scenery. Always ensure you have your work surface protected, you end up with runs and drips, so a layer of plastic sheeting or lots of old newspapers are essential to avoid accidents!
The ink wash immediately improves the appearance of the rocks, toning down the bright colours and enhancing the texture.
It was at this stage that I decided never to use cat litter ever again. I know that some people say it's the best thing for rubble, but I found that it absorbed so much of the ink wash that it took almost an entire week to dry completely, especially in the bottom of the pool at the base of the cliffs. I think I'm happier just using sharp sand and other less absorbent materials.
Once the terrain had finally dried, I gave the cliffs a drybrush of taupe craft paint.
I overdid this stage and a lot of the subtle shading and colour variation seemed to disappear from the cliffs.
Looking more closely, the variation was still there, and it looked really good, so my initial worries were unfounded. It’s only meant to be a background anyway, so it is supposed to be fairly neutral.
The green staining around the stream down the cliff face had all but vanished, so this would need more attention later. The rubble looked good though, and blended in well with the base of the cliff.
I was also pleased with the loose rocks along the top of the cliff.
The stream bed looked just as intended, a bit bare along the edges but those would get hidden later when the base was flocked.
With the main painting completed, it was time to apply the finishing touches with some flocks…


No comments:
Post a Comment