Sunday, 26 February 2012

Supply Depot

I've been meaning to build some sort of supply depot for a while.  It can act as an objective for a small game, or just as part of the general scenery during a bigger engagement.


I have a huge supply of 1cm square pieces of 5mm foamcore which are the cut-outs from the windows of my desert village and other projects.  I've used some of these to form the stacks of crates.


The tarpaulins are PVA-soaked kitchen roll draped over the foamcore stacks.  The depot staff have used large wooden poles to weigh down the edges of the tarpaulins, these were made from bits of barbecue skewers.  Everything has been painted using Inscribe acrylics.
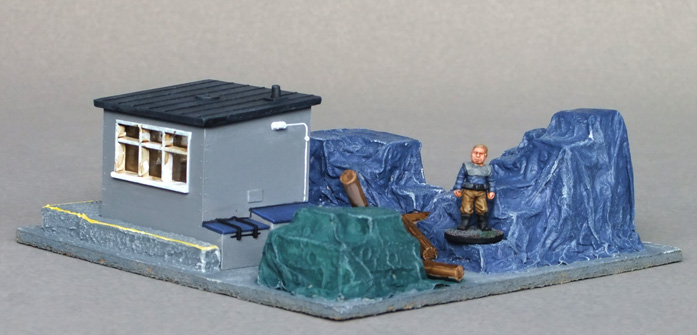

I've tried to make sure that the steps in the crate stacks are large enough for my figure bases to stand on (eg. GZG armed colonist and Rebel Minis contractor and gang member).


The little hut is a model railway building.  Being designed for HO/OO scale it's a bit large when compared to an average height 15mm figure (a GZG colonist in this case).


I solved the problem by creating a raised concrete step in which the hut sits.  It's just more foamcore scraps, I also shaved off the original lower door hineg and made a new one out of paper (it even has blobbed-on PVA screw-heads, though they're hard to see in this photograph!).


Tuesday, 21 February 2012

Desert APC conversion

 My latest conversion is this armoured personnel carrier, more cheap but useful goodness from Poundland.  There's another recent article about it on the Glue in The Carpet blog which I'm sure many of you will have seen, GJD is obviously much quicker at turning around his buys as I've had mine for several weeks and have only just got around to finishing it!


As has been mentioned on other blogs, this is a French VAB personnel carrier which comes in 2 flavours, 4-wheel and 6-wheel, the latter being primarily an export model.  I've already got a 4-wheeled version which featured on my blog in March last year, I've decided to go for a different colour scheme with this one.


The first thing to change was the weedy missile launcher turret which had a strangely positioned pair of skinny little tubes on each side.  After removing the screws to take the whole thing apart, I disassembled the turret and got rid of the missile tubes.  The replacement pods come from a Mechwarrior clicky figure (might have been a Jes II missile carrier or something like that - an excellent source of satisfyingly chunky missile pods!).  They were drilled & mounted on a cocktail stick that fitted snugly in the pivot-point of the turret.  Why use a cocktail stick instead of a bit of brass rod?  Because I can't find where I've put my pack of incredibly useful bits such as rod, wire, plastic girders etc, that's why!!


With it's huge wheels, I thought that this would be a suitable vehicle for desert operations on sandy terrain.  Colour scheme matches my recently painted NSL Power Armour, in fact I thought of it for the APC first but took so long to complete it that I felt compelled to try the scheme on the infantry while I was waiting.  Base colour is Humbrol 93 desert sand, Vallejo reflective green mixed 50/50 with the sand colour for the main camo stripes, plus Vallejo cold grey patches here and there.  The whole thing received a wash of Vallejo sepia ink with base colours drybrushed on top, followed by an all-over drybrush of Vallejo bonewhite to give a dusty finish.  Wheels have been left the basic sand colour rather than trying to tie in the camo - if you have stripes across a wheel it tends to engender a stroboscopic effect as it rotates, drawing the eye towards it rather than helping it blend in.  I know that out little model vehicles don't actually drive around and get shot at, but I still try to follow the principle if I can.


The last photograph shows a GZG armed colonist to give an idea of scale.  I only got one of these APCs at the time because I wasn't sure how it would look with the huge wheels.  I think it probably works OK (though I wouldn't like to try and squeeze out of those driver's compartment doors in an emergency), but as Pounland didn't have any left when I last visited, looks like this one is destined to be lonely!

Saturday, 11 February 2012

IMEC's latest acquisitions

The Interstellar Mining and Extraction Consortium have two more vehicles to add to their inventory...


These large dump trucks came from the local Poundland, painted in a hideous orange colour that was sprayed on so thickly that most of the detail was completely obscured - but I could see their potential!  After disassembly and 2 lots of paint stripping on the metal parts, the cabs received a grey spray undercoat while the trailer received white.


The body of the vehicle is Vallejo matt black with a Humbrol 32 dark grey drybrush.  The hopper is GW red gore with a Vallejo sepia wash.  The whole thing has been drybrushed with Humbrol 29 dark earth and GW chainmail to give it a suitably worn appearance.  I made a stencil for the IMEC logo and stippled through it with Vallejo black, then hand-painted the yellow slice afterwards.


IMEC would have liked to continue their red/black liveried theme throughout the vehicle, but health and safety law decrees that they must have the guard rails and steps in a bright, contrasting colour.  You can see the wear on the treads and by the door where the driver has been climbing in and out.


Hazard stripes were added to the rear mudguards.  Headlights and reversing lights are GW mithril silver, indicators Vallejo fire orange and GW red gore for the brake lights.  At some point I'll line the hoppers with clingfilm and pour in some plaster & sand to create removable loads for them.


A group shot of the IMEC gang.  They'll make good scenery for a mining colony and I already have a couple of scenario ideas in mind.  I think I need a few more crew though, plus more excavators.  That Mining Droid will have to work hard all on its own!  I'm thinking a 1/43 scale tracked digger should look huge and imposing if I convert it for a 15mm crew.

Tuesday, 31 January 2012

Power Armour


I've known for some time that my armies have been lacking in that most important of SF staples, Power Armour.  The figures have been sitting in my "to be painted" box for some time but all I managed to get partially finished were a few Critical Mass Games Kaamados Vivipara and Agaamids (of which more on another occasion...)


A dig through the collection of little polybags in the box provided me with a few human power armour figures who were purchased to help remedy this omission.  Various figures are part way through painting (with several test pieces complete), but these 6 are the first complete set I've finished.  They are Ground Zero Games' SG15-N03 Neu Swabian League Power Armour.  In the bag are a commander with sensor pack, 2 missileers with shoulder-mounted missile pods, a SAW gunner with under-arm gun mounting (reminds me of a GW Terminator assault cannon) and 2 standard troopers.  As often seems to be the case with the older GZG power armour figures, the guns seem a bit small and ill-defined, but apart from that I really like these figures (even if they have super-slim waists that a fashion model woudl die for!)


Base colour is Humbrol 93 acrylic matt Desert Yellow.  Camouflage stripes of 50/50 mixed base colour and Vallejo Reflective Green (it's an olive drab colour, not sure where the "reflective" bit comes in?) were added, I didn't want the green to be too sharp a contrast.  Edges of the green stripes had a smaller dab of Vallejo Cold Grey here and there.  Base was painted with Inscribe Acrylic Sand Yellow.  I was going to paint the back of the knee joints in a darker colour, but I rather liked how they've come out with the shading, so left them as they are.


Vallejo sepia ink over the whole figure including the base.  Humbrol desert yellow drybrush across the entire figure followed by Vallejo bone white.  Weapons are picked out with Vallejo Cold Grey and washed with Vallejo black ink.  Visors are GW red gore with appropriate highlights/shadows and finished with GW red ink.  The commander has received a matt black sensor dome over his left shoulder and the stalk on the right shoulder has a red lense which received the same treatment as the visors.


I'm pleased with the camo, it gives a rather subtle effect, exactly what I was after.  I admit that at normal viewing distances on the 15mm battlefield it'll just look a uniform dull greeny-yellow-brown colour, but as I spend far longer painting figures than actually playing with them, I don't mind!  Click on the pictures for a larger view, showing all the detail which will never be noticed during the games...

Wednesday, 25 January 2012

Special Forces ideas


I've decided that I need some special forces types for certain missions.
 
I do have a set of Rebel Mini's SAS, but they're more of an anti-terrorist or hostage rescue mixture of figures with gas masks and anti-flash hoods, armed mainly with pistols and SMGs.  The force I most commonly use in games are my NAC Marines from GZG, so I'm going to use them as the base figures.  The majority of their equipment will be the same as that carried by the regular troops, so there are only two main changes that I'll want to make to them:

1) Head swaps.  I'll be replacing all the heads with some of GZG's replacement heads, probably those which include night vision goggles.  I haven't decided whether I'll have 8 with goggles or split a pack so that 4 have goggles and 4 have something different.  I could give them gas masks, though I've also been considering some MPs.  If I get Jon's other pack of replacement heads I could use berets or something similar to help differentiate them from the other Marines.  Of course, I could just get the "NAC Marine in Berets" pack for my MPs, which would be a whole lot easier...

2) Weapons.  My special forces team will use the standard marine assault rifle, but with a large sound/flash suppressor attached.  I plan to cut off the existing barrel and drill a hole into which I will insert a thin piece of brass rod.  This rod will act as an attachment point for some brass tube to form the suppressor.  I could fix the tube directly onto the barrel as it comes on the figure, but I don't think that would stand up to much handling.  I don't want to be forever hunting for the loose suppressors rolling around in the figure case ready to glue them back on!


An artist's impression of the finished product.  I'm happy to report that the artist has been given the sack after producing this poor quality image.  Hopefully the physical result will turn out better than this (and without a curious greenish stripe along the bottom).

Colour scheme will need to be different from the normal troops, probably a dark grey/black so that they look suitably menacing.  If I go for MPs as well, they'll be painted to match the regular troops, but with one or two changes such as coloured shoulder pads to emphasize their
importance.  (I imagine they'd have coloured, elasticated patches they can pull over the armour panels, easily removed if they get involved in fire combat.)

Sunday, 22 January 2012

Desert Village

Well, after several months I've finally managed to finish off my Afghan-style desert dwellings.  These will be used in modern games, they'll also appear in the more arid desert regions on the colony world of Gordon's Gamble.


I started working on this back in May 2011, but work ground to a halt just after I'd applied the initial texturing.  This was mainly because I'm lazy and flit from project to project when I get to any difficult bits, in this case trying to create a dome for the mosque/meeting hall!


Here is the finished article - plastic ball former covered with cling-film received a papier-mache base layer followed by a coating of thick plaster of paris.  A good firm sanding smoothed it down and it was fixed to a foamcore roof with than cardboard edges.  Texturing helped bring the whole lot together and concealed any defects in the construction!


Windows are made of that mesh stuff you use for cross stitch, carefully cut to size and PVA glued in place.


The largest building, also the tallest.  The little canopy at the front is glue-soaked kitchen towel and cocktail sticks.


 All the roof sections lift off.  In this case, the top section is completely square so that you can position it 4 different ways.


Some buildings have stairs, others have ladders.  I imagine that this one has stairs inside to first floor level, then the little ladder to the roof.  Ladders are chopped up matchsticks and balsa scraps.


 All the buildings have received a thick coat of Dulux weathershield masonry paint which I hope will be long lasting and wear resistant.  The roof areas were painted in the sand colour first, then lightly stippled with the white, leaving dusty areas in the corners.


 I'm pleased with the end result.  The yellow matches our gaming club's desert boards, so they'll fit in nicely.

Saturday, 21 January 2012

GZG Free Cal-Tex

 Some more oldies from Ground Zero Games... the Free Cal-Tex.  As usual, click for larger versions of the images.


SG15-T01 is the standard pack, comprising squad leader, support gunner, RPG style missile launcher and 4 riflemen.  The final figure is kneeling with a long-barrelled variant of their standard assault rife.  You could use this as either a sniper rifle or another SAW, though you'll see that it's slightly different from the standing gunner's weapon.


  I've already reviewed this pack back in January 2011, so I won't go into too much detail here.


 This time I've gone for a blue/grey colour scheme as suggested by Jon at GZG.  The blues are Humbrol 104 Oxford Blue base with 24 Blue highlighting and a final light drybrush of GW enchanted blue.  The grey is Vallejo 72.050 Cold Grey, black ink wash, drybrush of base colour then highlight of Vallejo 72.049 Stonewall Grey. Visors are Vallejo 72.051 black (not sure if it's supposed to be gloss, but my bottle is so it's just right!).  Weapons are Humbrol 33 matt black with a Humbrol 32 dark grey drybrush.


I also have a pack of kneeling/prone troopers.  These are actually slightly smaller than the first pack, more similar to GZG's New Israelis in size.  I realised that I haven't taken a comparison shot with the kneeling figure from the original group, I shall have to remedy that and add it to this post.  They're still in scale within the pack, so the weapons, armour etc. are also proportionally smaller.  This means that they look fine on their own, but the two sets might look slightly odd mixed on a base!