Saturday, 18 July 2020

GZG SWAT Team

While my Colonial Security have Spider Droids for really heavy support, there are times when you need a lighter touch (and less official paperwork!) but something that's still a step above the basic beat cops. 

SWAT team next to normal security trooper.

I got the Armored Police SWAT command/specialist set from GZG to fulfil this role.  This pack has the mix of figures I want, 4 pistol-armed in 2 poses, 2 with battering rams plus a couple of techie/officer types (the latter not pictured yet).

SWAT team rear view.

These are basically the AD Police who originated in Bubblegum Crisis, though I haven't used that exact colour scheme.  My SWAT team have the same grey trousers and blue jackets that my normal security troopers wear.

"Police!  Drop your weapons!"

I'd grade these a B+.  The detail is nice and crisp, though it sould do with being a little better defined around the respirator cannisters and helmet area.  Some of the creases on the trousers seem unnaturally sharp but there wasn't much flash to clean up.  The pistol-aiming poses could be a little more varied, but overall I'm quite happy with them.  I'll probably get a pack or two of the assault rifle/shotgun & grenade launcher armed SWAT troopers in due course.

Tuesday, 14 July 2020

Sci-fi "Tech Crate"

I bought a set of Sci-fi "Tech Crates" a couple of years ago at the local Diceni games show.  Although designed for 28mm gaming, I thought they looked like they'd be good for 15mm as electrical equipment housing, generators/batteries, vehicle engine packs etc.  This one is just a test piece to see how it looks and I'm very pleased how it turned out.


Over a Wilko grey primer base coat the casing has been painted Vallejo reflective green and the metal parts GW chainmail over a black base coat.  A 50/50 wash of Vallejo black ink and Future floor polish toned down the metal to a dull sheen.


This was also a chance to try out some "chipping" techniques, something I haven't done much before.  Vallejo Russian uniform green was used to show where the darker top colour had scuffed/flaked away around the edges of the casing.  This was followed by some cheap Inscribe acrylic craft paint burnt umber for an aged, rusty colour.  Smaller specks of Inscribe burnt sienna were used to represent fresher, brighter rust.  An HB pencil was rubbed along some of the exposed edges where the rust has been rubbed back to the bare metal.

Lots of switches! Especially good for making
it look like 15mm equipment housing.

It still didn't look quite right so a rummage through my decal folder produced a variety of extra details, some WWII vehicle markings, a couple of yellow panels which I think came from a M1 Abrams kit and the circle and triangles which are from QRF.  These are all waterslide transfers and were affixed with Vallejo decal medium.  Chipping was re-applied where required to blend the decals in.  Next time I'll add the decals before weathering rather than as an afterthought!


All in all, This has come out very well, it's the ideal size for a piece of scatter terrain and could even be a useful game objective for something like Rogue Stars or Black Ops:
  • It's small enough that one team could be trying to steal it
  • Perhaps they have to get to it to sabotage power to the enemy base
  • Maybe they need to turn it on to reactivate the base force-field before the local wildlife tries to eat them!

Friday, 28 February 2020

Sheringham Viking Festival 2020


Saturday 22nd February saw the culmination of the Sheringham Viking Festival on the North Norfolk Coast.  This year I managed to have my camera with me so here's a few of the things that happened during the day...

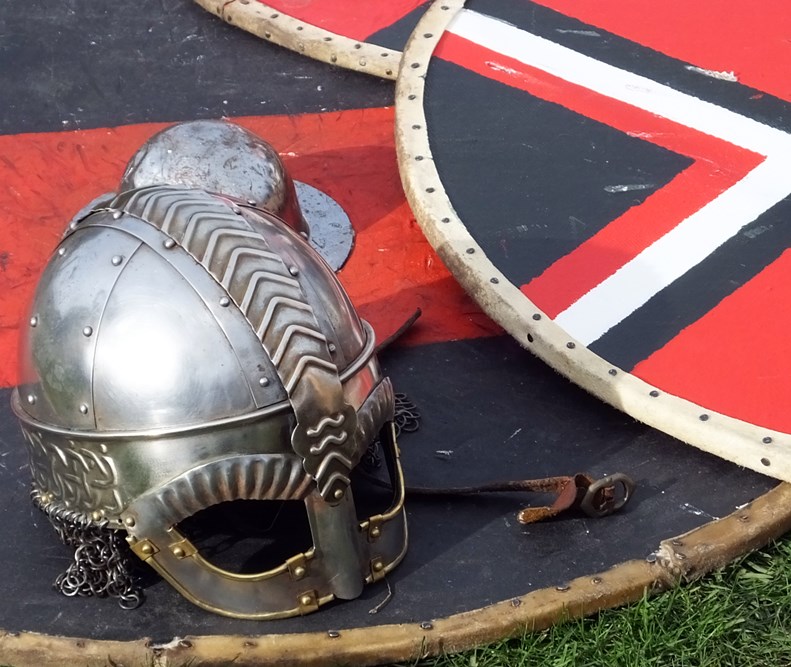
Things started at the living history encampment on the cliffs, where one could test the weight of an axe or sword, try on a helmet or just marvel at the magnificent hand made craftwork such as drinking vessels, armour, clothes and fabrics. 

Even Vikings enjoy the odd waffle stick...

A nice range of helmets.

Hand carved drinking vessel.

One of the numerous banners.

Musician.

Discussing the coming battle.


There were a couple of battles on the beach during the day.

"We shall fight them on the beaches..." etc.

Shield wall

Chaaaarge!!

Viking woman captures image of battle on 'phone to e-mail back to the fjords...


The day ended with a torchlit procession through the town and a ceremonial burning of a longship on the beach.


Monday, 24 February 2020

Dungeon library - Mantic terraincrate review

One thing that my Hirst Arts dungeon has been lacking is a decent library.  All evil wizards need a good supply of magic spell books, gazetteers, atlases, arcane manuscripts etc.  I've been thinking about constructing one for years but haven't had a chance to sit down and do all the cutting out of balsa for the bookcases, cardboard for the books etc.  Fortunately Mantic Games have come to my aid with their Terrain Crate library, a set of which I recently picked up along with their torture chamber furniture, both for about half price.
Painted above, from the box below.
The bookcases are a hard plastic and come pre-assembled and pre-painted in a dark brown.  Mould lines are minimal but they still benefit from a quick clean up with a razor blade or very sharp craft knife.  I gave mine a good scrub with warm water and washing up liquid before painting in my usual "dungeon wood" colour scheme.

A small library.

The set include 2 complete sets of bookcases (3 wide, 1 narrow, 1 corner), a desk, pile of books and a ladder.  The torture set includes 2 complete sets of an iron maiden, trolley of equipment, rack, table, coffin, sarcophagus and skeletal remains.
Book cases and desk.
The bookcases have nice chunky detail that takes drybrushing well.  Although I repainted them completely, a quick brush of light brown would be sufficient if you wanted a fast, easy improvement.

Torture equipment and cupboard
Some of the torture equipment is a little fiddly and needs to stand in hot water to straighten out slightly warped legs etc.
Ready for the next victim!

Detail is excellent, especially on some of the torture equipment.
A few ominous stains on that wood...

Due to the moulding process, there isn't much recessed detail, eg under manacles and chains, but it's probably tougher than resin would be and lighter and cheaper than metal.

Cupboard and shelves.

Bookcase.


The books are varied in size.  Although they don't have any spine detail, it's easy to add some with a dab of gold paint.
More bookcases.

I'd give the library set a B+ (good detail, comes ready-assembled and painted but quite chunky and a few mould lines to clean up) and the torture chamber set a B- (also excellent detail but mould lines again and also some warped legs on the rack, turture table etc.)

Sunday, 26 January 2020

Snow Trac

A few years ago I spotted this Snow Trac at the Norfolk & Suffolk Aviation Museum in Flixton. 

Snow Trac

Snow Tracs were used by NATO in Norway and I think they'd be a good addition to my mid-1980's Action Force collection.

Snow Trac rear detail

The Royal Marines version was very light weight, with the fixed cabin replaced by a canvas tilt.

Information panel at Flixton museum.

They could easily be fitted with a WOMBAT recoilless rifle for anti-tank work.  Incidentally, anyone who watched the recent His Dark Materials BBC TV series may recognise the Snow Trac as a vehicle the Gyptians had in their convoy to rescue the children from Bolvangar (though without the gun!).

Snow Trac in use with an L6 WOMBAT recoilless rifle.

A trip to the local car boot sale this morning furnished me with a matchbox Snow Trac for the princely sum of 50 pence.  It's slightly over-sized but not by much and to be honest, how often do you see one driving down the street to be able to compare it to a person?

Snow Trac in the snow.

I'll need to whip up some tracks for it but that shouldn't be too hard.  Royal Marine Snow Tracs did not have the fixed cabin but I'm not planning on fitting a WOMBAT so I'll just add a bit of stowage and leave it at that.

That man in blue should be wearing a hat in the cold weather.

I'll need to bend the front back into shape slightly and the tow hook and part of the rear equipment rack but should be fairly easy.

Won't get far without any tracks!


Some paint stripper or a polish with a steel brush and some wire wool should get it ready for an undercoat and a suitable snow camo scheme.

Saturday, 14 December 2019

Ikwen Uprising kickstarter

Very late (apologies) but I thought I'd better give a mention to Eli Arndt's Ikwen Uprising Kickstarter.  This is a great range of 15mm low-tech aliens.


https://www.kickstarter.com/projects/485545784/loud-ninja-games-the-ikwen-uprising-redux

Only 8 hours left as I write this and it isn't quite funded yet so if you read this and think you're interested, get over to Kickstarter pronto!

Friday, 13 September 2019

Desk Raiser Buildings


We've been having a massive clear out at work and among the piles of rubbish and recycling were these desk raisers.  You know the sort of thing, you stick them under the feet of your desk to make it a bit higher if the built-in adjustment isn't sufficient.  Anyway, I saw these and instantly thought "They'd make good 15mm buildings" which is possibly rather sad but there we go.

Some will need a bit of a wash because they're covered in crumbs, coffee splashes and bits of fluff but once that's done they'll receive some windows and doors and perhaps a few roof-top gubbins. They're made of a very sturdy, rigid plastic that should take paint and glue well.  What's more, they stack very neatly.

 
Windows will be some of Antenocitis Workshop old 15mm sci-fi ones, now sadly out of production.  I'm going to heat them and hold them in place so they conform to the curve of the desk-raisers, then glue them in place once they're cool.  I've had them for ages and never got around to using them so it will be good to finally justify their purchase!  Doors are also Antenocitis Workshop OOP 15mm resin items and I'll either file a flat patch into the curve of the desk raiser or possibly just glue the centre strip of the door onto the curve, then fill in around the edge of the frame with epoxy putty.


Roof gubbins will include aerials/comms dishes plus an assortment of pipes and boxes made from guitar strings, wire, small lego bricks.  I also have some OOP AW 15mm hatches or ventilation fans which will sit nicely in the middle of the roof, I've already glued a couple in place.
And there we are, 8 super-budget offices/homes from recycled junk and a few add-on items.