Monday, 12 August 2013

Red Shadows

Something I've been planning for a long time is the recreation of the Red Shadows in 15mm.  "Who are the Red Shadows?" many of you may ask.  Red Shadows are brainwashed troops who selflessly devote themselves to the service of their mysterious master, Baron Ironblood.  They were the enemies of Action Force (which later merged with GI Joe) and wore a sinister red uniform with black accoutrements.


My standard troops will carry an assault rifle, squad leaders an SMG, special weapon troopers a machine gun or a missile launcher (slightly larger and more powerful than a standard LAW). All carry grenades as standard. Because of their brainwashing, Red Shadows are fearless in battle, they have high confidence and high morale, rarely retreating - and only then because of reasons other than their own safety.


As you will no doubt have guessed, there are WWII German infantry, late war troops with the MP44/StG44 assault rifle.  I've modified the helmet with some fine white milliput epoxy putty.


 The original Red Shadow figures used a "German stormtrooper" as their basis, the only difference being the altered helmet design and the new colour scheme.  They still carry the stick grenades, canteen and cylindrical gas mask case of the original figure.

With his big brother...


I've opted for a GW red gore base coat with Vallejo sepia ink wash for shading.  The black parts (boots, webbing, weapons) have been drybrushed with Humbrol 32 dark grey to make the details a little more visible.  Other markings have been painted very carefully in white using an extremely thin brush.  I wasn't sure how well the skull and crossbones marking on the helmet would come out but it's worked fine (even if I missed out the black eye sockets).

Skeletron robots add extra firepower

The skeletrons that appeared in a previous article will form expendable robotic auxiliaries for my Red Shadow army.

Skeletron with little friends.

I have 3 packs of troops to paint as Red Shadows, firing and advancing poses with StG44s plus officers with MP40s.  I shall add some support weapons with another order.  All I need to do now is decide on some vehicles.

More Peter Pig ready for painting.

Sunday, 11 August 2013

Peter Pig AK47 professionals

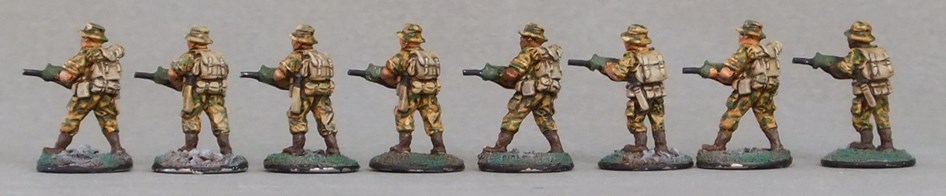
 It's taken me a very long time but I've finally managed to get some Peter Pig stuff painted.  I liked the look of the professionals from Peter Pig's AK47 Republic, this is pack 160 "Professionals standing" which I bought to sample the range.  As always, click on the pictures for a larger image.


 I'm really impressed with the level of detail on these figures.  They're all armed with an FN FAL rifle, you can see the little carry handle folded over the side of the weapon.  All have a variety of pouches and backpacks with bed rolls attached.  Some even have grenades strung on their webbing.  I think they'll be ideal for a 1970/80s set "imagi-nation" campaign in Africa or South America.


 I've opted for a 2-tone camo scheme for desert/grassland.  Paints are a mixture of Vallejo model and game colours.  Base colour is 70977 desert yellow with 70850 medium olive camo splodges.  Webbing and backpacks are 72061 khaki, boots are 72045 charred brown.  Flesh is dwarf skin, charred brown or beastly brown.  The rifles are black with 70890 reflective green furniture.  The whole figure has a wash of diluted sepia ink.  Drybrushing is desert yellow for the fatigues and khaki for the webbing, the webbing received an extra highlight of 72034 bonewhite.


Little details to note in the last photograph, from left to right:
Figure 1: Detail on the straps and webbing.
Fig 2: General view of the camouflage, also a grenade on the chest webbing on the right (hard to see!)
Fig 3: Knife and webbing pouches.
Fig 4: More webbing, bellows pockets on the legs.
Fig 5: Backpack detail, also water container on the webbing.

I shall certainly need to get a few more of these!

Saturday, 3 August 2013

Budget aerospace fighter

Found this nifty little F16 kit in the local "around the £" shop this morning.  To be honest, I wasn't expecting much but I thought it might be useful for construction a crashed aerospace fighter objective marker.

"Based on" the General Dynamics F16 Falcon

 I was pleasantly surprised by the contents, a neat injection moulded styrene kit.  The instructions obviously haven't be written by anyone who has actually seen the kit (let alone assembled it - if followed, correct assembly is actually impossible!) but hey, it only has 8 parts so it's not actually very hard to work out.

Assembly step 1: throw away the instructions!

 It comes on 2 sprues (or "sheets" as the instructions refer to them!).  No mould release marks or sink marks, very well cast.

Assembly step 2: open packet and throw away awful stickers!

A couple of minutes with cutters and a craft knife and it's all assembled.  No undercarriage or other small details but it has got engraved panel lines which I thought was quite impressive for such a cheap kit.

Assembled and ready for action.

I'm very pleased with the end result, a great little fighter for a tiny price.  It won't need much work to "sci-fi" it up and turn it into a crashed 'plane.  If you wanted to create an airfield for games, these could cheaply and easily provide some extra scenery over which to fight.
 
15mm figure for scale.


Friday, 26 July 2013

Dungeon of the Dwarves of Chaos

 Busy busy busy... almost 2 months since I last managed to post anything!  Time has been filled with organising Scout camps, building additional dungeon for the games club and more.

What follows is the most recent outing for the dungeon.  Chaos Dwarves (seldom encountered before) are up to no good and are building some sort of mysterious pumping station in the depths.  What lies at the heart of their nefarious scheme?  Best send some adventurers to find out...

Sir Egbert the barbarian has obviously been on a course of steroids since the last adventure and is now far taller and wider than ever before.  His first encounters in the dungeon (Beastmen) are unimpressive but we eventually worked out that he needs a good run up before he starts doing damage.  Soon the Beastmen are slain and a search of the room reveals a scroll on the bookcase that warns of overindulging in healing potions.

Sir Egbert the Barbarian confronts the Beastmen
Venturing down a side passage, a mysterious pool of ooze is discovered.  Rather than risk falling in, the adventurers decide to follow a different route.

The Elf contemplates leaping the pool of slime.
Falstaff the dwarf finds a bridge that leads deeper into the dungeon.  He finds and makes safe some pitfall traps but decides to wait for the others to catch up before going any further.

Falstaff the Dwarf checks the bridge for traps.
Sir Egbert takes the lead across the bridge.  The wizard stays safely in the middle of the party where his spells will be most useful.  At the end of the bridge, tunnels lead both left and right.

Sir Egbert crosses the bridge.
Disaster!  Sir Egbert plummets into a pit trap and is beset by a horde of Chaos Dwarves.

Aaaargh!  Sir Egbert falls into the pit trap and is attacked!
Meanwhile in the opposite direction, the wizard opens a door to discover a mighty Chaos Sorcerer!

The Chaos sorcerer
The sorcerer guards a treasure chest of some kind, but with Sir Egbert fighting for his life elsewhere, the wizard cast a wall of stone to block the passage and heads to the rescue.  The evil sorcerer can wait until later...

The Chaos sorcerer again.
Sir Egbert and his companions are battered and weary but have fought past the trapped staircase.  Now they face a Chaos Dwarf champion and his bodyguards who defend some sort of pumping station.  Once they are slain, a trickling sound is heard down a nearby corridor.  Our battered and bloodied heroes limp to investigate...

Chaos Dwarf champion in the pump room.
A healing fountain!   Now, what did that scroll say..?

The fountain of healing.
Falstaff drinks and heals slightly.  He drinks some more and falls into a deep slumber from which none of his fellow adventurers can rouse him.  The Chaos sorcerer has worked his way around the maze (falling into the pit of ooze on the way and losing a body point) and is killed by our heroes after a brief struggle and a clash of magics with the adventurers' wizard.

Falstaff the dwarf drinks too deep... and falls into eternal sleep.
Meanwhile the halfling has decided to sneak back to the Chaos Sorcerer's lair.  A spell from the wizard enables him to sneak through rock and he enters the room and opens the treasure chest.  AAIIEEEEE!  Traps hidden within the treasure chest fire poisoned darts into him and he collapses lifeless to the floor.  A Beastman lurking in the nearby Nurgle shrine comes out to investigate and is soon tucking into this unexpected, fresh feast that has appeared. Yumm!

The halfling thief just before he was struck down by traps in the treasure chest, then eaten by the Beastman.
Our remaining heroes reach their final encounter in a shrine to Khorne, worshipped by many Chaos Dwarves.  The room seems strangely empty but an aura of menace hangs in the air. The Elf slits his finger and drips blood upon the altar between the piles of skulls.  In a flash of light a Bloodthirster appears and a mighty battle ensues!  The other heroes try to help but their weapons have no effect against the Greater Daemon.  Only Sir Egbert's enchanted blade will harm it!  The magical Spirit Blade does its work and after a hard fought battle the Bloodthirster is finally slain, banished back to the Warp for a thousand years and a day.

Shrine of Khorne (work in progress!)
And so... the dungeon is conquered, the evil of the Chaos Dwarves defeated - for now.  But wait!  What is that faint scratching noise?  It comes from the room next to the Khorne shrine, the room that the heroes failed to explore before the final encounter.  Opening the entrance they discover a trapped wizard, one who would have been a great aid to them against the Bloodthirster and who would have enchanted their other weapons, allowing them to damage the Daemon!  Oh well, live and learn...

The dungeon in its entirety.
Another room the heroes didn't visit until later was the Nurgle shrine.

Shrine of Nurgle (needs more slime?)
They also found a fabulous healing gem, fortunately just before the final encounter with the Bloodthirster.

The fabulous healing gem.
A fun game again, I did tone down the Bloodthirster slightly to avoid a complete slaughter at the end of the adventure - he would have been rolling 10 dice to attack/defend but I had him rolling only 6 for each.  It was still a close run fight though!

Still to come on Mini Metal Mayhem... more 15mm goodies including reviews of Mad Mecha Guy scenery, quick and easy desert buildings from bird feeders, Red Shadows, Peter Pig, more Matchbox repaints and possibly (if I ever find the stencil I want to use) the completion of the APC rebuilding project!

Saturday, 8 June 2013

Catacombs of Chaos

My next Heroquest adventure using Hirst Arts dungeons...

Catacombs of Chaos - goblin hall and entrance stair at the top.
Catacombs of Chaos - goblin hall at bottom.  Wizard's lair at the top right.
6 fearless adventurers braved the depths of the Catacombs of Chaos, Sir Egbert the barbarian, Falstaff the dwarf, the dark elf, the forest elf, the dwarf miner and the wizard.  At first it appeared a very simple task.  Skeletons and zombies attacked the moment they entered the old ruined hall on the hill but all were easily dispatched.  3 of the adventurers had already bested the Maze of the Minotaur and laughed merrily as they slew the undead with gusto.  Alas!  All too soon their less experienced companions succumbed to their own enthusiasm.  Dashing unthinkingly down a side passage to attack a zombie and skeleton, the dwarf stumbled into a pit trap.  As he lay stunned at the bottom, the zombie lurched into view above and thrust its rusty blade into the dwarf's head!  Being too short to fight back from the bottom of the pit, the dwarf hauled himself out of the opposite side and limped back to his companions.  The wizard was equally unlucky.  Caught up in the excitement, he failed to use his magic, instead flailing ineffectually at the zombie with his dagger.  Needless to say, he came off worst.  Fortunately the dwarf had recovered his wits and was able to help defeat the zombie.  The skeleton attempted to leap the pit trap but failed, dashing itself to fragments at the bottom of the hole.


The remainder of the party ventured along the opposite path, slaying zombies and skeletons left, right and centre and deactivating traps as they went.  As they approached the end of the corridor, the source of the undead was revealed - an evil Necromancer!  Fortunately he proved a particularly inept Necromancer and was easily defeated by the adventurers.

Hurrying back down the corridors, the fleet-footed elf moved into the lead and was first across the bench the group laid over the pit into which the dwarf had previously fallen.  Sadly the Elf paid no more attention to checking for traps than the dwarf, and fell down a second pit on the same stretch of corridor.  Luckily he fared better than the dwarf, managing to smash the ankles of a skeleton before it could impale him upon its scythe.

The last few undead were easily defeated now that their master was lost.  Now that the danger was past, the Elf reconsidered what he had seen down the pit - perhaps some sort of steps, leading downwards.  Lowering a lantern down, the party saw that there were indeed steps - all they had faced so far was but a distraction - this was the entrance into the dungeon proper...

Edging down the crumbling stairs, the adventurers found themselves in a large hall - obviously a goblin barracks judging by the number of them who screamed their anger and ran to attack.  A general melee ensued, several goblins meeting the warriors in hand to hand combat but two hanging back and using their short bows to dangerous effect.  usually easy to defeat, the goblins here proved dangerous foes and several of the party were severely injured by the time the last goblin lay dead in a pool of its own green blood.

A shrine to Nurgle, lord of decay was found just off the goblin barracks and the sorcerer and Chaos champion here almost brought about the downfall of the party.  Teamwork carried the day for our heroes and down a nearby passageway they discovered a fountain of healing which cured all their injuries.  Nearby was a sealed metal door.  No handle or switch was visible and it resisted all attempts to break it down.  A switch must be concealed elsewhere in the dungeon.


Deeper into the dungeon they faced beastmen, Chaos warriors, Chaos thugs.  At the Chaos shrine (the room with the 8-pointed Chaos star on the floor) they found a great mage of Chaos.  Before they could slay him he escaped in a flash of light.  Venturing round an alternative route, the Dark Elf and a Dwarf encountered fearsome beastmen and all too soon the Dark Elf lay slain upon the ground!  The dwarf paused over his companion's unmoving body - was he trying to heal him?  Perhaps saying a quiet prayer for his departed friend?  Nope, he was stripping him of weapons and treasure before trotting off to rejoin the rest of the party!  Meanwhile in the Chaos shrine, the heroes had found a potion of healing.  They glanced down the corridor where the pitiful, crumpled body of the Dark Elf lay.  Then they chuckled and swigged the potion down themselves!

Falstaff the dwarf took the wizard to explore another corridor, entering a small room with stairs leading up to one side.  The stairs took them over a bridge and into an entrance hall, fresh air blowing in from outside.  2 Chaos dwarf sentries lay in wait, armed with crossbows.  The wizard swiftly cast sleep upon one, rendering him harmless.  The other was soon slain by Falstaff.  Having used few spells so far, the wizard decided to use his abilities once more, casting Treasure hoard, allowing him to draw 3 treasure cards instead of the usual one.  Unfortunately the three cards drawn were all wandering monster cards and 3 concealed Chaos Thugs leapt to the attack!  Though eventually defeated, the surprise attack of the Thugs left both heroes injured.

Battling their way down the corridors they finally reached the end chamber (red & yellow decorated squares in the centre of the room) where they finally slew the wizard, though not before he had blocked them with a wall of flame and cast madness upon Sir Egbert, sending him capering insanely back down the corridor and away from the fight.

Stepping over the wizard's corpse, they reached into the hole beneath a Dragon's skull and tripped a switch.  Far away, a metal door could be heard grinding open.

Dashing back through the dungeon, the heroes faced their final challenge, a Cockatrice!  Sadly for the DM, the Cockatrice proved a less than worthy foe and before long the party were wiping the sticky ichor from their blades and dividing up the monster's treasure hoard.  They also relented and gave the Dark Elf a trickle of healing potion.

As DM, the game had a number of highlights - the dwarf falling down the pit trap and the elf falling into another pit down the same corridor... the wizard managing to pick all 3 wandering monster cards from the treasure deck after casting his treasure hoard spell... unusual die-rolling meaning the heroes almost getting wiped out by the feeble goblins right at the start of level 2!

Saturday, 1 June 2013

I need more buildings! (Part 4)

 Gosh - it's been a month since I last managed to post anything!  I've been busy preparing for Scout camps and other events, also beavering away casting, sticking and painting plaster blocks for my Hirst Arts Dungeon so that we can explore level 2 at the Old Buckenham Bone Crushers this Sunday!

I did find a couple of hours to finish off the desert ruins I started back in January.


I found a good packet of Javis scenics "autumn grass" which is just right for parched desert grass.


Buildings have been painted with a thick layer of PVA + filler with a top coat of masonry paint to seal it all in.  I've been pleased with how hard-wearing my other buildings using this technique have turned out to be.


It's also been months since I've managed a game of anything in 15mm so I must try and get one in soon!

Wednesday, 1 May 2013

Another use for Mad Mecha Guy watchtowers

 Another possible use of Mad Mecha Guy watch towers would be to use one as the basis for a water tower.


I've cobbled this example together using an old paint pot and a drinking straw.  If I was going to build a permanent one I'd try and find a slightly smaller pot to go on the top.


Useful for scenarios...

Destroy the water tower!  Deprive your enemies of water by destroying the tower - fight your way to it and attach explosive charges to the tower legs - or perhaps you can destroy it from a distance using missiles?

Poison the water tower!  Fight your way to the tower and climb it to pour poison/mutagens into the supply.

Steal the water!  Your troops are running low on water and a raid on this water tower might save their lives.  Spend a number of turns in contact with the base of the tower while you fill water containers, earn more water counters (victory points) for every turn, but make sure you escape before enemy reinforcements arrive.  Make some water markers before the game - paint some spare jerry cans or something similar.  If you have appropriate models, the mission could be to use escort vehicles to protect a water tanker.