With the rocky plateau completed, it's time to think about some extra detail
on the industrial structures. Some pipes are easily made using a few of
the snap-off ends from COVID swab tests. These are a fairly soft
plastic that can be heated for a couple of seconds over a candle and
bent into shape.
| Bending the COVID swab sticks into shape. |
I made a range of shapes designed to fit on and around the Robotix pieces.
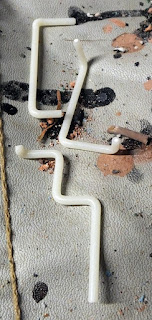 |
| "Pipes" ready for fitting. |
Other
useful parts come from laser-cut MDF building waste. All sorts
of interesting shapes in here that have been cut out from windows and other structural
elements.
| Useful cut-outs from laser-cut MDF scenery. |
Plastic coffee-stirrers, bits of electrical wire, plastic packing strips, pieces of coat-hanger, plasticard scraps will all find a use...
| More items from the bits box. |
A couple of Lego dish antennae and some technic parts fit neatly into the Robotix and can provide communication with the outside world.
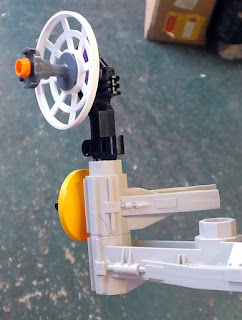 |
| Lego dish antennae and Robotix. |
Lego
radar dishes are really cheap (i.e. 1p each plus postage) if you order
them from somewhere like Brickowl or Bricklink and they are great for
adding extra detail on a model. After filing/sanding off the "Lego" logo wherever it might show, the various parts were superglued or polycemented together. Some MDF scraps were added as platforms, brass wire and fine steel wire for electrical cables, small pieces of 3D print supports, plus the previously mentioned COVID-test pipe sections.
 |
| Lego is a cheap and easy source of bits. |
After a black spray undercoat, patches of burnt umber were applied across most of the model, then some burnt sienna in smaller patches to give a good rusty colouration.
 |
| Rust colours applied. |
The sections where glue will be applied have been left free of paint to allow good adhesion.
 |
| Rust colours applied. |
A heavy drybrush of silver give a weathered metal look, with plenty of rust remaining in all the recesses.
 |
| Silver drybrush over rust colours. |
 |
| Silver drybrush over rust colours. |
 |
| Cable detail. |
All parts were given a couple of coats of Pledge/Finish floor polish to give a clear, tough coating. Experience has shown that without this, the scrubbing during the later stages of the chipping process can wear away the silver paint and sometimes the rusty colours too.
 |
| Silver drybrush completed. |
For my "chipping medium", I have just used an old tube of toothpaste. You can use Marmite instead (other brands of yeast extact are available...) but I prefer the fresh minty smell of toothpaste.
 |
| "Chipping medium" - or toothpaste as most know it. |
The toothpaste is dabbed on with a scrap of sponge, making sure to get all the edges where the paint would get worn.
 |
| Aplying the toothpaste with a sponge. |
Using toothpaste means that it's easy to see where you've already applied it.
 |
| A range of big blobs and smaller patches. |
It's important to make sure the blobs are fairly large. If they're too small, they don't always come off when you scrub later.
 |
| Tower section ready for painting. |
I decided to leave off the hair-curler cage around the chimney. The fit wasn't quite as good as I'd have liked and I thought it would probably keep getting knocked off during games.
 |
| Platforms and antennae ready for painting. |
I applied a good coat of toothpaste around the edges of the little MDF platforms. It was particularly important to ensure these got a good coat of varnish earlier, otherwise they'll soak up lots of water and disintegrate during the scrubbing stage.

As soon as I'd finished dabbing the toothpaste on, I quickly grabbed a rattle-can of cheap white undercoat and gave the pieces a good spray from all sides to ensure good coverage.
 |
| Spray painted white. |
I waited until the paint was touch dry so I wouldn't leave fingermarks, then prepared a tub of warm water and an old toothbrush.
 |
| Warm water ready to scrub off the toothpaste. |
After a quick dunk in the water, the parts are given a good scrub with the toothbrush.
 |
| Scrubbing in progress. |
If all goes according to plan, the paint will flake away where the toothpaste is, revealing the metal and rust colours underneath.
 |
| Rust/metal starting to show through nicely. |
The process was fairly quick all over and the pre-varnishing prevented too much of the underlying colours washing off.
 |
| Antennae looking good. |
The MDF platforms survived with no problems. All the layers of paint and varnish hide any fibre patterns and they have a very good battered metallic finish.
 |
| MDF platform hasn't absorbed the water. |
The silver paint has worn off in a few places but the underlying rust cours have remained intact, giving a satisfyingly distressed effect.

Water pistol, MDF scraps, 3D print supports, coathanger fragments and COVID swab pipes are brought together into a uniform whole through the painting process.

The parts were Gorilla-glued into place and the top of the rocks were coated with PVA and sprinkled with various green flock colours. Some soil and tile grout was used to create paths and worn areas.

The entire top was doused in watered down PVA & matt varnish to stick everything firmly in place.

Assorted waterslide transfers have been used to add a bit of colour and interest. Space marine tactical arrows have been used to indicate flow direction for pipes and the "TRANSFER" comes from the title block of the sheet - never forget to check whether the transfer numbers or titles also have carrier film, they can all come in very handy.

Other transfers come from some old Space Ork transfers, a Gundam sheet and model aircraft.

The door and ladders were painted with burnt umber and burnt sienna and drybrushed silver. On the ladders I concentrated the silver drybrushing in the middle of the rungs where feet constantly wear them, but rustier towards the edges. A few rust streaks were added running down the cliff where the supports are attached.

If you look at the dish antennae closely, you see they're Lego, but from a distance they're great.

This was a satisfying structure to build and will come in very useful, either as an objective in its own right, or as a piece of secondary scenery that provides plenty of potential sniper perches.


Great tutorial. The end result is very pleasing (in a distressed/glad I don't own the facility sort of way).
ReplyDeleteThank you! Yes, not the sort of place I'd want in real life either. My wife constantly grumbles about the fact that all the scenery I make seems to be so run-down and grotty...
ReplyDelete