Sunday, 7 August 2011

Cargo Droid

This cargo loading droid has been sitting in my "works in progress" box for months, just waiting a few finishing touches. Here it is in action in the cargo bay.


I'm sure you recognise its origins! I found a couple reduced in Tesco one day and thought they'd come in handy.


A coat of light grey with a black ink wash, bare metal parts are blacl with a burtn umber/burnt sienna ryst patter applied, then drybtushed WG chainmail.


Laura (the wife) says that he still looks to cartooney - it's the droopy eyes that do it!


All the same, it'll make a good bit of cover for a shoot-out at the starport. I might make a few alterations to the other one.

Scenery from Hirst Arts starship wall & floor moulds, crates from Hirst Arts cargo bay mould. Very handy for 15mm as well as 25/28mm scale!

Friday, 5 August 2011

Warhammer or Tomahawk - take your pick!

I've finally got around to painting my giant robot - either a 70-ton BattleTech Warhammer heavy BattleMech or a Robotech Tomahawk Destroid Mecha depending upon your point of view.


It didn't look very impressive when it arrived from e-bay, but I could see the potential...


It's going to join my OUDF forces - see the trooper for scale.


After a spray of dark grey car primer, the base coat is Humbrol acrylic 75 matt bronze green, ighlighted with 86 olive green.


Camo stripes are Humbrol 33 matt black with humbrol 67 panzer grey drybrushing to show up the edges.


A few waterslide transfers finished things off. They're a mix of models & manufacturers; Airfix Sea King, Matchbox Westland Wessex, Italeri King Tiger, GW vehicle markings...


The arms and torso still twist, giving a nice range of poses.


The UK temperate camouflage scheme fist in with my DLD AFVs


It's suitably imposing, but not so big that it's impractical on the tabletop.


A few close-ups of the transfers.


I think they add a nice finishing touch!


Now to try it out in a game...

Tuesday, 2 August 2011

Messing around in boats

I produced this little vessel months ago but realised that I hadn't posted any pictures.


It's a from a Majorette set that included a car, trailer & boat. I lost the outboard long ago, but my bits box contained various useful bits and bobs. The jerrycan comes from a 1/72 Italeri accessory set.


The engine was some sort of component cover from a circuit board, luckily it's styrene so I can stick it easily with polycement. I've embellished it with a few plasticard scraps, including a plasticard circle produced using a hole-punch and very thin plastic.


Here's Grumpy the colonist demonstrating how a GZG figure can stand inside the boat.


GZG seated NAC marines will also sit comfortably on the seats!


A couple of scummy low-tech rebels try out their boat. On isolated colony world such as Gordon's Gamble, grav vehicles aren't always available. Something as basic as an inflatable dinghy can provide a ready means of transport through rough terrain, even if it is restricted to the river.


OK so it's not particularly inspired and is slightly out of scale, but it only took a few minutes to do, and it could provide a couple of adventure hooks - who can gain control of the vital ferry crossing in a battle between rebels and local militia? Can the rebels get to their boat and escape down the river before the Grav tanks catch it? Are the rebels luring the grav-tanks into a carefully prepared ambush, taking advantage of the overconfidence of the government forces with their apparent technical superiority..?

Saturday, 2 July 2011

Command Team

Another of GZG's little-seen packs, the generic command team SG15-G01.


I've painted them to match my OUDF troops, GW goblin green uniforms with Humbrol Matt 186 brown boots, belts & holsters, all washed with a Vallejo sepia ink wash.

The pack contains 2 each of 4 different figures - officer, tech, bodyguard and a sitting comms officer (not yet painted as first I'll need to build a seat and comm station for him!).

The officer does remind me of a certain Colonel D Dare of the Interplanetary Space Fleet!

Monday, 27 June 2011

Long Time, No Posts

I haven't had a chance to post anything new for a while now - very slow internet connection at the local library that I use, it can take me 20 minutes just to read a couple of e-mails! In addition, my duties as a Scout leader have left me without so much spare time; we've been off on a few camps recently, raft-building by the river Tas, out running around the woods, cooking over open fires (I've never seen a burger look that black and charred before!).

I shall be leaping into the 21st Century next Monday when I get broadband at home, so should be able to start posting more regularly, especially as the end of the Scouting term is coming up.

I have lots of little projects on the go, hopefully I'll actually finish some of them so I have some nice little pictures to pop on the blog too.

Stay tuned for the next exciting developments in the world of Mini Metal Mayhem...

Saturday, 4 June 2011

Time to get technical

Another find from the local charity shop - a crew cab pickup which just cried out "technical" as soon as I saw it!


I drilled out the rivet holding the chassis and body shell together, which in turn enabled me to get the axles out. A couple of minutes with a pair of pliers got the axles straight (you can see in the photograph that the wheels were a bit wonky to start with), then I filed & sanded the body shell.


A couple of coats of Humbrol matt white spray gave a good basic finish. Vallejo black ink gave some depth to the grilles below the windscreen and the gaps round the doors. Inscribe military sand acrylic was daubed over the whole model including chassis, then wiped off with my thumb, leaving a dusty coloured residue in all the right places. A bit of scratching with my thumbnail cut through the paint to the metal, giving some reasonably realistic paint chipping around the edges of the pickup bed.


Headlights are GW mithril silver, brake lights GW red gore. Seats are Vallejo beastly brown with a wash of black ink (not that you can really see them in these photographs). Hubcaps received a quick coat of GW chainmail & mithril silver where required.


A suitable addition to my collection, for use as either background scenery or as a technical (once I get a weapon mount for the back) in either Ambush Alley or low-tech sci-fi battles.

Quite satisfactory for 20 pence and an hours painting!

Saturday, 21 May 2011

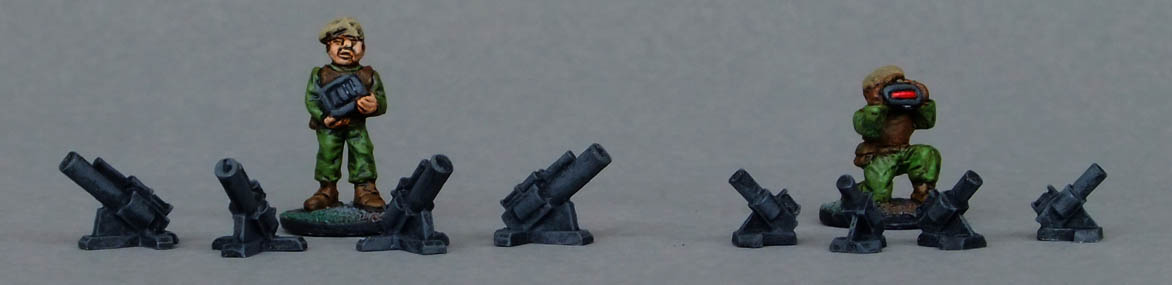
Mortar support

My OUDF forces are sadly lacking in support weapons, so I have some GZG RAM mortars to give them a little extra firepower.

The plan is to mount them on bases with their support crew. I though they might make useful artilley pieces in 1/300th scale too.