Friday, 8 September 2023

15mm Shipping Containers

Headbunny Games produce some neat sets of 15mm sci fi scenery for great prices on e-Bay.  I spotted their sci-fi shipping/storage containers for £1.80 a pair plus postage, so immediately ordered 5 sets.

All 10 crates, with 15mm figures for comparison.

These have been printed using an FDM printer, rather than a resin printer like mine.  As a result, they do have more obvious layer lines, but will have cost much less to produce!  They are hollow, so nice and light, but being PLA (Polylactic Acid) they are also very sturdy, less likely to be chipped than my usual resin.

Rear and front views of the containers.

To get them quickly table-ready, I gave a grey spray undercoat, then drybrushed white, before using some of my Army Painter speedpaints.  I can see I missed a couple of spots with the undercoat, so the red plastic is showing through slightly.

Side view of container.

 They'll benefit from some decals and weathering/detailing, but for now they'll fill a space in a cargo bay or on a colony world.  Headbunny games produce a few other 15mm sets: sci-fi hover cars, spaceship wreckage, stone walls, castle ruins and junk piles/walls.  I have already printed the latter myself, had I not done so, I'd have certainly ordered some of these!

Thursday, 7 September 2023

Action Force - Z Force Whirlwind

Continuing my 15mm Action Force project, the Z Force Whirlwind was a re-coloured version of the US GI Joe Whirlwind. 

 Armed with twin 20mm armour piercing rotary cannon, it can be towed by a jeep to provide anti-personnel and limited anti-tank capability.

 The guns elevate, so can even be used against ground attack aircraft or helicopters.

Jabberwock produced a very fine original toy scale (1:18) version of the Whirlwind on Thingiverse.  This has nice chunky details that work well when printed at 18% for 15mm.

Basic model undercoated.

I undercoated in Wilko grey primer.  Now that Wilkinsons has gone into administration, I may never be able to replenish my supply of this great paint, so I'll be on the lookout for an alternative.

Whirlwinds in action.

The base colour is Vallejo olive green, with black details.  I drybrushed the black parts with dark grey and carefully painted in the Z logos in white, then red.

Side detail.

I used a couple of 2x2mm Neodymium magnets in each Whirlwind to allow them to rotate.

Neodymium magnets.

 These Whirlwinds will be used for my Z-Force army in AK-47 Republic.  Treating them as towed anti-aircraft guns would probably be a reasonable reflection of their armament and capabilities.  Now I just need to find a couple of suitable crewmen for them.


Wednesday, 6 September 2023

Lightyear Hyperspeed ships for gaming

 Some of the Lightyear Hyperspeed ships are reach in an all time low in price. I’ve already posted about the Zurg Fighter, but the twin pack of Buzz’s ships XL-01 and XL-15 is now only £3.85 and the Zurg Mothership has fallen to £7.13! I have both and they are really good for 15mm. They might do at 28mm at a pinch and the mothership would make a fantastic landing ship for 6mm games.

Friday, 11 August 2023

Growing trees - Teloxys aristata (Seafoam) part 7

My Seafoam has been quietly growing over the last month and a bit.  Sadly, the ones I planted directly in the garden aren't very impressive.  Most are like this spindly little specimen.

Fortunately, the ones I moved out into the larger planter are getting very impressive now!

I also transferred some of the ones remaining in the seed trays into small pots to see if the extra room to stretch their roots will give them a bit of a boost before it's time to harvest them.

They were only transplanted a couple of days ago, but I'm hoping that I'll see a bit more growth in another week or two.

The branching structure is really coming on well, so these will be great to preserve in the Autumn and use over the winter for a few terrain projects.


Saturday, 29 July 2023

Lidl wargame storage case

Lidl are currently selling a fishing tackle bag wargame storage case for £25.  I didn't buy one when I saw it, but after considering, I decided that it might come in handy for some of my Epic scale vehicles.  As it happened, we were passing a couple of Lidls on a day out yesterday, and the second one had a few cases left.

The front pocket has a few elastic straps so you can keep your pencils neat.  There's space for lots of dice and a tape measure too.

The 2 side pockets both contain 12-compartment containers.  I'm thinking these will be useful for order counters and the like.

The main compartment includes a zip compartment in the top of the cover.

The main compartment contains 6 large plastic multi-compartment trays.  These will come in extremely useful.

Each tray has 18 compartments, which will be excellent for all my tiny tanks.  They stack neatly in the bag, which is well padded to protect them. The 2 long dividers are fixed, the rest are slot-in removable ones, so you have space for larger vehicles if required.

My Epic models are rather cramped at the moment, so spreading them into some extra cases will be good.  The existing cases are the same size, so I can mix and match which ones I transport in the bag.

The metal models will need a little padding, but the resin ones are very light and should be fine once they're spread out across extra cases.  If I swap some around, I might reallocate a tray or two to my 15mm scatter scenery which is about to overflow from its existing couple of trays.


Friday, 21 July 2023

Medical beds and a desk

 Some 3D printed furniture... these medical beds come from Ecaroth and are designed to print support-free.  I printed them flat on the build plate, they come in 2 parts (base and bed with arm) which are easily glued together after cleaning up.  These were reduced to 56% to convert from their native 28mm down to 15mm.  The first pair were painted in a utilitarian grey and brown, maybe you'd find them in the medical bay of a grungy freighter or merchant vessel.  Or maybe a disreputable backstreet medical facility.

I painted a second set in a cleaner white/blue pallet suitable for a medical facility.

This desk and chairs will populate some of my office buildings or 1980's supervillain lairs.  The chair comes from crazyrabbit, reduced to about 20% original size.  The computer desk came as part of a large set of computer equipment, when I locate the original again, I'll include the creator/link.


Wednesday, 12 July 2023

Summer Scenery Project: Ruined City part 4

The bulk of my ruined city will be the smaller ruined buildings I've mentioned in my previous 3 posts.  I do have some larger city blocks from Terrains4Games.  These have appeared in one or two games already, in a partly-completed state (glued together, window sills added and sprayed grey).

I've been improving these since their earlier appearances, filling in around the connecting tab slots and adding rubble to some.  I've adopted a red-brown colour scheme to provide a bit more visual interest than the more typical grey.  The buildings have a panel-clad design, so perhaps it's COR-TEN steel or something similar.  I've used red oxide, burnt umber and burnt sienna dabbed on with sponges to vary the colour.

The buildings include internal floors.  This gives them great rigidity, though it might be difficult to get figures in and out of the bottom floors!

I have one tall building and a pair of identical shorter ones.  I'm debating whether to make "sockets" of rubble into which I can place them, allowing me to swap the different sizes around.

I experimented with adding some rubble in one of the smaller ruins.

The rubble has been base coated grey, black ink washed for shading, then some parts have been drybrushed with the red-brown colours of the walls.

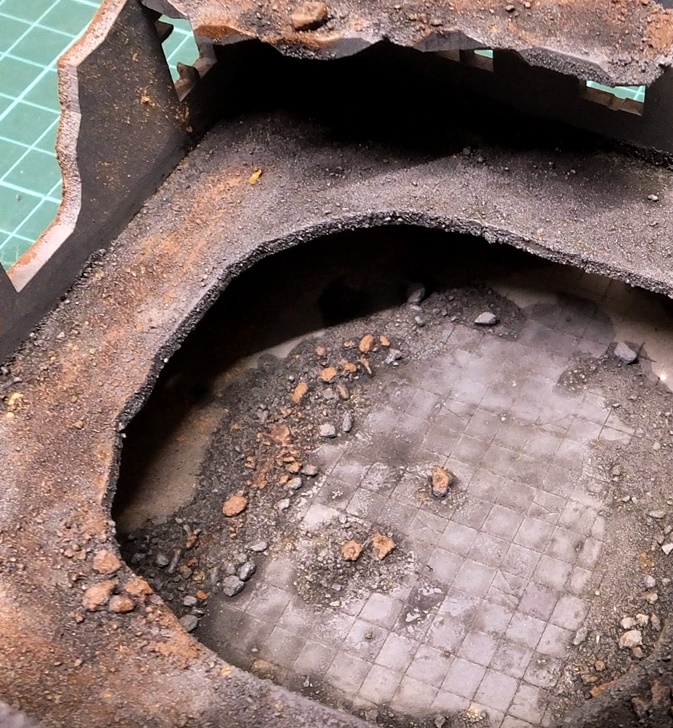
I've tried a tiled floor in the more detailed building.  This is simply a piece of paper scored with lines to make a 5mm grid pattern and glued onto the floor of the building.  An ink wash soaks into the scored lines to enhance the appearance.  Rubble has been added around the edge to blend it into the floor.  The result is better than I had expected, so I'll definitely be using this technique again in some other buildings, perhaps with checked or different coloured tiles.  Adding the red-brown colours to the rubble definitely makes it look more 3-dimensional than just different shades of grey.

These buildings will be great as focal points during a game, whether on the edge of the city as sniper locations or in the centre as objective locations.  They are big enough to provide cover for large mecha or big alien creatures.