Tuesday 22 September 2020

2020 Summer of Scenery - Part 7: TTCombat Ruined Gravity Lift review

 I saw this ruined gravity lift on the TTCombat web site recently and at only £3.95 and free postage in the UK I thought it would be a great piece of scatter scenery.  Although it's designed for 28mm, it's pretty scale agnostic (no doors, windows etc) so looked like it would be fine for 15mm too.

What the postman brought...

It comes on a single sheet of MDF, laser cut with only a single point of contact on each part keeping them in the frame.  Number 1 son was eager to assist with pressing out the parts and we sat outside in the sunshine to do so.  This did lead to a slight problem when all the outer panel pieces got knocked off the bench onto the floor, I thought that I picked them allup but one was missed and got rained on which left it expanded and disintegrating.  Fortunately this was easy to hide during construction!

All on 1 sheet of MDF.

The pieces were assembled with PVA.  The structure was a little bit fiddly in places and had to be kept in shape but overall it was a pretty easy build.  There are only 4 different panel shapes so it's important to set them out carefully to avoid repetition.  I cut out little scraps of card which were glued onto the panels to hide the square construction holes, hopefully they look like broken sections of an outer protective coating.  After assembly, they were stuck to some foamex bases with UHU then reinforced with hot glue, as with the hair curler scenery.  A few cables were added using guitar strings and solder. The base was coated with brown acrylic caulk and the main structure was given a spray with matt black primer.

Basic assembly & undercoat complete.

The bases were coated with texture paint, then a coat of Wilko emulsion Nutmeg Spice splotched with Coffee brown.  The gravity ring pieces were painted burnt umber then dabbed with a rough layer of burnt sienna.

Base coated.

Scale Reference Man is pleased to make another appearance.  These are suitable impressive for 15mm scale.

Main painting completed.

On to drybrushing - GW chainmail for the gravity lift rings, Wilko desert sand for the base.

Behold - cables!

Some of the cables were painted in brighter colours to add a bit of interest.

Scale Reference Man climbs up for a better view.

That's enough climbing! Come down!

After painting, on to flocking!  PVA was daubed around the bases and my homemade mixed flock sprinkled on.  A couple of bushes were constructed from coir (coconut fibre).  The flock helped to hide the panel that had been left outside in the rain!

Might have overdone the bigger bush.

Green-dyed tea-leaves helped blend the foam flock into the bases.

Dangling cables added.

A final sprinkle of autumnal static grass finished them off.

Completed!

I'd give this ruined gravity lift a grade A-. It goes together quickly and easily and is really cheap, especially when you bear in mind the free UK postage.

It could do with a few improvements: a greater variety (ie more than 4 shapes) of the external panels would be good; the inclusion of a sheet of laser-cut card panels to cover the assembly holes in the outer panels would be nice; the larger ring could do with a base.  I can see that the latter 2 would push the price up though, and it isn't especially hard to remedy these things yourself which is why it doesn't drop down to being a grade B.

Is it a Stargate?

I did make a couple of mistakes with these.  The card pieces on the outer panels didn't come out as I'd hoped.  My wife immediately said "Ooh, a little Stargate" and they do indeed look a bit like the SG1 gate glyphs (if you squint a bit).  Not what I intended but the idea of an ancient interstellar gateway discovered on a remote colony world immediately provides a few scanario/adventure hooks!

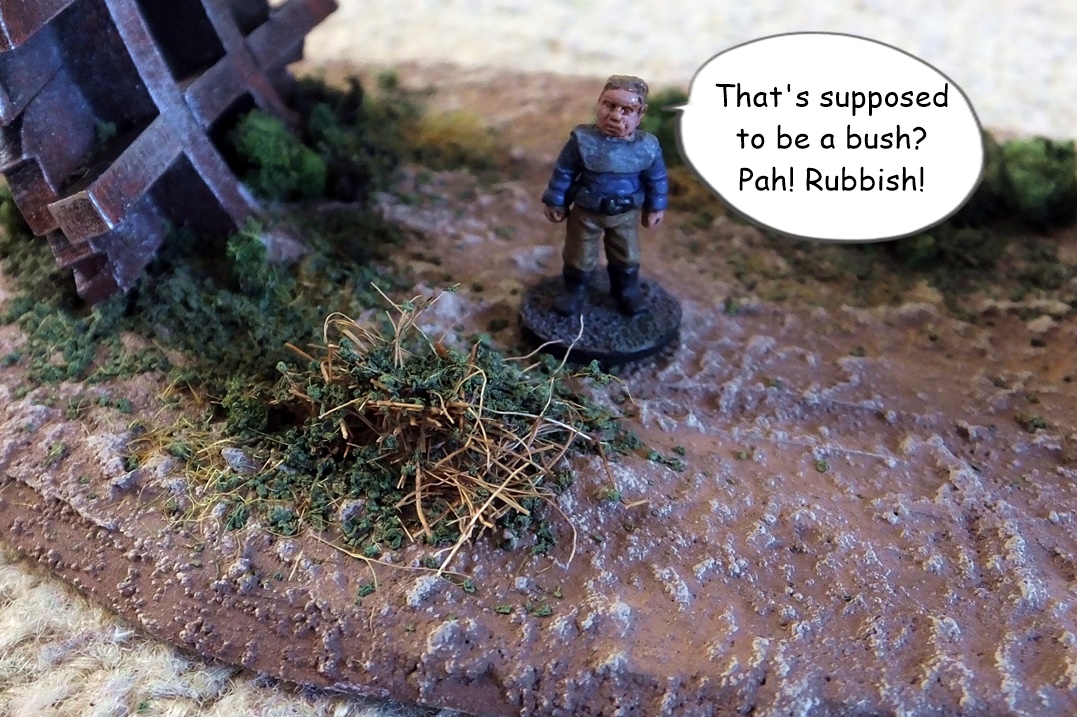
Scale Reference Man vents his opinion.

 My coir bushes also turned out to be somewhat of a disappointment.  Scale Reference Man agrees.

Oh and did I mention this kit was only £3.95 with free UK postage?!  Go and buy one now!


Friday 18 September 2020

2020 Summer of Scenery - Part 6: It's enough to make your hair curl!

Having been busy making lots of scenic materials, I've been after a chance to use them on some terrain.  I bought some hair curlers a while back (£1 for 6) with a view to removing the velcro-like outer covering to leave me with some satisfyingly industrial-looking ribbed cages.  I decided that I'd make a bit of scatter terrain using chopped-up hair curlers to represent mysterious, partly buried bits of abandoned structures.  I'd be able to use some of my scenic flock on these.

The first thing was to chop up the hair curlers.  The plastic was fairly soft so I used a sturdy pair of scissors on the first one but switched to a pair of tin-snips for the second and third because it was easier on my fingers.

Card templates.

I planned out how to set them out using some scrap card to make templates.  Once I was happy with the layout I drew around the templates onto some 3mm foamex (PVC foam board), my preferred basing material because it's easy to cut and won't warp.  After cutting out using the hacksaw blade with my Scorpion saw, I bevelled the edges with a sharp knife and smoothed them off with a sanding block.  I attached the hair curlers with UHU glue, which seems to be the best thing for foamex.  Because the attachment points are quite small (in most cases, a row of cut ends of the bars), I reinforced them with a line of hot glue, also using it to gap-fill where my cutting was slightly wonky.

Glued to foamex bases.

I used my craft knife to score the top of the bases to give some key, then coated them with brown acrylic caulk.  This was followed by some of my new texture paint (filler/PVA/paint/sand).

Texture applied to bases.
I tried to make sure I painted right over the bottom of the hair curlers to help conceal the glue. It'll be covered by vegetation too.
A nice view from in here?

One of the curlers has a partly broken out side for a bit of extra interest.

Scale Reference Man is disappointed to be out of focus.

Scale Reference Man helps show how big these are.  Although I've built them for 15mm, they'd be fine in 28mm too.

See? I told you.

The paint was a bit patchy but I was fairly happy with the end result.

A very buried curler.


I tried a range of different angles for the curlers ot be buried.

Could make a nice tent using PVA/baby wipe?

Next task was to base coat the curlers.  I just used a matt black spray can and the paint seemed to stick fine.

Curlers base-coated.

There was only one place I couldn't get the spray (or the texture paint) but I can fix that later.

Matt black spray base coat.

The ground was painted with my usual Wilko household emulsion tester pots, Nutmeg Spice base coat, Coffee splotches to add variation then a drybrush of Desert Sand.

Main colours done.

The hair curlers received a coat of acrylic craft paint, burnt umber as a base with some burnt sienna daubed in patches to give a nice rusted look.

Ground drybrushed and ready for vegetation.

I trimmed a few extra bars out of the "window" curler so it will be easier for someone inside to fire (or climb) out.

Enlarged window.

The final part of painting was to drybrush all the curlers with my trusty old GW chainmail paint.

Curlers drybrushed with chainmail.

Onto the flocking! I grabbed my tub of random mixed flock which includes all the left-over sweepings I've gathered up after the main batches we made had been put into separate tubs.

Vegetation applied.

I applied some PVA to the bases where I wanted the flock to go and sprinkled on random pinches from the tub.

"Just needs a lick of paint and a new roof..."

After the foam flock, green-dyed tea leaves were liberally sprinkled around the edges.

"Will it keep the rain off?"

The place where it was too awkward to paint was flooded with thinned down PVA and tea leaves sprinkled in to fill the space.

Not sure he'll fit under the lower one...

The final touch was a sprinkling of pale brown/green static grass around the edges of some of the vegetation.  I used a dropper-bottle to apply thinned PVA to all the vegetation, this soaked in and helped fix it formly in place (or at least it did once it had been sitting on theh windowsill in theh sun for a couple of days).

Easy to climb in and out?

 Overall, I'm ridiculously pleased with how these have turned out.  They only took a few evenings to complete and as a first attempt at doing "proper" vegetation I think it looks very good.  Using the flock sweepings had the unplanned advantage of giving a real mix of colours.tectures which has added to the realism. 

Admiring the view. Or maybe not.

The tea leaves also turned out very well, this was an idle experiment one afternoon when I found my old tub of forest floor tea leaves and decided to try dying them with paint because I haven't got around to geting any sawdust yet.


Friday 11 September 2020

2020 Summer of Scenery - Part 5: Teddy-bear Fur Games Mat

Enthused by a few posts on some terrain making groupd on Facebook, I thought I'd have a go at making a teddy-bear fur terrain mat.  Initial outlay was about £10 for 2 metres of fur fabric from a local craft and material shop plus £7 for a hair trimmer from Asda (rather than risk damaging the one used for our own hair).  Further materials to appear in a later instalment include brown acrylic caulk for £1, clear silicon sealant for £2 plus various paints which I already have.

Hair clipper £8 from Asda.

The first task was to decide on the terrain features that I wanted.  I'd seen a nice effect created using clear silicon sealant to create a flowing river that could still be rolled up for storage, so a stream across the mat is one feature I want.

Vehicle and 15mm figure for scale.

I also wanted a road and some smaller pathways (or maybe drainage ditches) through the fields.  These were easily trimmed down to create the initial layout.  The road runs the length of the mat with a couple of side roads to add interest and create strategic junctions which can act as scenario objectives.  A ford across the river can also be a scenario objective.  The roads and tracks will be created using brown acrylic caulk the same as I used on my other games mats.

Reasonable height grass for 15mm figures and still traversable for vehicles.

I've seen a lot of videos where the fur needs to be severely trimmed because it's so long to start with but mine is a pretty good size for what I want with no alteration.  I've just trimmed slightly here and there to give a more undulating level to the grass but it probably didn't even need that.

Trimming the tracks.

Road running L-R, stream will run top to bottom just right of centre.

Road plus footpaths and/or drainage ditches.

Next up will be the painstaking process of painting with a comb...

Tuesday 8 September 2020

2020 Summer of Scenery - Part 4: Crashed starship

A recent e-bay purchase provided me with several Star Wars "mini-rigs" plus a few larger objects which included the lower hull of a Rebel Transport (Gallofree Yards GR75 Medium Transport to be specific).  Along with an ISP-6 shuttle pod mini-rig, I thought this might make a good crashed starship.  Being over 2 feet long, it will be the centrepiece for a game.  Scenario ideas so far include rescuing passengers trapped inside, defending crashed ship until troops/vehicles can be unloaded, attempt to deny crashed ship to enemy forces (ie. go in and plant explosives), retrieve secret data recorders, race to capture alien technology...

Shuttle pod and transport with 15mm figures in foreground for scale.

To form the crashed vessel's bridge/cockpit, the shuttle pod will have the wings removed and some additional structure added to blend it into the main hull.  The fuselage is held together by screws on the back, so easy to take apart.

Shuttlepod with 15mm troops for scale.

The e-bay lot also included some CAP-2 Captivator ships.  These included legs with suckers and arms with claws that fit into the holes.  The reptile-like bounty hunter Bossk was shown with this vehicle.  Their destiny is to be sawn up into smaller pieces for use as scatter scenery etc.  The jaws on the back open and close, I think these will make good airlock doors if I cut them off and mount them part-open in a suitable hole on my crashed starship hull.

CAP-2 Captivator with 15mm figure for scale.

Strangely, I will need to add additional kit-bashed detail to hide the existing kit-bashed detail on the Rebal Transport hull.  Some of it is fine, you can see there are lots of slices of plastic tube which are fairly inoffensive.  There's a tank hatch lower left which is OK.

Detail of the hull.

The main problem is the large number of Panzer IV parts which dot the hull.  Turret side hatches are visible and a lot of individual track links have been used all over the place.

Panzer IV parts dot the hull.

A Crusader tank also makes an appearance.  Some of the large road wheels are visible, with their distinctive patter of holes around the curcumference.  The front hatch (which replaced the forward machine gun turret of earlier model Crusaders) appears bottom right.

Crusader parts also make an appearance.

I might just leave the road wheels unchanged, the Crusader is perhaps not quite as well known as the Panzer IV.

Crusader road wheels.
The plan is to cut the main hull into 3 or 4 sections which can be magnetised to fit together as a crashed ship.  Alternatively, the sections can be spread across the board as separate pieces of wreckage with spilling patches of freight (eg crates from Lego wheels) or piles of rubble attached to the magnets.  This gives me the option of adding internal decks or other interesting bits inside if I want to.

Hmm, time to do some thinking on how to cut it and what to fit inside...

Saturday 5 September 2020

Here be treasure!

 A trip to the seaside today resulted in the discovery of an ancient pirate map washed up in a bottle on the beach.  Number 1 son was most excited when he discovered it wedged under a rock (shortly after I had carefully planted it).

Ye olde treasure mappe.

 A trip up the nearby "Beeston Bump" took us to the Ordnance Survey Triangulation Point shown on the map.

Directions to the treasure.

 A check of the compass bearing showed us the direction to take.  Now, would that be 16 5-year-old paces or 16 grown-up pirate paces I wonder?

Taking the bearing.

A few pokes with a plastic beach spade swiftly uncovered undreamt-of riches...

The hoard.  Probably not "treasure trove".

What magnificent finds!

£2 worth of brass from charity shops.

From a junk shop for 20p.

Treasure chest 99p, 3 coins for 60p.

Less than £4 for the pirate hoard but well worth every penny for the excitement that resulted!  I always enjoy the process of hunting down props for things like this, you never know what interesting items you'll find.  The ship plaque was an especially fortuitous discovery for only £1.50, splendidly nautical for a piece of pirate treasure.  The map was fun to draw too.  I turned up the brightness on my tablet to full, then traced the outline and main geographical features in stages in pencil before going over it and adding detail using a range of waterproof drawing pens.  Some tea-bag antiquing (dried in the oven), burnt patches round the edges and carrying it round in a pocket for the day gave a reasonably aged look.