Showing posts with label Mad Mecha Guy. Show all posts

Sunday, 10 November 2013

Mad Mecha Guy crates

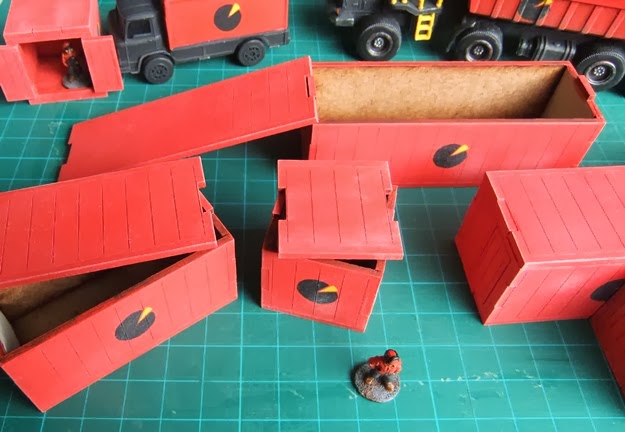
 A few photographs of some of my laser cut MDF crates from Mad Mecha Guy.  These have been painted in the colours of the IMEC mining company who inhabit my fictional sci-fi universe.  I've used a Wilko red emulsion tester (I think it was "flame"!) and drybrushed with desert sand for a slightly dusty, used finish.  These will come in handy for decorating the starport or an industrial site.

Ready to load the truck...

An assortment of crate sizes: 3, 6 and 9cm lengths.

15mm figures for scale.

The top of some have been left removable.

Old toy lorry gets a re-paint in IMEC livery!

IMEC logo stencilled on.

Saturday, 17 August 2013

Mad Mecha Guy buildings

 I ordered these buildings from Mad Mecha Guy some months ago but they were packed away ready for my Birthday.  The service was fantastic as usual - I received an e-mail the day after I ordered to say that everything had been freshly cut and was about to go in the post.

This will be a fast food takeaway with entrance and exit doors.
I've already reviewed the watch towers (I had a couple of them before the rest were packed away) so here are some photographs of the shop units.  This is just the basic paint job, they're not finished yet, they need some weathering and additional details.  Several flat walls are crying out for some posters or notices and the odd vent or ducting.  They come with 2 designs of roof, tiled and panelled.  I've left them as they came but it would be easy to add extra detail by sticking a sheet of textured plasticard on top.  There are loads of different combinations of walls you can use.


I've smoothed over the interlocking cut corners with filler.  Rather than use water, I've used paints to mix up the filler, this seems to give a better texture for application and sands to a good finish.  I've used Wilko emulsion tester pots which I've found to give excellent coverage.  Each building received a couple of coats of white MDF sealant, then a very gentle sand with a fine grade foam sanding block.  After wiping off the sanding dust (I just use a big, soft brush) I've followed this with a couple of coats of my chosen colour, again sanding between coats.  This gives a nice smooth finish and helps conceal any grainy or fibrous texture from the MDF.


There are a number of other web sites out there with nice examples of painted buildings from MMG, my two favourite so far are Marja's Miniature Adventures and Dropship Horizon.


Here are a few of the storage containers I got in the same order.  These are fantastic value, just what I need for filling up table space with large objects to provide cover.  I've assembled some with the doors open, these can act as objectives for certain scenarios.


Monday, 29 April 2013

Mad Mecha Guy watch towers now painted

My watchtowers are now painted and ready for action!  After an all-over undercoat with MDF primer, I've used Inscribe olive drab acrylic for the tower and a tester pot of Wilkinson's stone wall grey for the concrete base.  The tower was drybrushed with olive drab with a dash of white added and for some reason it's come out looking almost grey in my photographs!  I think it's because I was taking the pictures in natural light.

The completed tower.
I've made a small addition to the basic tower, gluing small blocks over the top of the holes in the roof.  This means that I've been able to shave a bit off the roof supports so the roof easily lifts off - with the layers of paint it had become a little tight.  The blocks on the top stop the roof sliding down and crushing the occupants!  In this instance I've recycled the window cut-outs from the WC blocks I ordered at the same time.

Interior detail.
 The interior is spacious enough for a squad of troops to keep a lookout.

Should hold a fire team nicely!
 Then I thought I'd have a play with some scenery...

The patrol set out...

Observation tower in the forest.

Keeping watch over the border.

Defending a forest road.

Sunday, 28 April 2013

Mad Mecha Guy watch towers

 I was so impressed by my first order from Mad Mecha Guy that I've already ordered some more bits.  This was dealt with just as efficiently as last time, I e-mailed my order on Wednesday evening, received an e-mail about 7:30 Friday morning to say that it was all cut and ready for delivery and received it early the next week -despite the Easter weekend and its two bank holidays!

This time I've gone for 5 small shops with pitched roof, a set of 3 public conveniences (1 to act as a shower block for the shanty town, one for the starport and one for the city centre), some storage containers, a large house and 7 tall watch towers.  Most of the package has been squirreled away as my birthday present from my wife, so no reviews until July!

I was allowed to remove a few items for "test purposes" though...

The watch tower.
I have 3 watch towers to build.  I've just thrown one together quickly to take a few photographs.  You can see that it looms over the battlefield nicely.  This is the taller set of towers - the shorter set features 3 sections of tower instead of 4.

Removable roof.
 I'm going to leave the roof removable so that it's easier to get figures in and out.

Alternate platform configuration.
If you wanted to build it without the roof, you can turn the wall sections upside-down like so.

Engraved detail.
As usual, Joseph has engraved some panel detail to break up any large flat areas.

Components.
As always, the components are carefully thought out and go together with no trouble.  It's very obvious where they all go and the fit is snug, as can be seen from my dry assembly above - no glue required for these photographs, though you'd want some for the final assembly.  The pack contains 7 towers, enough for one on each corner of a firebase/POW camp and two either side of the main gate, plus a spare for the centre of the camp.  Alternatively they could form a frontier across the length of a 6' games table.  Plenty of scenario ideas present themselves immediately:
1) Prison camp break-out or rescue
2) Firebase siege
3) Frontier raid
4) Defend the lone tower from the restless natives

I've got them painted now, just need to set up a suitable scene for photography.  Can't wait to start work on the rest after my Birthday!

Sunday, 10 March 2013

Mad Mecha Guy crowd control barriers

Crowd Control Barriers


When I asked about these, Mad Mecha Guy said that he was reviewing how he makes them.  I said that I didn't mind any changes, so instead of the pack of 40 that I ordered, I received 60 - but cut from 2mm MDF instead of 3mm.  They've obviously been redesigned slightly too, he said he was planning to reduce the number of uprights from the originals in order to reduce cutting time but mine appear to have the same number.  The little feet have been redesigned to take the thinner 2mm thickness.  I think that this reduction in thickness is a good thing, I wonder if they'd look a little too thick in 3mm MDF.

I'm extremely pleased with these.  The original pack of 40 would provide 1.2m of barrier, my pack provided 1.8m!  I can't see anyone ever needing to buy more than one pack, there are enough that you can paint them in a range of different colours.  I've done the first 10 blue for my Colonial Security team to use but I intend to do some more of them in orange or red (safety/construction barriers), grey (civic barriers to delineate parking bays etc.) and rusty metal (marking areas in scrapyards, shanty-towns).

60 barriers!
All 60 are undamaged despite their delicate looking construction.  I've assembled the first 10 with no difficulty, any remaining blank areas between the bars pressed out easily.  I might need a sharp craft knife to gently separate the blank section from some of the others where the cutting residue has held them in place, but only as a precaution to ensure I don't snap anything by accident.

Barrier and feet ready for assembly
They assemble easily, the little feet have a small cut-out where the base of the barrier rests.  I brushed a small amount of PVA into the gap on the foot and place a tiny smear on the base of the barrier then just popped the parts together and left them to dry for a few minutes.  I found it easiest to line up several sets of feet on a cutting mat, brush the glue into them all (use a very small paintbrush!), then press the base of each barrier into them on an assembly-line process.  Easier than trying to use tweezers!

These barriers had a stickier finish than most of the other parts, presumably due to the more intense cutting in such a small space.  They painted easily with the MDF primer and after this had dried all traces of the stickiness had vanished.  A quick coat of Humbrol Matt 104 oxford blue followed by a lighter coat of Humbrol Matt 24 blue completed my security barriers.  I imagine they'd take drybrushing very well if you wanted to paint them as rusting metal.

A few ideas of how they could be used...

Safety barriers - move along citizens, nothing to see here...

Marking traffic lanes

A very controlled crowd.

A less-controlled crowd.  Barriers aren't so good at keeping out zombies!

Parking bays marked.

Thursday, 7 March 2013

Mad Mecha Guy laser cut MDF scenery

Mad Mecha Guy started selling laser cut MDF scenery in November 2012 but I only recently discovered him via Dropship Horizon's "Cataloguing 15mm Scenery" article.  He's still revising some of his products and refining the web site, at the moment you have to contact him via e-mail to confirm postage costs and to order but he hopes to add a PayPal cart to the site soon which should speed things up.  I e-mailed to check postage on Sunday, received the information and confirmed my intent to purchase on Tuesday, received and paid the PayPal invoice on Thursday, received notice it had been posted on Friday and received the box on Saturday.  Communication was very good throughout and he removed much of the excess cuttings to save weight and therefore postage costs.  I don't mind receiving the few remaining cuttings, I can see that it would take a long time to remove all of them and besides, lots of tiny regular-shaped blocks are always handy to use as additional surface detailing on buildings, or just as rubble.

The contents of the parcel...

The first thing that struck me when I opened the box from Mad Mecha Guy was... the strong smell of burning!  I hadn't really thought about it before but if you're getting a box full of freshly laser cut MDF scenery, of course it's going to smell of burnt wood.  I've left the bits out of their bags so the smell can dissipate but it's something to bear in mind if you order any - don't open them in the dining room half an hour before you're due to eat a meal in there or in the living room if you're expecting guests!  I should say now that this is the first set of laser cut MDF scenery that I've bought so I don't know if this is a common feature of all of them or a particular quirk of the way Mad Mecha Guy cuts his.

The second thing that struck me was how much you get for your money and the well-thought out way that all the parts go together.

I purchased a range of items  - a set of crowd control barriers, a set of 2 x 3-storey shops, 2 x 3-storey houses and a pair of large 2-storey shops.  There was also a large bag of mystery MDF squares with rounded edges, it turns out that these are small bases (suitable for figures etc.) that he throws in to make use of any excess MDF because he can't stand wastage - a man after my own heart!


3mm MDF bases

Each individual set comes in plastic bag, with larger sets these are subdivided into additional bags to separate the different parts.  The quality of the cutting is excellent, all but one of the parts (that's one in probably over 1000 separate bits)  pressed out without any problem and there wasn't a single broken bit in the entire order despite many of the pieces having detail sections less than 1mm thick.

Very finely cut detail and it all arrived completely intact!


Where they differ, ground floor walls interlock differently from upper storey walls so that there is no chance of you accidentally incorporating the wrong sort as you build.  The design of the interlocking wall-ends differed between the various packs I ordered, depending upon your point of view this could be an advantage (no accidental mixing of packs together) or a disadvantage (harder to customise buildings by using wall sections from other packs).  There is such a range of different packs on offer that I don't think the latter inability to customise buildings is an issue, there are often different wall types within a pack that enable you to create variety even using only the basic set of bits.


A wide variety of wall types within a single building set.

Many of the parts seem to have a slightly tacky surface texture near the cut edges, which I assume comes from the cutting process.  I think this is from the waxes and resins used in manufacturing MDF, I've heard that these can spread onto the surface either because of the heat of cutting or because of the jet of air that some cutters blow as they work.  Whatever the cause, a quick wipe over with a piece of damp kitchen roll removed most of the residue and I've undercoated the buildings with MDF primer which has sealed in anything that remained.  I painted the crowd control barriers with primer without wiping them first and they've come out fine.

Crowd control barriers
I'll review the individual sets at a later date but here are a few more photographs to whet your appetite...

3 storey shop

3 storey dwelling

Single shop unit

Large shop

Crowd control barriers (easy peasy to assemble and paint!)