Our next game of Robot War incorporates my old Mega Force toys. Launched by Kenner in 1989, they lasted only a year. The range included lots of large land battleship vehicles, huge aircraft and loads of smaller die-cast vehicles in about 1/285 or 1/300 scale. The 2 sides were V-Rocs and Triax, neither of which was specifically labelled as being goodies or baddies. They caught my eye at the time as being suitable as proxy models in games of Epic Space Marine. I got a few sets when they came out, a load more sets when they were remaindered in various toy shops, and a few more of the larger vehicles in recent years from eBay. We only used the small V-Rocs vehicles and a couple of tactical aircraft refuellers. This was also the first outing for my Lidl wargames mat (or "outdoor carpet" as they refer to it), even though I've had it for a couple of years. They have these every year for about £8 and it's the ideal size for our dining table. I dug out my rocky plateaus to use too, it's also the first time I've had a chance to use them in a game.
 |
Stand by for action!
|
Number 2 son's forces included 6 tanks (move half a range ruler, fire 1 or 2D8 for their main guns), 2 Anti-aircraft tanks (move half range ruler, fire 2 or 3D6 for AA guns), 4 missile launchers (move half a range ruler, fire 1D10 for their missile). Air assets included 2 helicopters and 3 VTOLs (all travel 1 range ruler, fire 2D6 guns), 3 fighter-bombers (stationed off-table, appear at any point on the table to fire 2D10 missiles each). There is also a Trident tactical aircraft refueller, we decided that this moves half a range ruler, fires 1D8 and can spend a turn repairing a destroyed VTOL or helicopter. All vehicles can take only a single hit apart from the Trident, which can take 4 hits.
 |
MBTs ready to move off.
|
The tank turrets look to be vaguely Merkava inspired. Command tanks have 2 guns.
 |
Robots view the battlefield.
|
My robots used the same rules as the previous game against the dinosaurs.
 |
Prepare to move out...
|
Number 1 son also had 6 MBTs and 2 AA tanks, 4 missile launchers, a couple of helicopters, 2 VTOLs and another Trident refueler.
 |
Air strike!
|
Number 2 son started the game. His first action was to send his fighter-bombers streaking across the battlefield to attack my robots. Poor aim meant that only 2 of the 6 missiles struck home. Return fire from the mecha would wipe out the entire flight.
 |
Air units advance.
|
The VTOLs and helicopters used their longer movement to skim over the top of the rocky cliffs.
 |
Lone VTOL spotter sighted.
|
A single VTOL was transported forwards by the Trident, then leap-frogged forward using its own movement to rapidly close the range. A very lucky pair of shots damaged one of the enemy robots!
 |
| VTOL. |
This was cunning use of the transported vehicle by Number 1 son.
 |
Firing on enemy VTOLs and helicopters.
|
One of the robots fired on Number 2 son's aircraft.
 |
Tree cover doesn't save these 2.
|
Lucky die rolls eliminated 2 of the aircraft despite their attempts at concealment by hovering in the trees.
 |
Armoured advance down the centre.
|
The main armoured force was making slow but steady progress down the centre of the table.
 |
Flank column.
|
A smaller armoured column pressed down the edge of the table, remaining concealed by the trees and rock formations.
 |
One robot down.
|
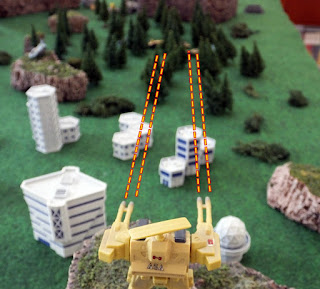
The robots advance into the city. The missile robot was destroyed by a very lucky extreme range shot.
 |
Useless shooting.
|
One of the robots decided to deal with the aircraft concealed in the woods. It completely missed all targets at very short range.
 |
Prepare to repair crashed aircraft!
|
In the centre, the armoured force closes on the crashed VTOL and helicopter, ready to try and repair them.
 |
Trident strikes a robot.
|
The other Trident makes a long-range snipe against a robot.
 |
Yet more poor shooting. This pilot needs spectacles!
|
Displaying yet more incompetence, the robot pilot manages only a single hit on the sitting duck in front of him. The Trident is able to get both the helicopter and VTOL operating again on successive turns.
 |
Carnage on the flank.
|
There is more success on the flank, where one of the robots catches the armoured column and wipes out an entire tank unit.
 |
Useless robot pilot pays for his bad gunnery skills.
|
A volley of missiles puts an end to the embarrassment of the incompetent robot pilot in the centre.
 |
Another robot goes down.
|
Just off-centre, another robot manages to miss with all 4 short-range shots against the main tank force. He pays for his mistake as his mecha is blown to pieces by massed tank fire.
 |
Massed tank firepower is telling now!
|
On the flank, the robot's luck runs out. At this short range, the anti-aircraft tanks prove devastatingly effective against ground targets too.
 |
Air strike deals the final death blow.
|
Only a single robot remains, and this is the moment that Number 1 son chooses to unleash his fighter-bombers on their attack run. Enough of their missiles strike home to eliminate the final enemy unit.
It was a fun game, introducing additional die types (D6) added more variety to the game. Using a target number of 5 for all attacks at short range means that bigger guns/missiles (D8 or D10) are more likely to hit, but I gave the AA tanks and helicopters/VTOLs 2D6 each to boost their chances. Adding +1 to the difficulty for each range ruler length effectively limits those guns to 2 range rulers (about 2 feet), because they aren't going to be managing to roll a 7 on a D6 after that!
It was nice to get out and use some of my scenery, I was pleased how well the flocking on the rocky plateaus matched the Lidl games matt, this was purely by luck.
The half-term holiday is over now, so I might have a chance to work on clarifying the rules a bit before we get to the summer holidays - assuming the kids are still interested by then!


