Showing posts with label Lego. Show all posts

Sunday, 14 June 2026

Playing Quest for Makuta - The Bionicle Adventure Game, played at last!

This afternoon, we finally got around to playing the Bionicle game that we bought back in 2022.

The Bionicle Game.
 

The rulebook is not particularly well laid out, and our initial attempt to play didn't really work.  I takes quite a while to set up because of all the little counters you have to set out.  Now 4 years older and wiser, Number One Son decided he wanted to give it another try.  The rules say that you begin with only the start tile, and draw a new tile to put out every time you get to a "portal" marker on a tile edge.  Number One Son decided he wanted to build the whole of the island of Mata Nui before we started.  Note that if you play by putting out tiles as you explore, the initial set-up time will be much shorter!

Mata Nui.

The game is for 2-6 players, each of whom takes on the role of one of the Toa, the saviours and protectors of Mata Nui.

The Toa.

 I took the part of Onua, Toa of Earth.  All the Toa play identically, there are no special abilities for any of them.  Each Toa has a character card, on which you place counters that you collect as you explore the island.  Each Toa can have up to 4 Kanohi masks (which give extra powers/abilities), 2 Turaga village chiefs and 3 keys. 

Character card.

Movement is by rolling a D6 and moving that number of spaces around the board.  The hex tiles have various paths to follow, and as you explore, you have to confront Rahi - fierce creatures that roam the island.  You roll a D6 and add any bonuses from Kanohi masks and/or Turaga that you have collected.  Turaga give you a bonus of +10 to your die roll if they are your tribe (i.e. the colours match), or +5 if a different tribe.  The counters aren't hugely clear, it's assumed that you know which Turaga is which tribe, but a coloured background would make it more obvious how they match.

The Turaga.

Rahi come in 3 varieties, when you turn the counter over, you find out the strength of the creature. Roll a D6, add your bonuses and beat the strength score of the Rahi.  Draw and you are pushed back 1 space.  Lose, and not only are you pushed back 1 space, but you lose one of the masks, keys or Turaga that you have collected.

Rahi counters
 

The game hex tiles come with Rahi marked onto them, where you place the counters.  These give you an idea of the rough strength of the foe, so you know how much of a risk the attack will be.

Rahi 

It's a shame that the rulebook doesn't have any additional pictures of the Rahi.  Again, it just assumes that you know what they are.  You don't need to know what they look like to play the game, it's just that it would have been a nice feature to add.

Nui-Rama
 

Nui-Jaga
 

Muaka

As well as collecting Turaga as you explore, you can pick up Kanohi masks.


Some of the Kanohi mask powers.

These give you various powers, such as being able to roll a D8 or D12 instead of a D6 for movement, a bonus of +5 or +10 when fighting, the ability to steal a counter from another player, the ability to travel to any other point on the map.  The latter 2 abilities are single use, after which the mask disappears and re-appears on the starting space, from which it can be collected for (re-)use.

Character board in play.

The final items you can collect whilst exploring are keys.  These are required to open the temple to confront the evil Makuta.  Laura was the first to gather the necessary keys.  There are 9 lock counters, 6 are selected at random and placed on the 6 portals around the sides.  Moving onto the portal allows you to flip the counter over to discover what 3 keys are required to open it.  Some of the keys are wildcards, which makes the task easier.  Once the portal is opened, a D6 is rolled, and the temple rotated that number of sides.  The colour of the strip round the base of the temple tells you how strong Makuta is - so you can never be sure how much you need to beat him until the battle occurs.  Fortunately, Laura had more than enough power to defeat him and save Mata Nui.

Tahu enters the temple and defeats Makuta.

We decided to keep playing - I was next to finish, thanks to my masks and Turaga, and having 2 wildcard keys to help open the portal.

My finishing character card.


The rulebook isn't very well written or laid out.  I don't know whether the original game was written in English, perhaps it's a problem with translation?  Some of the mechanisms could be improved, I think.  Fighting the Rahi becomes an automatic success later in the game - collecting the right Turaga and masks could give a combined bonus of more than 20, which is the maximum strength of the Rahi Muaka.  Rather than the masks adding +5 or +10 to your score, it might be better to do the same as movement - roll a D8 or D12 in battle instead of the usual D6.  This would keep the element of risk when fighting Rahi, but significantly increase your chances of success, especially against the smaller ones.  Without this risk, it just becomes a bit of a slog around the board hunting down keys.

Counters and playing pieces are good quality, thick cardstock, but could be much clearer.  As mentioned earlier, the game assumes that you know a lot about Bionicle, and more pictures/information is needed for casual players.  It's not very easy to distinguish between the Toa, the pictures are quite small and the colours not all that obvious.  You'd think they could have produced some sort of small 3D model instead of just a picture in a plastic stand, even just a microfigure of the appropriate colour would have helped.  There are a few 3D models of Toa floating around the internet, so I might try printing some replacement pieces.  I have found some nice ones, they're the upgraded Toa Nuva versions, but they will probably work OK, especially when painted appropriately.  Some sort of key for each player would also help, showing which Turaga is linked to which Toa and what the different masks do.  Having to look up "Kanohi Pakari" and "Kanohi Miru" in the rulebook every turn to work out which does what is a pain.  Having a simple "+10 Strength" note on a quick reference card or even printed on the mask counter would be a big time-saver.

Nope, no actual Lego included.

There are some problems if you run into too powerful an enemy early in the game.  Your route can be blocked by something that you don't have the power to defeat.  We had this issue, with a very strong Nui-Rama that took the mask from the first Toa to fight it due to a very bad die roll.  It took a very long time to fight our way through!

We will play again, but may well tweak the rules a bit to see if it makes the game more interesting. 

Thursday, 6 April 2023

R-CEE Robot

This 3D printed R-CEE robot comes from the talented Evan Carothers.  Mine has a few ridges on the arms and legs, but this is due to user error (or "incompetence" if you will), not any problem with the file or printer.  I am always very careful to ensure the screws for the resin vat are done up tightly, but on this occasion I failed to tighten the bolt on the print head, leaving it to wobble around.  Despite this astounding stupidity on my part, a bit of superglue fixed the worst problems, so it's fine to use as a bit of background scenery.

The scenery includes a lino sample, some Hirst Arts blocks for the walls and hatch, Lego wheels for the barrels, and a few small 3D printed crates and oil cans.
 

 I've reprinted the robot since I took these photographs, and it turned out much better with the build plate securely fixed in place!

Saturday, 26 March 2022

Quest For Makuta - the Bionicle Adventure Game

Bionicle game

We had a nice trip to the market town of Diss today, and we always enjoy a browse of the charity shops while we're there.  Today in the Oxfam shop we came across the Lego Bionicle Adventure Game: Quest for Makuta for a mere £2.99.

The blurb on the back.

Number 1 son (7 years old next month) has enjoyed playing with my Bionicle stuff for the last couple of years and he didn't need much persuasion to spend his saved up pocket money on this rather than some bit of useless tat from one of the other shops.

Mata Nui.

The game comes with a set of neat jigsaw fit hex tiles, shown here assembled as the island of Mata Nui, home to the Bionicle Toa (player characters).

Counters/tokens.

The components are decent quality, nice thick card stock.  It's a shame the playing pieces are plastic pawns with card inserts instead of actual plastic figures.  I suppose I could always order some of the Bionicle Hordika minifigures which are quite cheap (and the right colours, though not exactly the correct shape), but I'll wait and see how the game plays first.

Bionicle Guide
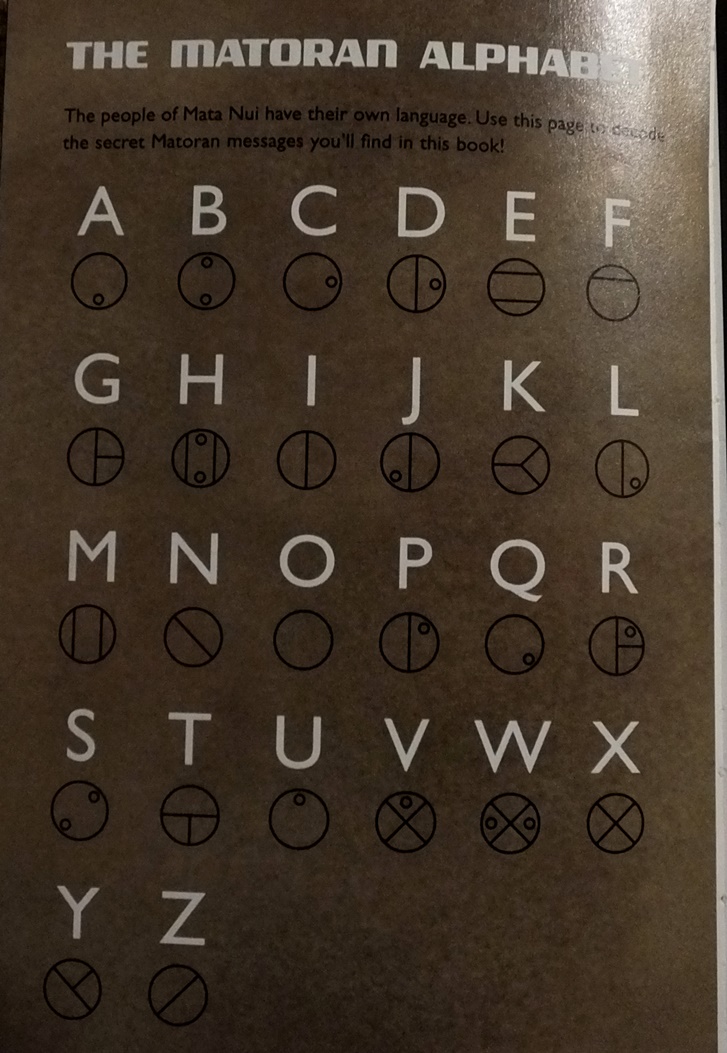
 I was asked to get out my Bionicle guide (a previous 50p Charity shop find) so we could have a look at some of the glyphs and try to translate them.

The Bionicle Lexicon.
With any luck, we might get a chance to try playing the game tomorrow!

Saturday, 12 February 2022

Barrels from Lego

Following on from my crates, I had often looked at small Lego wheels and thought they'd make nice barrels for 15mm.  Their ribbed appearance reminds me of intermediate bulk containers, something any self-respecting starport or industrial site needs.  They're also a good size, enough to provide complete cover for a 15mm figure standing behind them.

Liquid bulk storage containers.

I chose orange for a couple of reasons: first of all they were cheap (about 1.6 pence each); secondly, I didn't even need to paint a base coat - it was easy to just apply a black ink wash and call them done.  I bought some matching orange single stud circular plates and sanded off the Lego logo to fill the holes in the top.  The 6 pictured are only a small proportion of the number I ordered.  Now I have all the portable liquid bulk storage capacity my starport needs for under £1 and with minimal painting time - super cheap and super fast!

Thursday, 10 February 2022

Crates from Lego

Lego is a great source of bits that you can use for scenery, even the more basic bricks. I had a few pale pink 4-stud square bricks in a batch of secondhand Lego.  These don't really go with any of our other bricks so I liberated them and provided a new lease of life as scenery for my games.

A small stack of crates.

The bricks had a flat tile glued on top as a lid and were undercoated with Wilko grey primer spray.  A quick coat of old GW blue grey paint was followed by application of a few waterslide transfers from my decal supply, a mix of tank markings from various WWII kits. Broken wiggly lines of white were painted on some to give an appearance of labels.

Paint chipping around edges.
 

They were shaded with a wash of black ink thinned with matt varnish - experience has led me to do this after applying the decals because using a decal fixing medium often reactivates the wash and removes some of it, leaving odd pale patches. Some of my ancient pot of GW chainmail was dabbed around the edges for paint chipping effect.

Lego!

So there we go, a set of crates for only a few pence.  The groove around the edge of the tiles enhances the lid effect and they're ideal blocking scenery for 15mm games.  They'd do as smaller crates for 28mm games too.

Tuesday, 20 October 2020

2020 Summer of Scenery - Part 10: Electrical box buildings

I've been working on some buildings constructed from surface mount pattress boxes since around May.  I've used 3 depths, 25mm, 32mm and 45mm.  I've also used 2 widths, single and double socket sized.  All came from Toolstation, ranging from 54p to £1.14.

All boxes were well sanded with a wet and dry foam sanding pad to give a good surface key for painting and remove any sharp edges.

Basic materials and tools.

 I've used mainly plasticard and Lego parts to enhance the buildings and add detail.  Main structural elements (eg roof) use 1.5mm plasticard while thinner sheets and textured sheets (treadplate, corrugated) are used for surface detailing such as doors, panels etc. Various other wires, old toys etc will also come in useful.

Lego enhancements.
 
Doors have been scratch built from thin plasticard. Most will have entry pads added from Ainsty Castings (now sold by Brigade Models) 15mm stowage basket sets.  These etched brass sets come with 4 stowage baskets of varying styles on each frame, plus a couple or radar dishes, a small grille and a couple of display screens/keypads.

Scratch built doors.

 I've used some 1.5mm plasticard for walls/barricades. Small Lego curved slopes (part number 11477/17134) form the supports to either side and a section of corrugated plasticard to create a more interesting texture along the centre.

Plasticard and Lego barricades.

 The largest building is a 2 storey workshop (45mm lower storey with 32mm upper storey) with the upper floor mounted at 90 degrees to the ground floor.  Windows are created from Lego windows (part number 28961) glued on sideways.  The door is Evergreen/plastruct metal siding plasticard with Lego curved slope (part number 13731 razor-sawed to size) sides.

2 storey workshop with office above.

 The flat roof has some hatches and a Lego brick electrical cabinet with plasticard doors etc. The height of the building provides a strong attachment for the Lego girder tower (part number 58827).

Flat roof area with electrical cabinets and hatches,

 Plastruct steps provide access to a plasticard treadplate platform. The overhanging office section is supported by a pair of Lego inclined stanchions (part 4476).

Note stairs to roof and supports for overhanging office.

  More Evergreen metal siding plasticard provides doors for this 45mm tall double garage / workshop, plus some sloping vents at the top of the wall.

Double garage building.

A smaller workshop has a nice large door plus 32187 "extension for transmission driving ring" chimneys.

Small workshop.

Small workshop side door - with access control.

Rear of small workshop.

Guitar strings make useful bits of cabling.  Small lego tiles and scraps of thick plasticard make junction boxes.

Side of small workshop.

Small workshop 2 with roller door and canopy.

Rear of small workshop 2 with plant and machinery.

Small workshop 2 with small vents.

Communications antenna from Lego.

Painting has started but more on that another time!