Saturday, 22 August 2020

2020 Summer of Scenery - part 1: making foam flock

Number 1 son (5 yrs old) and I are embarking upon a terrain-making project over the summer holidays.  He's already given instructions on a small ruined building I've made but I've been watching some terrain making videos recently (specifically ones on making your own materials cheaply) and it's piqued his interest.

Inspired by various videos from the Terrain Tutor and Luke of Luke's APS, our first task is to make some flock clump foliage.  I've sourced the bits I need for this over the last couple of weeks. 

Materials and tools

Reconstituted chip foam off-cuts were free from a local furniture repair and re-upholstery centre.  Acrylic paint was £2 a tube from "The Works", PVA £11 from a local hardware shop (extra concentrated, better than the cheap stuff from Poundland), an assortment of jugs £4 in total from the local cheap "warehouse" shop plus a hand blender for £5 from Gumtree (local free-ads web site).  Not pictured - tube of black acrylic paint I already had, plus some old ice-cream tubs for storage of the finished product, free from the local ice cream shop.  Social distancing was maintained at all times during the collection of the aforementioned supplies!


Stage 1 was to tear the foam into 2-3cm chunks, add a splash of water and wring it through.  The hand blender was then used to shred it into a medium sized crumb.  The water apparently helps it shred more irregularly than dry foam and it will help draw the paint/PVA mix through in the next stage.

Something to add extra warmth to the basic green.

I decided that I'd add a drop of yellow to the paint mix too, I already have a large supply of Wilko tester pots from ainting my Hirst Arts dungeon scenery and this "Retro Ochre" seemed like just the job.

Paints and PVA ready to go.

I had approximately 500ml of shredded foam.  To this I added 10ml of PVA, 20ml of green paint, 5ml brown and 5ml of ochre.

Number 1 son undertaking the initial mixing.

Donning a blue glove (which always me think of Firefly - "Two by two, hands of blue"), the paint was squeezed and mixed through the shredded foam by Number 1 son.

After initial mix - not enough paint yet.

At this point I realised that I had only added half the amount of green I had meant to (should have been 40ml) which is why it looked rather pale!  Adding another 10-20ml of green produced a better result.

The end result!
The final result includes 4 different shades:
Basic green as described above.  This was then split and some variation added to form:
Lighter green (I added an extra 5ml of ochre)
Dark green (additional 5ml of black)
Very dark green (additional 5ml of black, 5ml of brown)

Basic green

Light green

Dark green

Dark brown/green

So what did I learn during this initial part of the project?
  1. Upholstery / furniture repair shops can be very friendly and helpful
  2. Very few places seem to use rubberised coir (coconut fibre) nowadays
  3. A little foam goes a long way
  4. Foam can be very tough.  I think I've broken the blender!  It got very hot and now the blades stop moving if a lump of foam gets in the way and it seems to have small parts rattling around inside the casing...
  5. My 5 year old doesn't initially show interest but is keen to be involved once the work is underway
  6. My garage needs a tidy up
What has been the total investment in terms of time and money?  Perhaps an hour or so sourcing the materials (a few minutes at a time taking small detours from other tasks to pick up the various bits), a couple of 'phone calls to obtain the foam, £5 for the blender, probably about 50 pence worth of the PVA and paint.  The remainder of the paint will certainly be used in other projects and I needed a new bottle of PVA anyway.  Time taken on the shredding/colouring of the foam was about half an hour.

Here's the end result with a 15mm figure for scale.


This will work well as clump foliage for bushes and trees but I'll need to run a bit of it through something like a coffee grinder or pepper mill to produce a finer flock for turf or highlighting trees.

Tuesday, 21 July 2020

AFCFA Reinforcements

My Armed Forced of the Charity Freedom Alliance line infantry are built up from GZG New Israelis but I wanted something similar but subtly different to represent an elite force within AFCFA.  These are Brigade Models Yenpalo, which fit the bill nicely.  They were previously available from Armies Army.


The pack includes 10 infantry: 6 riflemen, 2 support weapons, 2 leader-types and 2 with pistols and optional energy shields (which I will probably attach once I find where I've put them!).


Detail is good and they have a very good range of poses with some obviously firing, others advancing and I like the leader checking his watch!  All are wearing hardsuit armour and the guns are all of similar design, the support guns having a longer, heavier barrel.  Guns are not as detailed as some companies produce but still have a few features that drybrush well including sights etc.


After mounting on M8 washers, mine have been painted Humbrol 75 matt bronze green, washed with 50/50 Vallejo black in/Future floor polish with a Humbrol 86 matt light olive highlight.  Eyes are picked out in gold.  Weapons are matt black with Humbrol 32 matt dark grey drybrush to pick out the detail.  A fairly simple colour scheme but it matches my other AFCFA troops which is the main thing.


Overall, detail isn't as crisp as some other models (although I don't have any, the newer GZG New Israelis look like they have sharper detail and I might have used those instead if they'd come out sooner) but it's still very good.

I think I'd grade these a strong "B".

Saturday, 18 July 2020

GZG SWAT Team

While my Colonial Security have Spider Droids for really heavy support, there are times when you need a lighter touch (and less official paperwork!) but something that's still a step above the basic beat cops. 

SWAT team next to normal security trooper.

I got the Armored Police SWAT command/specialist set from GZG to fulfil this role.  This pack has the mix of figures I want, 4 pistol-armed in 2 poses, 2 with battering rams plus a couple of techie/officer types (the latter not pictured yet).

SWAT team rear view.

These are basically the AD Police who originated in Bubblegum Crisis, though I haven't used that exact colour scheme.  My SWAT team have the same grey trousers and blue jackets that my normal security troopers wear.

"Police!  Drop your weapons!"

I'd grade these a B+.  The detail is nice and crisp, though it sould do with being a little better defined around the respirator cannisters and helmet area.  Some of the creases on the trousers seem unnaturally sharp but there wasn't much flash to clean up.  The pistol-aiming poses could be a little more varied, but overall I'm quite happy with them.  I'll probably get a pack or two of the assault rifle/shotgun & grenade launcher armed SWAT troopers in due course.

Tuesday, 14 July 2020

Sci-fi "Tech Crate"

I bought a set of Sci-fi "Tech Crates" a couple of years ago at the local Diceni games show.  Although designed for 28mm gaming, I thought they looked like they'd be good for 15mm as electrical equipment housing, generators/batteries, vehicle engine packs etc.  This one is just a test piece to see how it looks and I'm very pleased how it turned out.


Over a Wilko grey primer base coat the casing has been painted Vallejo reflective green and the metal parts GW chainmail over a black base coat.  A 50/50 wash of Vallejo black ink and Future floor polish toned down the metal to a dull sheen.


This was also a chance to try out some "chipping" techniques, something I haven't done much before.  Vallejo Russian uniform green was used to show where the darker top colour had scuffed/flaked away around the edges of the casing.  This was followed by some cheap Inscribe acrylic craft paint burnt umber for an aged, rusty colour.  Smaller specks of Inscribe burnt sienna were used to represent fresher, brighter rust.  An HB pencil was rubbed along some of the exposed edges where the rust has been rubbed back to the bare metal.

Lots of switches! Especially good for making
it look like 15mm equipment housing.

It still didn't look quite right so a rummage through my decal folder produced a variety of extra details, some WWII vehicle markings, a couple of yellow panels which I think came from a M1 Abrams kit and the circle and triangles which are from QRF.  These are all waterslide transfers and were affixed with Vallejo decal medium.  Chipping was re-applied where required to blend the decals in.  Next time I'll add the decals before weathering rather than as an afterthought!


All in all, This has come out very well, it's the ideal size for a piece of scatter terrain and could even be a useful game objective for something like Rogue Stars or Black Ops:
  • It's small enough that one team could be trying to steal it
  • Perhaps they have to get to it to sabotage power to the enemy base
  • Maybe they need to turn it on to reactivate the base force-field before the local wildlife tries to eat them!

Friday, 28 February 2020

Sheringham Viking Festival 2020


Saturday 22nd February saw the culmination of the Sheringham Viking Festival on the North Norfolk Coast.  This year I managed to have my camera with me so here's a few of the things that happened during the day...

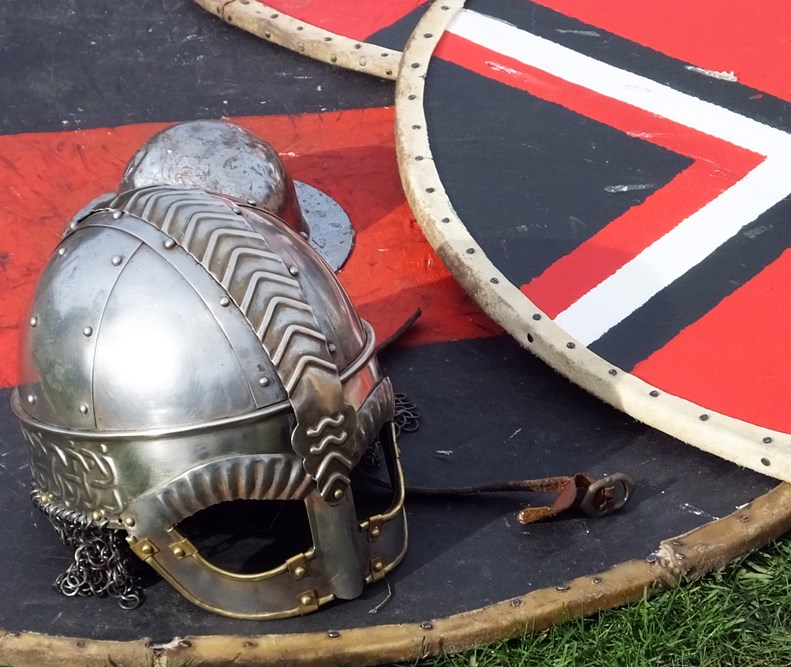
Things started at the living history encampment on the cliffs, where one could test the weight of an axe or sword, try on a helmet or just marvel at the magnificent hand made craftwork such as drinking vessels, armour, clothes and fabrics. 

Even Vikings enjoy the odd waffle stick...

A nice range of helmets.

Hand carved drinking vessel.

One of the numerous banners.

Musician.

Discussing the coming battle.


There were a couple of battles on the beach during the day.

"We shall fight them on the beaches..." etc.

Shield wall

Chaaaarge!!

Viking woman captures image of battle on 'phone to e-mail back to the fjords...


The day ended with a torchlit procession through the town and a ceremonial burning of a longship on the beach.


Monday, 24 February 2020

Dungeon library - Mantic terraincrate review

One thing that my Hirst Arts dungeon has been lacking is a decent library.  All evil wizards need a good supply of magic spell books, gazetteers, atlases, arcane manuscripts etc.  I've been thinking about constructing one for years but haven't had a chance to sit down and do all the cutting out of balsa for the bookcases, cardboard for the books etc.  Fortunately Mantic Games have come to my aid with their Terrain Crate library, a set of which I recently picked up along with their torture chamber furniture, both for about half price.
Painted above, from the box below.
The bookcases are a hard plastic and come pre-assembled and pre-painted in a dark brown.  Mould lines are minimal but they still benefit from a quick clean up with a razor blade or very sharp craft knife.  I gave mine a good scrub with warm water and washing up liquid before painting in my usual "dungeon wood" colour scheme.

A small library.

The set include 2 complete sets of bookcases (3 wide, 1 narrow, 1 corner), a desk, pile of books and a ladder.  The torture set includes 2 complete sets of an iron maiden, trolley of equipment, rack, table, coffin, sarcophagus and skeletal remains.
Book cases and desk.
The bookcases have nice chunky detail that takes drybrushing well.  Although I repainted them completely, a quick brush of light brown would be sufficient if you wanted a fast, easy improvement.

Torture equipment and cupboard
Some of the torture equipment is a little fiddly and needs to stand in hot water to straighten out slightly warped legs etc.
Ready for the next victim!

Detail is excellent, especially on some of the torture equipment.
A few ominous stains on that wood...

Due to the moulding process, there isn't much recessed detail, eg under manacles and chains, but it's probably tougher than resin would be and lighter and cheaper than metal.

Cupboard and shelves.

Bookcase.


The books are varied in size.  Although they don't have any spine detail, it's easy to add some with a dab of gold paint.
More bookcases.

I'd give the library set a B+ (good detail, comes ready-assembled and painted but quite chunky and a few mould lines to clean up) and the torture chamber set a B- (also excellent detail but mould lines again and also some warped legs on the rack, turture table etc.)