With the initial phases complete, it’s time for some action! Our heroes enter from the top left of the map, where the private transport from IMEC has dropped them. The supply depot is quiet for now…
 |
| Our heroes enter top left... |
 |
| The supply depot. |
An old robot stands slowly rusting behind barrels and machinery.
 |
| Supply depot and data terminal. |
More crates, a computer console and some more machinery provide extra cover.
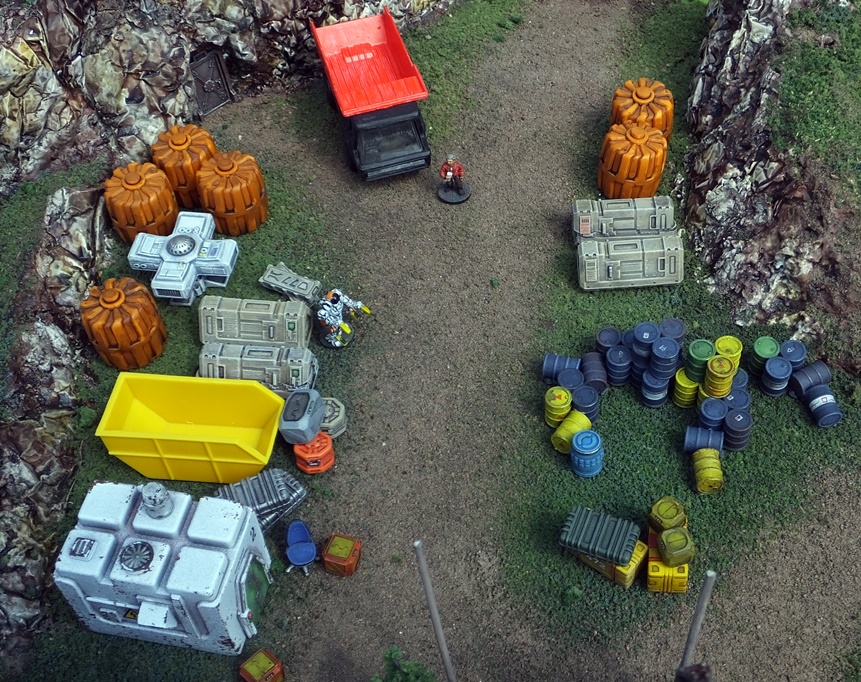 |
| Supply depot. |
Drock's contact approaches the rendez-vous.
 |
| Processing station. |
A processing station sits on the hillside above the depot.
 |
| Processing station. |
An additional processor is located on the small plateau nearby.
 |
| A small vent. |
A small vent stack can be reached along a narrow walkway overlooking the depot.
 |
| Drock's buddy with some additional rumour for them. |
The IMEC employee has some important papers that lend credence to the information they already have in Chotaar Tonn's notebook.
 |
| Depot site office. |
The crew's objecive is to get to the depot and hold off the punks who intend to loot it. The local authorities will be alerted when gunfire is heard, so the fighting needs to be concluded quickly. 2D6 is rolled each turn, if the number is equal or below the turn number, the game ends immediately and inconclusively.
 |
| The Misfortune's crew move in. |
After the IMEC transport drops them off, the crew of the Misfortune approach on foot. Chotaar Tonn (a GZG Crusty is standing in for him today) is armed with a colony rifle with attached assault blade. C4-RG0 carries a blast pistol and has a concealed blad mounted in his arm. Cradling his autorifle, Corvash Drock cuts off to the side to find a good vantage point overlooking the depot. C-2P6 carries a colony rifle, as does Torv Galliash, though his boarding sabre is missing thanks to TRM-9's gambling. TRM-9 has a simple handgun and tries to keep out of Torv's way.
 |
| Punks advance ready to steal some supplies. |
From the hills on the other side of the depot, the punks approach. Their lieutenant is armed with a handgun and blade. 2 specialists are armed with a clingfire pistol and blade, handgun and ripper sword. The remaining 5 are armed with a mixture of colony rifles, scrap pistol, shotgun and military rifle. All have a blade as a backup weapon. Though aggressive, they are poor shots and can easily panic (1-3 on a D6).
 |
| The punks advance down the hill. |
The punks spread out as they make their way down the slope.
 |
| The majority of the crew dash towards the depot. |
Drock sets up his autorifle on its bipod from the cover of a small rise. He settles his battle visor in place. The rest of the crew dash down the hill into the cover of some trees.
 |
| Drock takes aim at the punks from behind a small rise. |
Drock draws a bead on the punks and gently strokes the trigger.
 |
| Blam! Blam! Drock's shots take down 2 punks. |
As the punks descend, the leader's head suddenly snaps back in a spray of blood. The specialist punk alongside barely has time to turn in surprise before he is thrown backwards, the report of the first gunshot arriving at the same time as Drock's second bullet. A third punk falls to a shot from Torv Galiash. At her cry of pain, the punks waver for a moment but recover their resolve and dash forwards.
 |
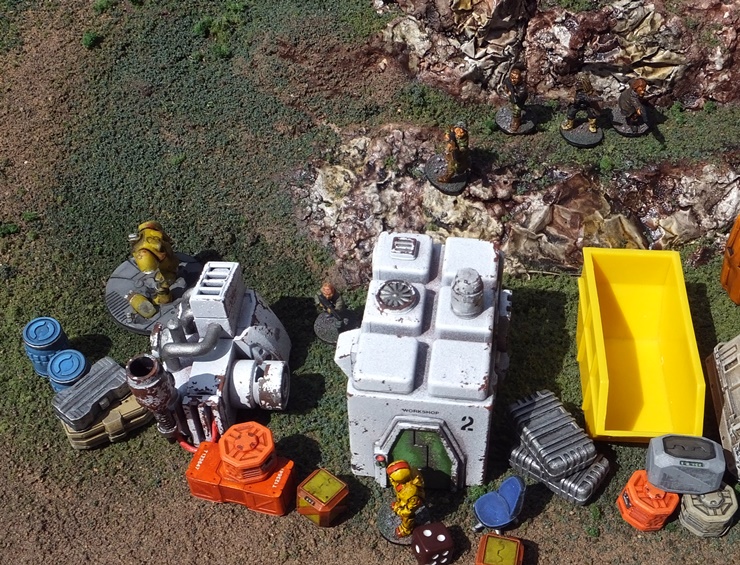
| Chotaar Tonn approaches the centre of the depot. |
Chotaar Tonn dashes all the way to the edge of the depot. Their contact is visible, making his way towards them.
 |
| The punks move into cover overlooking the depot |
Acting aggresively, the punks charge down the slope to a cliff overlooking the depot.
 |
| The crew are entering the depot from the ther side. |
While Drock remains on the hill rattling off shots with his autorifle, the others rapidly move downslope. C-2P6 and C4-RG0 follow Chotaar into the edge of the depot.
 |
| The remainder of the crew prepare to give covering fire. |
Torv stays in the cover of the trees with his rifle trained on the punks. TRM-9 is dawdling behind the others, he isn't really built for this terrain, or for combat, and he only has a pistol.
 |
| The two sides close rapidly. |
Though at long range at present, the two sides will soon be within pistol range.
 |
| One of the punks approaches C4-RG0. |
C4-RG0 dashes across the depot to the cover of the site office. One of the punks jumps down the rock face and approaches around the side of the building. The other punks clamber down to a lower cliff immediately behind the depot.
 |
| Will there be melee combat soon? |
C4-RG0 is in an isolated position, will the others be able to support him?
 |
| Torv Galliash is stunned by an enemy bullet. |
Though poor shots, the punks are firing enough that they are bound to hit someone sooner later, purely through luck. In this instance, it's Torv Galliash who takes the bullet from the long-ranged military rifle carried by one of the punks. Fortunately he is only stunned.
 |
| One of the punks is stunned by return fire from Drock. |
Drock keeps up his supporting fire. Although he doesn't replicate the success of his opening volley, he wings one of the punks, leaving him stunned.
 |
| More of the crew move through the depot. |
C-2P6 enters the depot. Chotaar is already in contact with Drock's IMEC acquaintance.
 |
| The notebook is handed over. |
The documents are handed over. Another clue for our heroes! Now they just need to stay alive and defeat the punks before the local cops arrive.
 |
| C4-RG0's concealed blade downs the nearest punk. |
C4-RG0's auditory sensors hear the thudding footsteps as the punk dashes towards him. He leans around the corner of the site office and flicks his concealed blade across the gap. The startled punk gapes at the blade protruding from his chest before collapsing to the ground. Their attention focussed on their enemies elsewhere, the remaining punks don't react to their companion's demise.
 |
| Drock's autorifle stuns another punk. |
The stunned punk on the cliff shakes his head and steadies his weapon... only for Drock's next burst of supporting fire to catch him and stun him once more.
 |
| More punks leap down the rocks and into the depot. |
Continuing their aggressive response, 2 more of the punks jump down into the depot.
 |
| Gunfire from the crew eliminates 2 more punks. |
The documents tucked safely in his jacket, Chotaar charges forwards and eliminates one of the punks with a well-aimed shot. From the cover of some crates, C-2P6 fires at the cliff and another punk collapses.
 |
| The 2 surviving punks flee the field. |
The 2 surviving punks have had enough. Abandoning their 6 comrades, they flee the field, leaving our heroes in control.
 |
| The surviving punks have fled, leaving only bodies behind them. |
The punks have been defeated and our the crew of the Misfortune hold the field. A check of the bodies scattered across the depot and hillside yields a handgun and a blade. A Nerve adjuster is also found, this could come in handy in the future (gives the user a 5+to avoid a stun result).
 |
| With the field theirs, the crew are victorious. |
With their first mission successfully completed, it's time to get paid. 5 Credits plus an extra 3 credits of danger pay gives a good start for their adventure...


Nice report. I like the aerial shot of the map, looks like a drone reconnaissance photo or something....
ReplyDeleteThose Punks got what they deserved!
ReplyDeleteDamn, this is all plain fantastic. I love your minis and your scenery!!!
ReplyDeleteThank you! Hopefully more to come in the next couple of weeks. Just waiting for a mist generator to come in the post for the appropriate “foggy” effects for photographing the game.
ReplyDeleteWhat the deuce! Real fog instead of photoshop effects? Next you'll be filming scale starships from low angles....
Delete