Several years ago (was it really 2013?!) I started on some hedges and the other day I came across them in a box and decided I should probably finish them.
Forgive the duplicate photographs fom the original posts but this was the project so far:
Hedges cut from large green pan scourers in approx 4 inch long sections.
 |
Hedges cut in 2 different heights.
|
 |
Some tall enough to block LOS and movement.
|
 |
Others shorter to provide partial cover.
|
I got as far as flocking the hedges (squirted with PVA then squeezed through to coat all sides before sprinkling with fine foam turf flock), but then the project stalled as I wondered what would be the best thing to use for basing them.
 |
Hedge with flock.
|
 |
Tall hedge flocked.
|
MDF seemed a bit too awkward to cut to a suitable size and I was
worried about warping or delamination of the edges and whether it would be so chunky that it would overwhelm
the hedges. I also considered a more minimalist approach, just using a large
washer 1/4 of the way from each end but I wasn't sure how to fix them
securely.
 |
Tall hedge.
|
 |
Short hedge.
|
7 years of prevaricating is long enough so I've finally pulled my finger out and got on with it. 2mm foamex sheet was easy to cut in thin strips and is not so thick that it is particularly noticeable. It won't warp when textured and painted. I cut the strips to about 15mm so that the 5mm hedge will occupy the central 1/3. The edges are trimmed slightly to a bevelled, wavy finish and the ends are cut down to allow hedges to fit end-on or with a right angle corner.
Hedges were hot-glued in place, then the top of the bases received a thin smear of brown acrylic sealant. Once that had dried, brown texture paint (brown paint, ready-mixed filler, sand & PVA) was daubed all over the bases.
 |
Hot-glued and caulked.
|
 |
Caulk helps fill the join and hide hot glue.
|
 |
Base showing cut down ends and wavy edges.
|
The usual Wilko emulsion Nutmeg Spice/Coffee was painted onto the base and drybrushed with Desert Sand so that they'll match my usual gaming mat.
 |
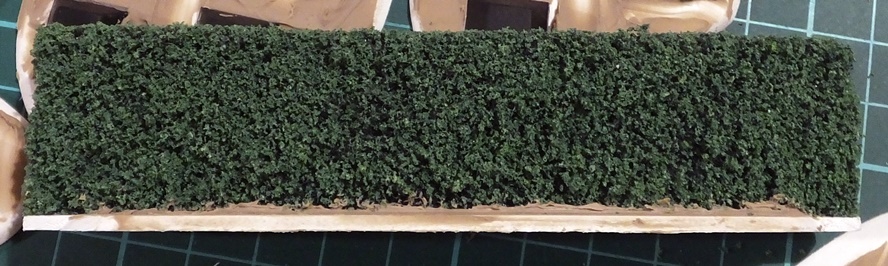
Hedges complete.
|
 |
Trimmed ends allow right angle corners.
|
 |
Only the tall hedges done so far.
|
 |
These are all very neatly trimmed.
|
 |
15mm figure for scale.
|
These have turned out fine, so next up will be some slightly rougher countryside hedges in contrast to these neatly trimmed ones. If I made a few more shorter sections of neat hedge too, I could make a nice maze, perhaps with a topiary sculpture in the middle...


These look great! I really hate using and storing vegetation that uses flocking, as it gets all over my gaming table, storage bins, floor, etc. Does the flocking on these sponges fall off?
ReplyDeleteGive it a spray of something to sealit on. Various options, start with 50/50 mix of water & isopropyl alcohol and immediately (ie while the hedge still wet) 50/50 water & PVA. The water/isopropanol penetrates and when you do the second spray of PVA, it draws it into the hedge. If you have no isopropanol, you can try just 25/75% PVA water with a few drops of washing up liquid to break the syrface tension. Alternatively, try a spray can of cheap varnish from the £1 shop.
Delete