Tuesday, 11 July 2023

Summer Scenery Project: Ruined City part 3

I've assembled some test buildings and experimented with texturing to make them more visually interesting.

I've painted PVA into the joints, pressed them together and painted some more PVA along the inside of the joint.  This creates a good, strong bond once it has dried.  I've used some coffee stirrers to add floors in one of the larger buildings that came with no internal detail.

Wood filler is smeared over the joints, then sanded smooth when dry to help conceal them.

The walls are textured with a mixture of tile grout and PVA, plus a few drops of black paint to give it a grey colour.  This hides the filler on the joints and blends the lintels and window sills into the structure.

I add the paint so that if the scenery gets bumped and chipped, the grey blends in rather than standing out as a bright white scar.  The buildings scale well against my existing home-made foamcore and it will be easy to add in some extra walls here and there using some of my foamcore scraps.

I've left the etched brick areas uncovered.  At this scale, the thickness of the texture paste is enough to look like broken render around them.  A sheet of thin plaster crumbled to small fragments will be sprinkled in the rubble under these chipped areas on the finished game board to simulate the flaked off render.

Broken edges of wall have been painted with PVA and sharp sand mixed with brown grout sprinkled over them for a rubble effect.  Some patches of rubble have been added on the floors inside.

I'll be able to mix and match the various corner sections to create different ruins, so re-use of 3 identical sets of ruins will be much less obvious.

Many of the ruins include damaged floor sections - you can see in this example that the bottom of the windows are sometimes very close to the floor, but this doesn't seem to be as noticeable on the first floor as it would be on the ground floor.  The floors are the same 3mm MDF, so quite chunky.

There are a range of window styles across the different buildings.  Although this will limit which ruins I can put together to create buildings, I like the variety that it will bring to the table.

Some of the ruins have a small internal wall section to add.  In this instance, I added it on the outside of the building instead.  It will probably be more useful out here, where it will provide extra cover and won't interfere with putting figures inside.

I've cut some more angular bites out of the broken sections of wall, where whole bricks will have been knocked loose.  A lot of MDF ruins have breakages that I think look too curving and smooth, and not how walls really break and collapse, in a more angular way.

These test ruins have been valuable for experimenting with a few different techniques and the rest of the buildings should go together pretty easily when I have the time to work on them.


Monday, 10 July 2023

Summer Scenery Project: Ruined City part 2

The buildings I'm constructing will have added detail to reduce the slab-sided look you often get with MDF kits.  The first thing to do is match up all the parts for each set of ruins.  As mentioned previously, all have a slightly different set of corner connecting lugs, so you can be sure that you have the correct pieces.  I'm not building them all yet, just a few to practice some techniques and work out the best approach to the project.

Window sills and lintels are the first thing I'll be adding.  These are just trimmed out of thin card or thick paper.

I cut the paper strips for the lintels to start, easiest with a sturdy craft knife and a metal ruler.  With the buildings laid out, it's easy to trim the strips down to the correct size for each window.

I cut all the lintels to match the angled ends laser etched on the MDF.  I set them out as I go, to help keep track, then glue the whole lot in one go.

I used a slightly thicker cereal packet card for the window sills.  Tesco Corn Flakes proved ideal, but other brands are available...

I use a small brush to apply the PVA onto the building.  The bits of card stick almost immediately when pressed firmly into position.

Once completed, it's onto the next building.

Even this small detail can make a surprising difference to the appearance of the building.

You can see the difference in thickness between the lintels and sills.


Experience has shown that these details are definitely best added before you assemble the buildings!  Next time I'll go into some detail on the assembly of the buildings and also applying some extra texture.

Sunday, 9 July 2023

Summer Scenery Project: Ruined city part 1

 I've fancied making a ruined city game board for ages.  Not the GrimDark TM gothic type, something more generic so that it can potentially be used for modern games as well as sci-fi.  I want it to be landscaped so that it is multi-level, with narrow, winding streets and steps as well as larger thoroughfares, a stream, gardens and lots of scatter scenery.  I intend to use a mixture of MDF, Linka and foamcore for a lot of the buildings.  It will be a chance to try out a few texture rollers too, for some interesting effects on cobbled/tiled paths.  Inspiration comes from many places that I have visited or lived such as Norwich, Bangor (N Wales), numerous Cornish towns and villages.  Ferrix in the Andor series had some interesting architectural ideas too, along with lots of narrow winding lanes going up and down hills.

JB MDF Products are an excellent source of cheap MDF structures to use as the basis of my city. I ordered a bulk buy set of ruins in October 2022 for £27.99 (including postage).  This includes 3 packs of his "set A" small ruins, one "set B" large factory and outbuildings and one "Set C" tower block ruins.  This should be enough to cover at least 4 x 1 foot square tiles, more when I mix in the foamcore and Linka.  Using the MDF will save all the time I would spend cutting out windows, which is a big bonus.

All the ruins have their own individual pattern of interlocking lugs.  This has advantages and disadvantages: it does mean that you can match up the lugs to ensure you put the right bits together with minimal need for instructions, but it also means you can't easily mix and match to create different structures.

There are exposed patches of brickwork, detailed windows and lintels visible for extra interest.  The windows in particular are one of the reasons why I like his models

Some pieces come together to form almost complete buildings.

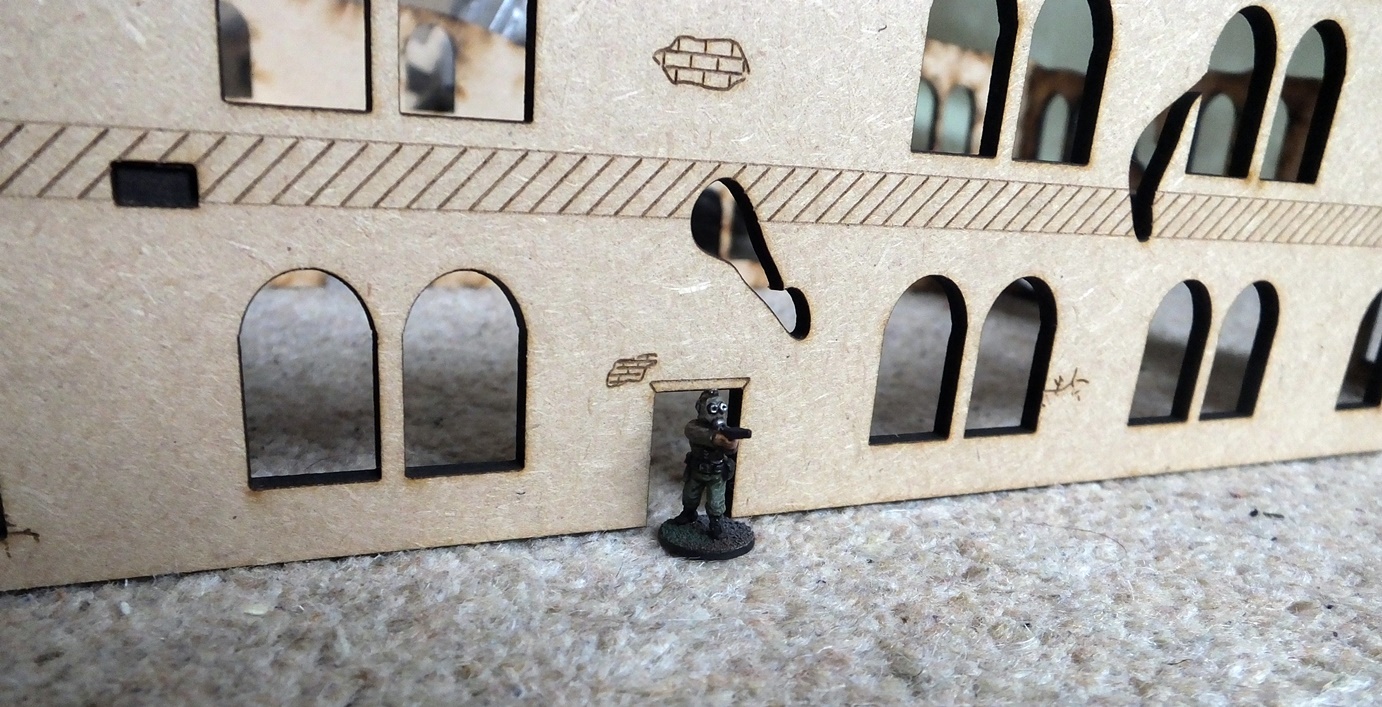
Doorways can be a little short for 15mm figures, but that's only a minor gripe.

Many of the ruins have a good number of windows.

There are still a few larger sections without windows, so mecha and armoured fighting suits will still have the occasional place to hide.

The lugs generally interlock very neatly to hold the structures together.

The designs have been well-thought-out to give a good range of variation in size and shape.

Many have upper floors of the same 3mm MDF.  In some cases, the floor thickness hasn't been fully allowed for, leaving the window 3mm too low, but this isn't too noticeable so isn't worth spending time fixing.

These will provide plenty of vantage points for snipers or weapon teams.

The large factory building will make a good centrepiece for a tile.

This has lots of space for internal details such as stacks of crates or chemical drums.

A storage yard outside would provide lots of extra cover during a game and perhaps host some objective markers.


I have been busy adding extra detail to these MDF shells, I'll go into some detail on this in my next post.

Friday, 7 July 2023

Action Force - SAS Panther

The SAS Panther jeep (presumably named after the famous SAS "pink panther") is a re-coloured version of the US GI Joe VAMP jeep.

This was one of Jabberwocky's models from Thingiverse, the GI Joe VAMP jeep rescaled to 18% original size. I wasn't sure how well it would print but I added a ridiculous number of supports and it came out great, even the roll cage had no problems.  The wheels and gun come separately from the main body of the vehicle.

SAS Force engage the Red Shadows...

The model is great, though missing some of the finer details of the original toy.

The Jerry cans and gun are particularly low-detailed, but you can still tell what they are.

These are simply Vallejo black for the body and Vallejo cold grey with a black ink wash for the seats, wheel arches etc.  Yellow parts were painted in white first, then my old GW sunburst yellow, with a sepia ink wash. Tyres were painted brown and drybrushed black before attaching to the model with gel superglue.

After printing, I wasn't sure if it was a bit small, but it doesn't look too bad next to a 15mm jeep or a Peter Pig figure.

Being a chunkier style than the jeep, I could maybe print them again at 20% original size instead of 18% but these are OK for the time being.

If I print some more, I will attach the wheels to the body before printing.  I might try and replace the gun barrels too, and if I can find a driver, that would be even more useful.

This is a great addition to may Action Force project, and may be used in a game of AK-47 Republic (Western Intervention Force).

Monday, 26 June 2023

Mortar Teams for AK-47 Republic

 When hunting for AK-47 Figures recently, I came across Keep Wargaming, who had a number of very temptingly priced 15mm figures.  As well as a number of nice sets of Alternative Armies Ion Age sci-fi figures (in their old Firefight packaging from the 1990's), I picked up some Skytrex Command Decision wounded, mortar teams, truck passengers, gun crew and other bits and bobs.

Base coat & webbing done.

I used Vallejo Khaki as the base colour with a sepia wash for shading.  Webbing was coloured using  Army Painter Camo Green Speedpaint.  Skin tones were touched in with a mixture of brown and pink flesh colours.

Base coat & webbing done.

Once boots etc had been added in black, the figures were gel superglued onto Warbases 30x30mm MDF bases.

Glued in place.

I tried to ensure a good mix of figures on each base and swapped out a couple of the crew for other gun crew for extra variety.

Ready for texturing.

The mortars come in 2 pieces, bipod and barrel.  These fit together very neatly, the bipod base curving around the barrel base for a snug fit.

Wood filler will hide the cast-on bases.

The bases were textured with brown wood filler, painted with burnt umber, coated with fine sand/grout and finally static grassed.

Transport will be a bit cosy in only 2 Landrovers.

Although these are WWII figures, the lack of personal weapons other than holstered side arms means that they will fit fine into a 1960's-80's army for AK-47 Republic.

"Left a bit. Up a touch." (Professional mortar spotter speak)

I added some camo spotting on their uniforms using Army Painter Camo Cloak Speedpaint and GW Gore-grunta Fur contrast paint.  This sort of paint provides a fairly subtle effect, which was just what I was after, with no additional shading or highlighting required.

"Shoot THAT way."

Larger rocks have been placed in front of a couple of the mortar positions, where the crew have made a half-hearted attempt to give themselves a bit of cover.

These fortifications will make us invulnerable!

Once I get my 3D printer set up again, I'll print a load of mortar bombs and ammo crates to stack around them.  There are plenty of empty spaces on those bases that I can fill!

Sunday, 25 June 2023

Growing trees - Teloxys aristata (Seafoam) part 6

I swear you can hear it growing...


The ones I planted in the garden aren't looking as impressive.  I'm not sure whether they'll catch up or maybe just wither away and die...