Saturday, 3 December 2022

Rocky cliff facility part 2: Constructing and painting the industrial sections and finishing touches

With the rocky plateau completed, it's time to think about some extra detail on the industrial structures.  Some pipes are easily made using a few of the snap-off ends from COVID swab tests.  These are a fairly soft  plastic that can be heated for a couple of seconds over a candle and bent into shape.

Bending the COVID swab sticks into shape.

I made a range of shapes designed to fit on and around the Robotix pieces.
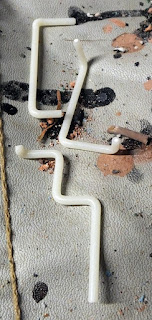
"Pipes" ready for fitting.

Other useful parts come from laser-cut MDF building waste.  All sorts of interesting shapes in here that have been cut out from windows and other structural elements.
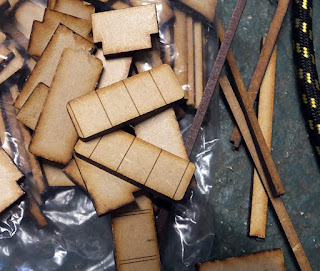
Useful cut-outs from laser-cut MDF scenery.

Plastic coffee-stirrers, bits of electrical wire, plastic packing strips, pieces of coat-hanger, plasticard scraps will all find a use...
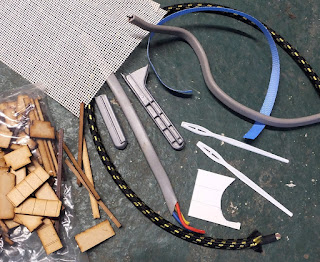
More items from the bits box.

A couple of Lego dish antennae and some technic parts fit neatly into the Robotix and can provide communication with the outside world.
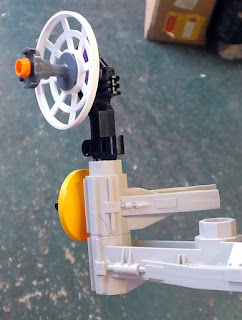
Lego dish antennae and Robotix.

Lego radar dishes are really cheap (i.e. 1p each plus postage) if you order them from somewhere like Brickowl or Bricklink and they are great for adding extra detail on a model.  After filing/sanding off the "Lego" logo wherever it might show, the various parts were superglued or polycemented together.  Some MDF scraps were added as platforms, brass wire and fine steel wire for electrical cables, small pieces of 3D print supports, plus the previously mentioned COVID-test pipe sections.

Lego is a cheap and easy source of bits.

After a black spray undercoat, patches of burnt umber were applied across most of the model, then some burnt sienna in smaller patches to give a good rusty colouration.

Rust colours applied.

The sections where glue will be applied have been left free of paint to allow good adhesion.

Rust colours applied.

A heavy drybrush of silver give a weathered metal look, with plenty of rust remaining in all the recesses.

Silver drybrush over rust colours.

Silver drybrush over rust colours.

Cable detail.

All parts were given a couple of coats of Pledge/Finish floor polish to give a clear, tough coating.  Experience has shown that without this, the scrubbing during the later stages of the chipping process can wear away the silver paint and sometimes the rusty colours too.

Silver drybrush completed.

For my "chipping medium", I have just used an old tube of toothpaste.  You can use Marmite instead (other brands of yeast extact are available...) but I prefer the fresh minty smell of toothpaste.

"Chipping medium" - or toothpaste as most know it.

The toothpaste is dabbed on with a scrap of sponge, making sure to get all the edges where the paint would get worn.

Aplying the toothpaste with a sponge.

Using toothpaste means that it's easy to see where you've already applied it.

A range of big blobs and smaller patches.

It's important to make sure the blobs are fairly large.  If they're too small, they don't always come off when you scrub later.

Tower section ready for painting.

I decided to leave off the hair-curler cage around the chimney.  The fit wasn't quite as good as I'd have liked and I thought it would probably keep getting knocked off during games.

Platforms and antennae ready for painting.

I applied a good coat of toothpaste around the edges of the little MDF platforms.  It was particularly important to ensure these got a good coat of varnish earlier, otherwise they'll soak up lots of water and disintegrate during the scrubbing stage.

As soon as I'd finished dabbing the toothpaste on, I quickly grabbed a rattle-can of cheap white undercoat and gave the pieces a good spray from all sides to ensure good coverage.

Spray painted white.

I waited until the paint was touch dry so I wouldn't leave fingermarks, then prepared a tub of warm water and an old toothbrush.

Warm water ready to scrub off the toothpaste.

After a quick dunk in the water, the parts are given a good scrub with the toothbrush.

Scrubbing in progress.

If all goes according to plan, the paint will flake away where the toothpaste is, revealing the metal and rust colours underneath.

Rust/metal starting to show through nicely.

The process was fairly quick all over and the pre-varnishing prevented too much of the underlying colours washing off.

Antennae looking good.

The MDF platforms survived with no problems.  All the layers of paint and varnish hide any fibre patterns and they have a very good battered metallic finish.

MDF platform hasn't absorbed the water.

 The silver paint has worn off in a few places but the underlying rust cours have remained intact, giving a satisfyingly distressed effect.

Water pistol, MDF scraps, 3D print supports, coathanger fragments and COVID swab pipes are brought together into a uniform whole through the painting process.

The parts were Gorilla-glued into place and the top of the rocks were coated with PVA and sprinkled with various green flock colours.  Some soil and tile grout was used to create paths and worn areas.

The entire top was doused in watered down PVA & matt varnish to stick everything firmly in place.

Assorted waterslide transfers have been used to add a bit of colour and interest.  Space marine tactical arrows have been used to indicate flow direction for pipes and the "TRANSFER" comes from the title block of the sheet - never forget to check whether the transfer numbers or titles also have carrier film, they can all come in very handy.

Other transfers come from some old Space Ork transfers, a Gundam sheet and model aircraft.

The door and ladders were painted with burnt umber and burnt sienna and drybrushed silver.  On the ladders I concentrated the silver drybrushing in the middle of the rungs where feet constantly wear them, but rustier towards the edges.  A few rust streaks were added running down the cliff where the supports are attached.

If you look at the dish antennae closely, you see they're Lego, but from a distance they're great.

This was a satisfying structure to build and will come in very useful, either as an objective in its own right, or as a piece of secondary scenery that provides plenty of potential sniper perches.


Rocky cliff facility part 1: Building the main structure and painting the rocks

I made some rocky plateaus for my games table as part of the "Five Quid February" challenge on the "Super Cheap Wargaming" Facebook group.  These were made from scrap foam sourced free from a local building site - even though it's waste, always ask before taking it!

Gloves and safety specs are recommended, a dust mask is also a good idea. Those little foam fragments aren't good for your lungs.

 I've sharpened an old table knife with my sharpening stone to make it more efficient at cutting foam.  You can use an extended craft knife, but there is always the risk that the blade will snap off inside the foam and it could be quite hazardous trying to remove it.

Scrap insulation.

This block of foam is 4 inches /10 cm thick, so big enough to make a substantial rocky plateau for my 15mm games without needing to add any extra layers.

4" / 10cm thick.

The first task is to peel the foil/card facing off  both sides.  This is quite thick and can be a bit sharp, so be careful!

Peel off the outer foil/card coating.

The basic shape is carved into the foam.  I try to make them all slightly irregular so that if you put them close together, you get winding passageways between the rocky walls.

Cutting the foam to shape.

This plateau will have 2 levels, and some sort of embedded processing facility with a doorway on the upper level and a ladder providing access from below.

Basic shape of 2 level plateau.

The rough shape is enough, as the surface is textured, the sharp edges disappear and everything rounds out into a more uniform shape.  Horizontal cuts are made that will give the effect of the sedimentary rock layers.

Horizontal striations engraved.

Vertical cuts are next, which will allow the sedimentary layers to flake off in small sections.

Vertical striations engraved.

I've made sure the upper level curves seamlessly into the main rock face.  Smaller chunks will be left scattered around the base of the rocky wall.

Don't forget the upper layer.

The messy part is scraping the knife edge across the sides of the plateau.  The little bits get everywhere and the static charge makes them cling to everything, so it's best to have a vacuum cleaner handy.  Don't do it in a room with carpet!

This bit gets messy.

After a couple of experiments, I've worked out the best order to paint the rocks for the look that I want.  The starting point is a brown texure coating made from powdered tile grout, PVA and some brown mortar tone.  I'm using deionised water, but only because it's more convenient than going into the house to use the tap.  A clean yoghurt pot is the idela size for the quantity I want to mix up.

Grout, PVA, mortar tone, water, mixing tub.

I use about a dessert spoon of grout (could have used brown but white just happened to be what I had left over from tiling the kitchen), half a level teaspoon of mortar tone and just a splash of PVA.

Ingredients ready for mixing.

I add an amount of water approximately equal to the total amount of dry ingredients which should mix to the consistency of thin cream.  Or maybe a very unpleasant milkshake.

Mmm.... chocolate milk.

A soft, long bristled brush is best. Used in a stabbing motion, it gets the paint into all the nooks and crannies.  Various extra bits of the foam flake off at this time but they can be wiped off at the base of any cliffs as fallen rubble.

Mmm.... chocolate cake.

Because it's been a chilly, damp few days here, the grout mixture was left to dry for 48 hours.

Grout layer all dry.

The texture of the rocks is getting clearer now that the grout has set.  There is a small alcove into which I can stick a door.

Rubble and door alcove.

 A 15mm figure gives an idea of the scale of the block of scenery.

15mm figure for scale.


With the main rocky plateau complete, it's time to think about the structure I want to build onto it.  I was originally planning some sort of dwelling, but I found an old, broken water pistol and decided to switch to a mysterious industrial facility.  A few bits of Lego, some 5mm mesh from a bird-feeder, bits of 3D printing supports, some MDF scraps, old wires and plastic rods, a Robotix beam.

Ready to scratch build some structures.

First thing to do is grab the junior hacksaw and chop up the water pistol.  Off comes the handle, trigger guard and a few other small parts.

Water pistol trimmed to fit.

A small strip is trimmed out of the side of the plateau to allow the structure to fit neatly.

Tower in place.

The tower needs some sort of chimney on the top, a piece of waste plastic tube trimmed to a shorter length will do.  A small hair curler will act as a protective cage around it.

A piece of plastic tube, hair curler and a bit of the water pistol.

 A test fiting of the parts looks pretty good.  These will be painted separately and then glued into place as the very final stage.

Chimney dry-fitted together.

 A 3D printed door will provide access into the interior of the plateau.

3D printed door.

 The doorway is a little large but I can fill in the gaps around it to make it look right.

Door in place.

 People will need a means of access to the plateau and this is where the bird feeder comes in.  Trimmed into strips, it forms the starting point for the ladders.

Bird feeder cut into strips for ladders.
 

The ladders are cut down to appropriately sized sections.  One will be useful to provide access to the machinery tower/chimney.

One piece to provide access to the tower machinery.

The other two provide access from the ground to the top of the plateau, the other from the top of the plateau to the lower level.

Ladder height test for proposed locations.

The side bars on the ladder fold back and push into the rockface.  Folding over the top couple of rungs helps fix it in place.

Ladder fixed in place.

With the main plateau completed, it's time to move onto painting. The first stage is to apply an ink wash, approximately equal quantities of  PVA and matt acrylic varnish, twice the amount of water, a few drops of black ink. Over the brown grout, this gives a well-shaded dark brown rocky look.

Black wash applied.

I should probably have used a bit more water in the mix, it does look slightly whitish when it dries due to the matting agent in the varnish, but this will mostly be hidden in the later flocking stages.

Black wash applied, ladder and door in place.

A few more paints will be used for drybrushing, starting with the tester pots of Nutmeg Spice (medium brown), then Potters Clay (pale brown - and shouldn't it have an apostrophe in "Potters"?), with a final, very light dusting of Quick Silver (which is actually grey, not silver!).

Greys and browns for drybrushing.

After the drybrushing, the rocks look much better.  The flat areas on top will be painted green prior to adding flock.  The green layer makes the flock look more luxuriant.

Drybrushing finished and ladders in place.

Showing the cut-out for the tower.

Main ladder.

Ladder and door.

For part 2, I'll go into more detail on how the industrial tower and platform was painted and weathered using a chipping technique over a rusty metallic base coat.

Friday, 11 November 2022

15mm heavy weapon troopers

 A couple more Security Force Alpha from Alternative Armies HOF range who will be joining either starship crews or the enemy forces in some of my Five Parsecs from Home games.  They'll also be easy to use with my mixed mercenaries for games like Tomorrow's War.

This female trooper has a flamer, ideal for fending off ravenous aliens or clearing out enemy bunkers.  She's been painted in a couple of different greens (one for the fabric, another for the armour plates) and brown boots and gloves, with black/sepia washes as appropriate.


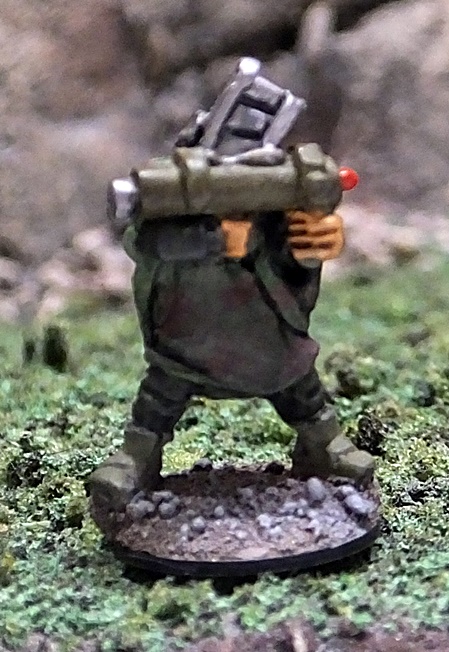
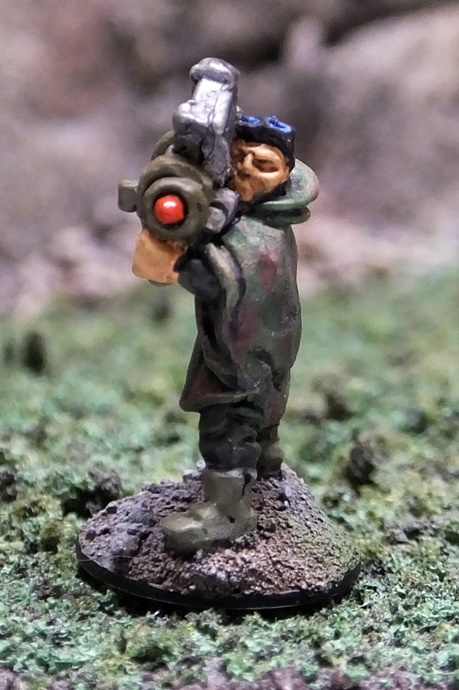
The male trooper has a compact missile launcher to provide some extra anti-armour firepower.  I've given him a camo cape and a fairly dull grey/green paint job.  Apart from the nice red attention-grabbing warhead!