Tuesday, 27 October 2020

Whoops!

 Every now and again, something goes wrong.  Usually it's my fault.  One such occasion was when I was putting a box of newly finished epic-scale models in the loft.  It slipped off the top of the pile I was carrying up the ladder and plunged two and a half metres to the floor where it burst open and sprayed bits across the carpet.  This included some of my new Forge World vehicles and I can advise you that Forge World resin does not take kindly to being dropped from a great height with metal models for company.  There were a lot of tank destroyer gun barrels and Basilisk gun platforms to repair after that...

I had a similar incident this week.  Way back in 2013 I started work on my AFCFA army, converting some old Matchbox armoured trucks into fully enclosed APCs.  Work on this project stalled repeatedly for various reasons, having 2 children being the main one.  I've also taken an inordinately long time to find decals I'm happy with.  Anyway, they're finally nearing completion, along with lots of scout cars and light armoured cars.

Having no dedicated painting/modelling area available, I have a lap tray which comes out most evenings when the time allows.  Unfortunately, I knocked this when getting something nearby and was rewarded by the sound of 18 armoured vehicles sliding off the tray en-masse and crashing down behind chairs onto the wooden floor...

Fuel tank to re-attach to scout car.
 

Looking behind the chairs, I could see the vehicles had scattered underneath and in several instances the body shell had parted company from the chassis.  These were only dry fitted and will be glued after painting is complete, so that was easy to fix by just matching up camo patterns.

Sensor bubble to re-glue to command vehicle.

Stowage box to glue to rear mudguard.

Minor damage to top rear rail (white chip).

Stowage box to go back over front wheel arch.

APC roof to re-attach.

Medical vehicle roof to re-attach.

Luckily it seems that nothing has actually broken other than the small chip on the top rail of the suport vehicle, so an evening with some superglue will hopefully resolve everything!

Tuesday, 20 October 2020

2020 Summer of Scenery - Part 10: Electrical box buildings

I've been working on some buildings constructed from surface mount pattress boxes since around May.  I've used 3 depths, 25mm, 32mm and 45mm.  I've also used 2 widths, single and double socket sized.  All came from Toolstation, ranging from 54p to £1.14.

All boxes were well sanded with a wet and dry foam sanding pad to give a good surface key for painting and remove any sharp edges.

Basic materials and tools.

 I've used mainly plasticard and Lego parts to enhance the buildings and add detail.  Main structural elements (eg roof) use 1.5mm plasticard while thinner sheets and textured sheets (treadplate, corrugated) are used for surface detailing such as doors, panels etc. Various other wires, old toys etc will also come in useful.

Lego enhancements.
 
Doors have been scratch built from thin plasticard. Most will have entry pads added from Ainsty Castings (now sold by Brigade Models) 15mm stowage basket sets.  These etched brass sets come with 4 stowage baskets of varying styles on each frame, plus a couple or radar dishes, a small grille and a couple of display screens/keypads.

Scratch built doors.

 I've used some 1.5mm plasticard for walls/barricades. Small Lego curved slopes (part number 11477/17134) form the supports to either side and a section of corrugated plasticard to create a more interesting texture along the centre.

Plasticard and Lego barricades.

 The largest building is a 2 storey workshop (45mm lower storey with 32mm upper storey) with the upper floor mounted at 90 degrees to the ground floor.  Windows are created from Lego windows (part number 28961) glued on sideways.  The door is Evergreen/plastruct metal siding plasticard with Lego curved slope (part number 13731 razor-sawed to size) sides.

2 storey workshop with office above.

 The flat roof has some hatches and a Lego brick electrical cabinet with plasticard doors etc. The height of the building provides a strong attachment for the Lego girder tower (part number 58827).

Flat roof area with electrical cabinets and hatches,

 Plastruct steps provide access to a plasticard treadplate platform. The overhanging office section is supported by a pair of Lego inclined stanchions (part 4476).

Note stairs to roof and supports for overhanging office.

  More Evergreen metal siding plasticard provides doors for this 45mm tall double garage / workshop, plus some sloping vents at the top of the wall.

Double garage building.

A smaller workshop has a nice large door plus 32187 "extension for transmission driving ring" chimneys.

Small workshop.

Small workshop side door - with access control.

Rear of small workshop.

Guitar strings make useful bits of cabling.  Small lego tiles and scraps of thick plasticard make junction boxes.

Side of small workshop.

Small workshop 2 with roller door and canopy.

Rear of small workshop 2 with plant and machinery.

Small workshop 2 with small vents.

Communications antenna from Lego.

Painting has started but more on that another time!

Saturday, 17 October 2020

Cheap Chinese Cars

I have a lot of old matchbox cars which go well with my "heroic 15mm" sci-fi figures but they do look oversized in comparison to my "true 15mm" moderns such as Peter Pig.  I recently splashed out the grand sum of £2.68 on a pack of 10 1:100 model cars and these will suit my games much better.


They come moulded in a range of different colours and could be used as-is but I've decided to give most a quick splash of paint and an ink wash & drybrush to accentuate the detail.  They also benefit from a few additional spots of colour for indicators etc.

As purchased on the left - painted , washed & detailed on the right.

The wheels/windows are a 1-piece moulding that fits inside the body shell, so it's easy to remove when painting, making it a very simple job with no masking required.

As purchased on the left - painted , washed & detailed on the right.

These will make good scatter scenery in my 15mm Action Force games, provided you can overlook the fact that they're not really 1980's syle cars!

Monday, 12 October 2020

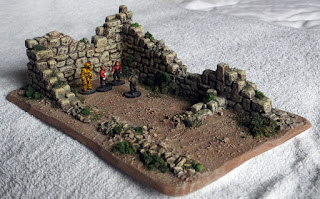
2020 Summer of Scenery - Part 9: Desert ruins

"A lick of paint and it'll be like new..."

 I've got a number of "generic desert buildings" but something that often seems to crop up in adventure stories (and also quite a few modern military memoirs) is the ancient "desert fort".  Whether the decayed remnants of the old colonial rule or the crumbling remains of old tribal centres, they provide a good contrast to the better-kept inhabited towns.  I decided to build a few ruins with some Hirst Arts "ruined fieldstone" blocks.

Initial construction and base coat.

Burnt Umber base coat on the walls.

I've built 3 sections of ruins to start, 1 small, 1medium with an archway to add a little interest and a larger section which can provide reasonable cover to a vehicle.  I bought a bag of builders' sharp sand probably 15 years ago and it's still serving me well for terrain building.  It was sieved into 3 different grades: fine (mix of dust and very small grits), medium (approx 1.5-2mm granules) and coarse (3-5mm pieces).  Bases were cut from Foamex board.

I needed something stronger than PVA to fix everything to the Foamex, so the Hirst arts blocks were assembled using 151 "Hard as Nails" which is the sort of no-nails stuff you dispense from a sealant gun.  I've found this is particularly good for the fieldstone blocks where you can end up with gaps if you aren't careful.  Layers of the adhesive were also used to delineate the crumbled/robbed away sections of wall between the Hirst Arts blocks, with some of the coarser stones from the builders' sand used for texture.


I wanted a bit of contrast between the walls and the desert, but also colours to tie them together.  The desert is, appropriately enough, a Wilkinson's tester pot of "Safari Sand".  This turned out to be a poor idea as I shall expand upon later.  Walls were base coated with burnt umber craft acrylic, drybrushed heavily with a dark yellow, then finished off with the Safari Sand.

GZG Islamic Federation for scale.


This work was completed a year or two back but having used the scenery in a game, I decided that the ground colour is too pale and makes it feel out of place amongst the other desert buildings.  As my recent blog posts have shown, I've been trying to improve my scenery techniques so I decided to revisit the ruins and make some modifications.

The first thing to do was reshape the bases and bevel the edges. The bases were repainted using the same mix as my other desert bases, Wilko "Nutmeg Spice", "Coffee" patches and a heavy drybrush of "Desert Sand".  PVA was painted around the edges of the ruins to attach the coarser clumps of foam foliage, then green dyed tea-leaves generously sprinkled on and around to blend them into the bases.  Dilute PVA was dripped on to soak in and set everything in place, with a sprinkle of autumn grass here and there as the finishing touch.

Bases re-shaped.

Vegetation added.


GZG civilians for scale.


It's ended up slightly more overgrown than I originally intended but that's OK.  The vegetation also helped hide a couple of places where there were air bubbles in the plaster cast blocks.