Tuesday, 26 July 2022

Volvo Lorry

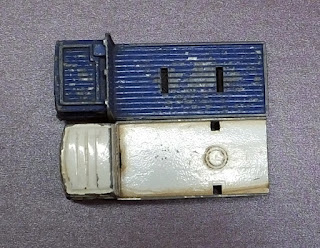
Last weekend I made a return visit to the car boor sale that yielded a couple of vehicles for the AK47 Republic objective competition.  There were the usual collections of battered old toy cars and this time we came away with 3 Matchbox goodies, a Porsche 928 and a Lamorghini Countach for the young 'uns and a Volvo lorry for me.  There lots of Matchbox "Leyland Ergomatic Cab" lorries but I already have quite a lot of those.

This was originally sold as a "container lorry" with a shipping container on the back, from 1985-2000.

The detail underneath lists it as being 1:90 scale but as you can see from the photographs, it matches neatly against the 1:100 Saviem I used in one of my objective markers.

I think it's unlikely that anyone seeing this in a 15mm game will exclaim "By gad man, what are you doing using that ridiculously out-of-scale vehicle!", so now to drill out the rivets and repaint.


Friday, 22 July 2022

Railway sleeper walls

 Something you often come across on industrial sites or farms is the "railway sleeper" wall.

Railway sleeper wall.

 They are usually used as retaining walls to contain something such as manure, crops (potatoes, turnips etc), or on an industrial site it could be aggregate or stone chippings.

Railway sleeper wall.

 I passed this one just at the side of the road, along the edge of some concrete hard standing.  I thought I'd get some photographs for reference.

Railway sleeper wall.

The wall is made by setting universal columns ("H-beams" or "I-beams") upright in concrete and sliding wooden planks down between the flanges.

Planks between the flanges.

 Railway sleepers tend to be the ideal size and are sturdy, often treated to resist rotting, and frequently cheap and available in large quantities.

I-beam detail. Very rusty!

I have a range of old girders, supports and beams from Plastruct and other companies, some old grey ones happened to be exactly the right size to use with coffee-stirrers.  All I needed next was a few scraps of Foamex that could be trimmed to the right length and cut into an irreguar shape along the sides.

Basic materials.
Some stirrers turned out to slightly thicker than others, so the first task was to sort out those of the correct thickness to fit into the girders.

Testing the fit.

 Once this was worked out, I had to determine out the most efficient use in terms of length of plank and height of wall.

Working out the lengths and heights.

 This was also an opportunity to try out my new bit of kit, the multi-angle cutter. This uses a stanley knife blade (or utility knife blade) which fits into the cutter and cuts against a metal anvil.  The anvil has a useful set of guides for cutting at different angles.

Multi-angle cutter.

The panels were glued together using a mixture of gel and liquid superglues (cyanoacrylates).

Finished fences.

Bases were finished with a smear of brown acrylic caulk followed by some soil & brown tile grout.

Finished fences with 15mm scale volunteers.

Statis grass and small shreds of foam were added in for a suitable unkempt look.  They were sealed in place with some dilute PVA dripped on from a pipette.

Vegetation/basing detail.

The steel uprights were painted burnt umber, then dabbed with a patchy burnt sienna.

Vegetation/basing detail.

Wooden panels were taupe, washed with thinned down green paint along the edges to simulate algae growing where the wood will have been damp.

Vegetation/basing detail.

A drybrush of the original taupe helped soften the green patches and I finished off with a bone-coloured drybrush for the highlights.

Vegetation/basing detail.

These fencing panels can be used in any of my modern games and will also be OK for sci-fi games.  They may not have timber railway sleepers in the far future, but there should be local trees that can be cut down and trimmed to size in order to quickly and easily assemble retaining walls like this.

Vegetation/basing detail.

I only had enough for the 3 panels. I did wonder whether I should have reduced the height by 50% and made double the length of walls, but ended up sticking with them as they were.  They'll provide cover to tanks and small mecha at this size, and I could always use them for a 28-32mm game too.

H-beam detail.

They've turned out pretty well and at the cost of only a few pence each, match my cheapskate aesthetic very well!

Vegetation/basing detail.

AK47 Republic - Objective Markers Part 13: Truck

As with the tour bus in my previous post, another item I picked up in a car boot sale for a few pence was an old Majorette Saviem truck. Labelled as being 1:100, it's spot-on for 15mm wargaming, especially for post-colonial Africa.  I have at least a couple of these already, but they're packed away somewhere in readiness for building work on our house.  When I saw this one I knew it would save me the trouble of trying to find where I'd hidden the others for my objective marker.

The original plan.

I drilled out the rivets, disassembled and cleaned the parts.  I had intended to re-spray the body of the truck but decided that the battered appearance was fine for my needs, and would also save time. Before reassembling the vehicle, I painted the seats brown, shaded darker brown and then drybrushed the front grille silver.

Internal detail.
 I painted the yellow stripe around the cab, added the red lettering on the front, the orange indicators and a black front bumper with silver headlights.  A wash of watered down brown paint was applied over the entire vehicle and then wiped off with a tissue, leaving the "dirt" in the recesses of the body and wheels.

Details and weathering added.

The completed vehicle was added to the plain base I'd made.  I had 3D printed a couple of crates to use as cargo and added some 3D printed fuel drums I painted a few weeks ago.

The finished objective marker.

I might add some more details another day such as a logo on either side of the cab, if I find some suitable decals

The finished objective marker.

The finished objective marker.


Tuesday, 19 July 2022

Kickstarters ahoy! Stork heavy lift VTOL and ScorpionMech

 A quick post about a couple of Kickstarters currently underway from companies I would strongly recommend based on personal experience:

First off, the lovely people at Kore have their Stork heavy lift VTOL running, 13 days left as I write this (finishes 1st August) and it funded in under 18 hours.  This is a Skycrane style transport VTOL with interchangeable payload pods that fit under the rear fuselage.  It also has the potential to carry various armoured vehicles.


Stork image borrowed from Kickstarter

I saw their LARC VTOL at the Diceni games show in Norwich earlier this year, here's a slightly blurry close-up of the 15mm version (cropped from a much larger image, hence the poor quality!).

LARC gunship.

 I've opted for the stl file collection at £12, which includes the Stork VTOL, 3 different rear pods (cargo, personnel, gun pod) plus weapons for the forward hull to convert it from a civilian to a military version.  If they reach 100 stl backers, they'll include the file for their adblimp - I spotted this at Diceni too.

Adblimp.
 

I also selected the £6 add-on for the stl files of the LARC which includes both standard and military versions, plus a "stretched" version with extra carrying capacity.

If you prefer physical models, they've still got you covered, in 15mm the Stork will be £25 and you can add on 15mm LARCs for £5 each (excellent value because they're normally £9.50).  28mm and 6mm versions of the Stork are also available.

It's been a pleasure dealing with Kore in the past so if you're after some cool aircraft, take a look at their kickstarter, or have a look at their web page for the many other excellent vehicles that they produce.

Secondly, as I posted about a couple of weeks ago, Rebel Minis Digital Direct still have their ScorpionMech Kickstarter running for another 41 hours at the time of writing (finishing 21st July).  Again, it's been a pleasure dealing with them in the past, they've been helpful and obliging and even refunded me the difference when they dropped the price on something I'd already bought a week earlier (VIPER suits).  They've already passed the stretch goals for 15mm and 8mm versions, jet packs and missile pods.

ScorpionMech Kickstarter

Examples of some of their models I've already printed to show the detail and quality of the sculpts, the VIPER suit:

Combat VIPER

Bear in mind these were printed on a sub-£100 resin printer so any print lines or lack in quality are the results of this rather than the stl files!

Civilian VIPER load-lifter.


Sunday, 17 July 2022

AK47 Republic - Objective Markers Part 12: Tour Bus

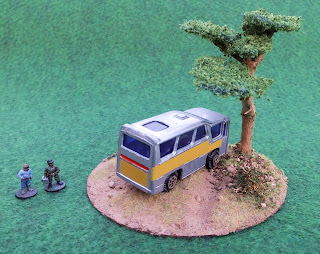
At a car boot sale a few weeks ago I spotted some old toy cars and I realised that some would be ideal for the objective markers I was panning.  My original plan involved a crashed truck with some gold bars spilling out, but when I saw this vehicle the idea metamorphosed into a crashed tour bus.

Original plan that I discarded.
 

This bus is probably slightly smaller than 1:100 scale, but it was close enough that I wanted to use it.  It came with a couple of faded and torn stickers on the sides, which I removed, before drilling out the rivets and disassembling it.  I gave the whole thing a good scrub with warm soapy water and an old toothbrush, then repainted the sides in yellow.

No interior detail for this bus.

I had some 1:100 model railway figures that were suitable for use as some of the bus passengers.

Passengers.

The bus was reassembled and the lights painted silver.

Headlights!

Alas, this little scene was also a casualty of my time running out.  I didn't get a chance to paint a logo on the sides of the bus and although the tourists made it to my painting tray, the brush didn't touch them.  I had prepared the base with a ditch ready to receive the crashed bus.

I hope I'll get a chance to paint a few people to stand around the bus, and I'll sort through my supply of decals for a tour logo.


Wednesday, 13 July 2022

AK47 Republic - Objective Markers Part 11: Ice Cream van

The next entry for the objective marker competition was based upon one of my favourite adverts of all time - the Boddington's ice-cream van.

I used the base with tyre tracks which I'd made specifically with this scene in mind.  The ice cream van was a 3D print file which I reduced to 6% original size.  The tyres were reduced in size to fit the wheel arches, then increased to 200% width to make them suitably chunky.  Rather than fiddle around with axles, the wheels overlapped slightly into the body to ensure they were firmly attached.

Thanks to the YouTube pause button, the colour scheme is fairly similar to the Boddington's ad van, allowing for the slightly different shape.  Ideally I would have added some ice cream pictures and a "SLOW - CHILDREN" sign on the back but I didn't feel my painting skills were up to it under the time pressure.

There are a couple of other versions of the van available with a hot dog or a burger on top, so they might be making appearances in my sci-fi games some time.  ("Myceli-yum! Mycoburgers are what a fun guy eats!")

Monday, 11 July 2022

AK47 Republic - Objective Markers Part 10: Camouflaged Observation Post

This observation post was another casualty of time running out.  I had intended to include a couple of tables and a radio, perhaps some maps laid out.  But let's not focus on what's missing,,,

Initial sketch.

Once the soil/grout, grass and tree foliage had dried, I sorted through my tub of 3D printing supports (always save them!) and found some long ones suitable to support the camouflage netting.  Cocktail sticks would have been too thick and some of these supports had branched ends to help hold the netting.

The netting is a piece of bandage.  It was supposed to be open mesh gauze bandage for the netting effect but this was the only one I could find at short notice!  It's been dyed with green and brown acrylics and pulled into shape when wet.

When I get a chance, I'll re-cover it with the correct sort of bandage and add tea-leaf patches.  That could also be the suitable time to add some tables as per the original idea.  I have a GZG command set that includes a sitting radio operator who will be ideal to go with it.

The Land Rover was the final touch, but it does look rather empty under there!