Tuesday, 23 January 2024

15mm Adobe houses: Part 5

 My existing adobe style generic desert houses are mostly very white.  One of the things I specifically wanted to do with these new ones was to add some more colour.

Only one existing building has any colour...

I've started by painting the strips along the lower half of each wall in a fairly strong colour.  They look quite bright at the moment, but later weathering will tone them down somewhat.  The sci-fi doors add a splash of a different colour to the buildings too.  I've used a number of emulsion house paint tester pots from The Range. These are former Wilko paints, The Range having taken over much of the former Wilkinson's product lines and stores since they collapsed into administration late in 2023.  These were £2 in Wilko but the Range were selling them off at 50p each and when I got to the checkout, they turned out to be buy one, get one free, so I ended up with 8 pots for £2, which was excellent value.  Although there is the odd exception, for the most part the Wilko paints are excellent, very strong colours and the paler ones are often very opaque and will cover other colours well.

"Retro Ochre" with "Jetty Blue" door.

"Retro Ochre" with "Jetty Blue" door, "Earthy Hue" bricks.

"Retro Orange" wall, "Jetty Blue" door, "Gold Heritage" canopy.

"Retro Orange" wall, "Jetty Blue" door, "Gold Heritage" canopy.

"Retro Ochre" with "Jetty Blue" door, "Earthy Hue" bricks.

"Retro Ochre" with "Earthy Hue" bricks.

"Retro Orange" wall, "Jetty Blue" door.

"Retro Orange" wall, "Jetty Blue" door.

"Jetty Blue" wall, "Retro Orange" door.

"Jetty Blue" wall, "Retro Orange" door.

"Earthy Hue" bricks, "Jetty Blue" door.

"Earthy Hue" bricks, "Gold Heritage" door.

Chiltern Arts acrylic Cadmium Red wall, "Jetty Blue" door.

Chiltern Arts acrylic Cadmium Red wall, "Gold Heritage" door.

I'll add some more details next, and then they will need weathering.  Before that though, I need to do something about the roofs.

Monday, 22 January 2024

15mm Adobe houses: Part 4

 The buildings are all textured by stippling a mixture of PVA and tile grout over the walls, being careful to avoid the doors and some of the features such as junction boxes, stonework or timber.  Although it's hard to see in the photographs, it does help blend everything together and hide the filler over the corner joints.


 After 24 hours drying, the houses were completely painted in white masonry paint, I think this was probably Dulux Weathershield or something similar, decanted into a smaller pot to save me having a 5 litre can on the painting desk.  This was painted smoothly onto some parts like the doors, but stippled onto the main walls to maintain the rough texture and create a contrast between the different surfaces.  It gives a really tough surface and is very opaque to give a good base for whatever colours I choose to use later.


Next, it will be time to add some colour.  I have a number of new tester pots to try.

Saturday, 20 January 2024

15mm Adobe houses: part 3

 My practice building has a canopy made from some matchsticks and a bit of old fabric soaked in PVA.  A Star Wars Monopoly piece makes a satisfying greeble for the roof.

Canopy and roof detail.

The walls of the building were painted with PVA and sprinkled with tile grout, then I tapped the excess off onto some paper to pour back into the bag.  After letting it dry for a while, I applied a coat of watered down PVA.  On reflection, it's easier, faster, and less messy to just mix up some grout and PVA into a paste and put that directly onto the model, the effect seems almost as good.  Tile grout can be rather hazardous if you breathe it in, so mixing it directly with water or glue is probably preferable to sifting it onto the model through a tea strainer.  I did use a dust mask while I was working.

Note the matchstick canopy supports.

Lego tile and clothes peg greebles.

I glued a couple of the houses together and put them on a scrap piece of 5mm Foamex board.  I added a few bits of 3D printed wall and will find some more scatter pieces to complete the small complex.

Front view.

Side entrance.

3D printed walls for rear yard.

With the walls textured and various widgets and greebles added, the next stage will be to start painting.

Friday, 19 January 2024

15mm Adobe houses: Part 2

With the first proof-of-concept height boosted house a success, I cut a whole load of 5mm wide strips of 5mm thick foamcore.  These are cut to the length of the sides of the buildings, less 5mm to allow an overlap on one end.  As with the test house, they are glued on with PVA.  These are trimmed if required after the glue has dried for several hours.

Foamcore and card ready for use.

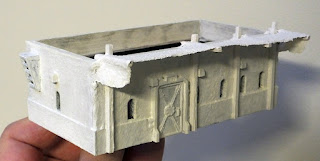
A 10mm wide strip of cereal packet card is added around the bottom of most buildings to hide the different materials and strengthen the join.  I find that the boxes of Tesco Malt Wheats are especially good for this, being a particularly good quality, thick card.  I was always intending to add something around the bottom of all the buildings to reduce the characteristically slab-sided MDF look, and now it has the added bonus of concealing the foamcore and fixing it firmly with the overlap.  This is stuck on with a good layer of quality PVA glue (not the cheaper watered down "school glue" type). A smear of wood filler is applied on the corners of the buildings to conceal the tell-tale interlocking MDF tabs, and over the engraved shutters present on some houses.  I also try to fill the gap around the protruding ends of the roof beams.

Engraved shutters filled in and corner joints concealed.

Cardboard "skirt" hides the foamcore and reinforces the joint.

Metal vent conceals the old engraved doorway.

 Additional details are added to enhance the sci-fi look of the buildings.  I have a variety of bits for this.  Some of the scrap MDF makes a good sun canopy and more scrap pieces provide uprights for some mysterious purpose.  Matchsticks are fitted between the 3 on the far side.

Lots of MDF scrap used on this one.

Broken pieces of kid's toys are handy, I've used part of a support from a Hexbug set, a 2x2 Lego tile with a couple of zip-tie pieces for vents, bits of 3D printing supports for cables.  Other small MDF off-cuts will become electrical junction boxes.

Bits of toys, zip ties, all make good greebles.

More MDF offcuts give a nice parapet to the roof, a piece of coffee stirrer forms a small canopy over the door. This one is getting embossed plasticard stonework instead.  This is glued on with superglue, making sure it only goes on the top half of the strip so that it doesn't melt the exposed foam inside the foamcore.

MDF scrap around the roof, embossed plasticard skirt.

The ladder is made from bird feeder mesh.  Small pieces of 3D printer support have been added to the walls.

Bird feeder mesh ladder.

On this smaller building, I've used a couple of pieces of clothes hanger, a Lego wheel for the chimney and another bit of coffee stirrer over the door.  I attach them using superglue, then use more superglue sprinkled with some bicarbonate of soda to give a really tough bond.

One of the smaller buildings.

Small scraps of card will break up the flat surfaces.

Lego wheel chimney.

Clothes hangers really are a great source of bits, especially the ones for trousers. Lots of long, straight sections of an even width, excellent as heavy duty steel beams or columns.

Clothes hanger metal columns.

 Once they have enough detail, the buildings will be covered with a layer of texture paste to give a more varied appearance.  More on that another day...

Monday, 15 January 2024

15mm (?) Adobe houses: Part 1

 I ordered a couple of MDF packs recently from JB MDF Products.  The first is this set of 15mm adobe buildings which I thought would make a good basis for some sci-fi buildings.  I could have made something similar from foamcore but in terms of cost (£12.99) and time, purchasing pre-cut MDF seemed the cheapest and easiest option.  I won't have to fiddle around cutting lots of tiny windows and the MDF is very well designed to construct sturdy, rigid structures with neat, square corners.  The roofs are removable, a very snug fit, so a little sanding of the edges will be needed.

8 large buildings, 3 smaller.

15mm figure to scale.

The buildings were smaller than I expected - a 15mm figure would find that the top of the door or window is about chin height!  I was intending to add lots of detail on the outside, so this isn't a particular problem, as you'll see later...

Comparison with 15mm GZG armed civilian.

 The buildings come with a variety of different windows and other features.

Arched windows.

Arched windows and brick base.

Square windows and brick base.

Square windows with shutters.

 I cut some strips of 5mm wide, 5mm thick foamcore and glued this to the bottom of all the walls.  This makes the buildings the correct height for the 15mm figures. 

Foamcore to add height to the buildings.

Doors will be replaced by 3D printed ones of a more "sci-fi" feel, these are much larger and overlap the foamcore, so it doesn't matter that the original engraved ones no longer extend all the way to the ground.

3D printed doors.

 The doors are superglued in place, taking care not to get the glue on the foamcore to avoid melting it.  Some need a little filing at the top to fit under the ends of the roof beams, only a fraction of a millimetre.

3D printed door in place.

Next, I'll be doing something to cover that foamcore...