Tuesday, 28 November 2023

Road Train Redux Kickstarter

 Kore's latest Kickstarter has almost reached its goal of £750, only £26 to go as I write this, but less than 2 days left.  They're refreshing a lot of their older designs and moulds to make them more printer friendly and easier to cast.


HAWG from Kore's display stand at Diceni.

For only £14 you can get a huge bundle of stl files for printing at home.  I'll quote direct from the Kickstarter:

"The STL Pledge level will give you all of the files for every vehicle that we are remastering - The Goliath Landtrain, Samson alt. cab, RP01 4x4, Type 404 APC, HAWG & Adblimp! You will also get files for every trailer option for the Landtrain plus the HAWG's 2 loadouts. That is a serious stack of hardware ready to print."

My Road Train (awaiting repair!)
 

As an optional extra, you can add the Stork heavy lift VTOL stl files for only £10.  I have one part-printed, but I have completed several of the smaller but similar LARCs:


Stretched LARC transport.

Another option is get lots of resin printed physical models, which tend to be £4-8 in 15mm or £10-30 for 28mm.

LARC gunship.

These models are great, I'd strongly recommend supporting the Kickstarter here if you can!  Mark from Kore is a lovely chap who really engages with the gaming community, and I hope they manage to get there.

Friday, 24 November 2023

Starship seats

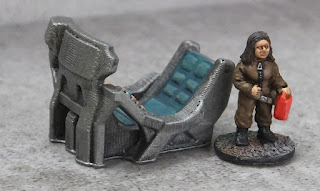
Following on from yesterday's starship consoles, the EC3D set also includes some great starship seats.

I've adopted a basic GW leadbelcher with black wash for the main structure of each seat.

The larger seat looks like the sort a captain might sit in on the bridge.  I've used GW goregrunta fur drybrushed with Vallejo khaki for a leathery look.

I added a few small accents such as the green cables on the sides and some GW mithril silver on ducting.

The next seat is probably that of the pilot/navigator.  I used Vallejo Xpress caribbean turqoise for the padding.

The seat has leg holes and lots of buttons.  The buttons were all dotted in with white, then coloured with Vallejo Xpress snake green, martian orange, Imperial yellow and plasma red.  If I use this in a large starship, I'll probably print another mirrored one so that I can create a symmetrical bridge layout.

The final seat is more basic, and I used Vallejo Xpress snake green for the padding.

The seats all look very sturdy.

Although I printed these at 56%, I do wonder whether they could be reduced further in size.  They do seem slightly large for a 15mm figure, but it might not be so noticeable during the heat of a desperate battle!

Thursday, 23 November 2023

Control consoles

 I've printed some control panels before, but EC3D do a great set that includes a range of consoles plus some starship seats. As always, these are all printed 56% original size, flat on the build plate, without additional supports.

The first console I painted Vallejo Xpress Imperial yellow over a plain white undercoat.  The buttons were dotted in with Xpress colours, plasma red, snake green, martian orange.

Cables and ducting were painted silver with a black wash.

Some chipping was applied with some silver paint on a scrap of sponge.

The screen is black with various lines, dots and squiggles in white.  Some have been overpainted with red and orange to add a bit of colour.  I might produce another of these consoles and paint it to match my bar scenery, it has the look of a meal order station.

The next console has a thin black wash over the white undercoat.  Buttons are shaded with Xpress snake green and plasma red.

Cables are painted in silver with a darker black wash.

The screen was painted black with white details, overpainted with assorted colours.

The bigger console is a similar colour scheme, giving a well-worn, grungy look.

The back of this one is plainer than the others, but still has a couple of little details.

 These will be right at home on a starship or in a lab, control centre or other sci-fi building.

Wednesday, 22 November 2023

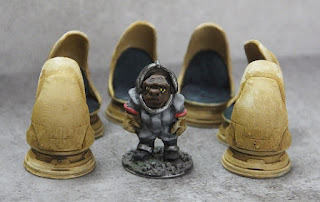
Egg-stremely comfortable chairs

 These egg-squisite chairs from the EC3D furnishing set.  Reduced by 56% to convert from 28mm to 15mm, they print support-free on the build plate.  They have nice panel detail on the base and seat back, so I thought they'd look good with very little effort from me.

They have a Vallejo khaki base coat, thinned sepia wash (1 part Vallejo sepia ink, 1 part Vallejo matt varnish, 2 parts water) which I wiped off the tops of the seat backs before it dried, then a final drybrush of Vallejo bone white.  The seats cushions were coloured with Army Painter cloudburst blue speedpaint.  This came out slightly darker than I expected, so I might repaint them or add more highlights at some stage, but they're table ready now anyway.

I did have a 7th chair but alas, I dropped it in the tub of isopropanol I use for rinsing the prints, and it vanished forever into the murky depths...


Monday, 20 November 2023

Off to the cantina

The stereotypical D&D adventure starts in the local tavern. It's a less frequently used starting point in science fiction, but it still crops up regularly, the Star Wars Mos Eisley cantina scene being one of the most obvious examples.  I knew I needed a range of bar scenery for my 15mm games and Evan Carothers (EC3D/Ecaroth) has produced a fantastic set of models for 3D printing in his modular cantina and bar.

The bar.
 

The bar comprises a number of sections that can be fixed together using openlock clips (3D printable spring clips that can be used to fix together floor tiles, wall panels and all manner of other bits produced by a number of different 3D designers).  I printed at 56% to convert from 28mm to 15mm.  As usual with EC3D, these are all self-supporting to print flat on the build plate.  The whole of the main bar printed on one build plate.  I had a second print run for the smaller stools, tables, seating booths etc.

Straight sections (internal).

 The straight sections include a simple seating section, an order station, drinks dispenser and a plain section.  I've painted them all GW Leadbelcher, black ink washed, then drybrushed with GW chainmail to highlight.  Bar stool cushions were painted in Vallejo khaki, then with Army Painter Speedpaint blood red.  A very gentle drybrush with khaki gave a slightly worn/distressed look to the seats.  The padding along the edge of the bar is Vallejo Xpress snake green.  A few extra details (pipes, drink dispenser) were touched in with my 30-year-old pot of GW Mithril silver.

Straight sections (external).

There are 3 angled sections featuring different details, one entry hatch (I've printed 2), a small sink and a plain seating section.  All of them include cupboards on the inside, the same as the straight sections.

Curved sections (external).

Painting is the same as the straight sections, with red bar stools and green edging on the bar.

Curved sections (internal).
  

The little sink is a lovely detail, containing some rippled water (I've painted mine a murky brown) and a small drainage area adjacent.

Wash up area.

I printed some extra stools from the office furniture set and painted them to match the rest of the bar scenery.  The patrons need some sort of separate seating to pick up and throw in a fight...

Bar stools.

The set also includes some curved seating booths and tables.  Multiple versions are included, some with the tables attached.  I opted for separate tables to give additional flexibility.

Seating alcoves.

These will fit neatly in a darkened corner for a smuggler and his first mate to discuss shady dealings with potential clients.

Tables optional.

There are some smaller, straight tables too, in the same format as the bar.

Small tables.

The bar can be set up in all sorts of different ways.  A large oval in the centre of the room...

Oval bar.

A smaller corner bar...

Corner bar.

The small tables look good either in the middle of a room or against the edge.

Small tables.

This set contains everything you need for a dimly lit spaceport scum drinking hole, a high-tech cyberpunk bar or a backwater colony planet cantina.  Other items I haven't yet printed include tables with attached bottles and drinking vessels, a whole range of separate bottles/tankards etc, other seating options and some large centrepiece items with a range of drinks displays.


Sunday, 19 November 2023

Storage lockers

The EC3D beds and lockers set also includes these larger equipment lockers.

Lockers.

As per usual, I rescaled to 56%.  Because they were quite large, chunky objects, I hollowed them and punched holes to save resin.  I find that a 1.5m thick shell is usually more than sufficient.

Hollowed & punched.

The paint scheme is simple.  Vallejo Khaki base coat, sepia wash, drybrush of the base colour and a highlight od Vallejo bone white.  Some GW leadbelcher was applied with a scrap of spinge for a chipping effect. The arrows were flooded with Vallejo Xpress plasma red.

Chipping detail.

These will fill the walls nicely in any space station or military base.

Saturday, 18 November 2023

File under "C" for Cabinet

The EC3D office set also included some filling cabinets.  As before, these were rescaled to 56% original size.

The office.

I hollowed the cabinets and punched drainage holes to let the excess resin escape from inside.  They were painted Vallejo cold grey with a stonewall grey highlight, to match the desks.  I added some shading on the keypad and in the slots on the sides.  The drawers were painted with Vallejo Xpress plasma red, leaving the handles grey.  The little screen above the keypad was filled in with Vallejo Express Snake Green.

Note the drainage holes.

 These will enhance my office buildings and provide extra cover in the event of a shoot-out.

Friday, 17 November 2023

When you need to go...

I have some MDF toilet block scenery, but never got around to scratchbuilding the necessary interiors.  Now, thanks to EC3D designs I can print all the toilet facilities I need!

Toilets and hand basins.

These are self-supporting files to print flat on the build plate.  I reduced to 56% original size for 15mm, but the toilet still looks quite large.  Either I accidentally printed the 28mm one, or I need to reduce to something smaller like 40% original size.  That one looks like it could eat someone...

Detail view .

A simple paint scheme, white with a thinned black wash and a white drybrush.  A few details  (tap, hinges, pipes etc.) were picked out with silver.  I added another dark wash to enhance the detail in the basin, toilet lid and around some of the edges.

Side view.

I've only printed a couple of items from the set so far, a stand-alone hand basin and a toilet. Other items in the set include a toilet in a stall, a basin with mirror and a urinal with privacy screens, they'll certainly be useful for detailing some of my other projects.


Thursday, 16 November 2023

Take the weight off...

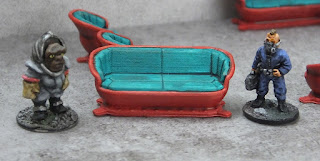
 All the running around fighting and adventuring can get tiring, so my little metal people are getting a selection of seating to let them take the weight off their feet for a bit.

Where to sit...?

The EC3D office set includes some chairs and sofas, which I resized to 56% and printed flat on the build plate, support free.

This looks a comfy chair.

I started with a white overcoat, then used Army Painter Blood Red Speedpaint for the lower part and Vallejo Xpress Snake Green for the cushions.

Or maybe sit together on the sofa for a chat?

 These will be excellent to scatter round the inside of my buildings to provide some extra cover or hiding places.

Wednesday, 15 November 2023

A day in the office...

Continuing my 15mm scenery theme, I've printed a collection of office furniture from EC3D, rescaled to 56% original (28mm) size.

L-shaped desks.

The set includes large L-shaped desks for the hard-working office staff.  These are designed to print end-on, flat on the build plate, with no additional supports required.  This gives a very clean finish with minimal clean-up required before painting.

Straight desks.

There are smaller desks for the less important staff.

L-shaped desk detail.

The desks include detailed keyboards and other features.  Some have a slot for a screen, rather than printing these, I'm going to cut some from clear plastic packaging and paint on some details with inks or translucent contrast paints.

L-shaped desk detail.

The office chairs that come with the set are very neat, with lots of detail that shows up well when given an ink wash.

Red office chairs.

All the chairs were painted silver with a black ink wash, then had the seat, back and arm cushions painted in khaki.

Green and khaki chairs.

I've tried various Army Painter Speedpaints and Vallejo Xpress paints for the cushions, and a couple were just given a sepia ink wash.

Straight desk detail.

The desks were painted Vallejo cold grey with a Vallejo stonewall grey drybrush.  The keyboards were flooded with a black ink wash to enhance the contrast.   The hex patterned areas were painted with Vallejo Xpress Snake Green.

Straight desk detail.

Popping some of these desks and chairs in my MDF buildings really adds character.