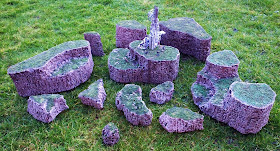
In my previous couple of posts I covered the construction of a rocky plateau containing some sort of industrial machinery. In this post I'll cover the construction of all the other rocky plateaus in more detail. This is slightly back-to-front, I did most of the work on these before I did the one with the run-down industrial tower!
 |
| Insulation foam. |
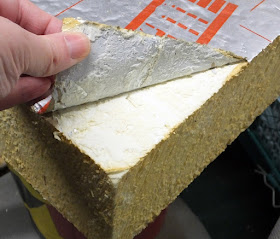
As before, the starting point is various pieces of insulation foam scavenged (with permission) from a bungalow down the road that was undergoing rennovation. The foam came in sheets 2" (50mm) or 4" (100mm) thick. The first task was to peel off the foil foam.
 |
| Peel off the foil coating. |
The outline shape of each section was cut out using a strong-bladed knife. NEVER USE A HOT WIRE CUTTER ON THIS TYPE OF FOAM INSULATION - depending upon the composition it can give off hydrogen cyanide gas, with potentially lethal consequences.
 |
| Cut the foam to shape. |
Once cut roughly into shape, a series of horizontal lines were carved around the rock face, then vertical lines with a similar spacing. Although you don't have to be particularly precise, more is better and they need to be 2-5mm deep to get the best effect.
 |
| Carve in a criss-cross pattern. |
By the time the carving is complete, there should be a criss-cross pattern over all the rock faces.
 |
| Ready for scraping. |
Scraping the sturdy knife horizontally across the rock face causes sections to flake off, creating the effect of sedimentary strata. The end of the blade can be used in a few places to make deeper cuts where a softer layer of the rock as eroded away. This is the messiest part because the static electricity generated by the blade scraping the foam makes the tiny bits stick to anything nearby. I did this in the garage so I could just sweep the floor afterwards and use the "dirty jobs" vacuum to capture any last escapees. Old clothes are a good idea and a dust mask is also recommended to avoid inhaling anything unpleasant.
 |
| Scraping the the side of the knife makes a lot of mess. |
The first experiment with the colour for the rock faces was a mixture of black paint, PVA and water.
 |
| Black paint, PVA & water. |
The mixture was applied over all the exposed rock faces. A brush with long, soft bristles is ideal for working it into all the crevices.
 |
| A thick coat applied to the rock faces. |
This is the most time-consuming bit of the process and after it has dried, you can often see lots of little cavities which you missed and have to re-paint.
 |
| Make sure it gets into all the nooks and crannies. |
Because of the amount of PVA used, the grey-looking paint does darken to black once it dries. I coated the top of quite a few of the rocks as well, to give a slightly tougher surface.
 |
| The paint darkens once dried. |
Once the areas had been covered sufficiently, they were ready for some colour. I used browns but you could use reds and oranges for a Mars-like effect, or just greys and dark blues for a colder slate-like feel. Blues and purples could make for an interesting alien world.
 |
| Drybrush with browns and grey. |
A rough coat of Wilko tester pot "Nutmeg Spice"was painted on, covering the rocks well but not filling too many of the little crevices.
 |
| Smaller plateaus nearing completion. |
A drybrush of Wilko "Potters Clay" highlighted the base colours and was followed with an even lighter drybrush of "Quicksilver" for the very edge highlights. Applied with the same brush only a few minutes after the Potters Clay, the Quicksilver blends in to come extent. If using acrylics instead of latex emulsion paints, you would probably end up with a harsher effect, but it's worth trying different combinations to see what you like best.
 |
| Texture detail shows well after drybrushing. |
Some rocks were painted with the mixture mentioned in my previous posts, using brown mortar tone instead of the black paint. Using burnt umber paint instead of mortar tone would have been another possibility. This didn't have the same depth to the crevices as the black, but the addition of the tile grout made it a much tougher surface than just paint & PVA. Drybrushed highlights straight over the grout mix didn't look nearly as good as the rocks with the black base coat.
 |
| Black base on left - brown grout base on right. |
The application of a black wash was a great improvement. Although the grout has filled in some of the detail, the trade-off for toughness is worth it, and the black wash does give much more depth to the crevices.
 |
| Multi-level plateau. |
A repeat drybrush of the lighter browns and grey improves it still further, to a similar standard to the black undercoated rocks.
 |
| Multi-level plateau. |
The top of the plateaus were painted with some acrylic "sap green". I was surprised how good they looked with just this - you could call them finshed at this point, and use them straight away.
 |
| Tall plateau. |
I includes a couple of stepped plateaus to give a wider range of tactical options when fighting amongst these rocky outcrops.
 |
| Two-level plateau. |
One minor issue I encountered with the black wash was that where it formed larger pools, the matting agent in the varnish did tend to dry to a paler look. Most of these areas can be hidden with the application of flock though, so it isn't really a problem in this instance.
 |
| Black wash is slightly pale where the varnish has pooled. |
PVA was painted on and 3 or 4 different shades of flock sieved over the top of the plateaus. I mixed up a bottle of PVA and matt varnish with water plus a squirt of washing up liquid as a surfactant, then applied with a plant mister bottle. I've found that the key to getting this to work well is to put all the ingredients in a measuring jug (allows you to check how much you have so you know it'll all fit in the bottle) and use a hand blender to give it a thorough mix. This breaks up any stringy blobs of PVA with minimal effort, ensuring your mister nozzle doesn't get clogged. Add the washing up liquid after you blend it otherwise you end up with a jug full of froth!
 |
| PVA and flock applied. |
The spray can be applied pretty heavily but dries to an almost invisible finish.
 |
| PVA and matt varnish to seal the flock. |
While the glue was still soaking in, I sprinkled some static grass in a few places to add even more texture.
 |
| Flock all dried. |
And that's the rocky plateaus finished. The grout gives a fairly tough finish, enough to stop any of the scraped foam areas shedding any little bits with normal use. If I was going to be using these a lot, I might have added foamex bases to protect the bottom edges more but for my use, they'll be fine without. There are a mixture of full height (4") plateaus, 3 stepped plateaus and a few smaller ones made from either the 2" foam or the off-cuts from the larger pieces.
 |
| All finished. |
If I were to do this project again, I'd probably make 4 or 5 small test pieces first. I would try different variations in colour mixes of grout/PVA and washes/drybrushing, including variations in emulsion and acrylics. This would have saved me having to black wash and re-paint the brown grout plateaus, though fortunately it didn't take very long. Having had these finished for months, it's just a shame that I haven't had an opportunity to use them for a game yet!
They came out quite nice. Thanks for sharng your methods.
ReplyDeleteThank you! I feel they don't really match the magnificence of your knobbly modular rock faces but maybe when I have more time/space available I'll try something like that.
Delete