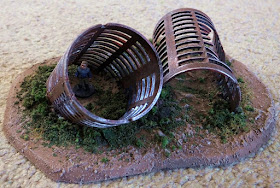
Having been busy making lots of scenic materials, I've been after a chance to use them on some terrain. I bought some hair curlers a while back (£1 for 6) with a view to removing the velcro-like outer covering to leave me with some satisfyingly industrial-looking ribbed cages. I decided that I'd make a bit of scatter terrain using chopped-up hair curlers to represent mysterious, partly buried bits of abandoned structures. I'd be able to use some of my scenic flock on these.
The first thing was to chop up the hair curlers. The plastic was fairly soft so I used a sturdy pair of scissors on the first one but switched to a pair of tin-snips for the second and third because it was easier on my fingers.
 |
| Card templates. |
I planned out how to set them out using some scrap card to make templates. Once I was happy with the layout I drew around the templates onto some 3mm foamex (PVC foam board), my preferred basing material because it's easy to cut and won't warp. After cutting out using the hacksaw blade with my Scorpion saw, I bevelled the edges with a sharp knife and smoothed them off with a sanding block. I attached the hair curlers with UHU glue, which seems to be the best thing for foamex. Because the attachment points are quite small (in most cases, a row of cut ends of the bars), I reinforced them with a line of hot glue, also using it to gap-fill where my cutting was slightly wonky.
 |
| Glued to foamex bases. |
I used my craft knife to score the top of the bases to give some key, then coated them with brown acrylic caulk. This was followed by some of my new texture paint (filler/PVA/paint/sand).
 |
| Texture applied to bases. |
 |
| A nice view from in here? |
One of the curlers has a partly broken out side for a bit of extra interest.
 |
| Scale Reference Man is disappointed to be out of focus. |
Scale Reference Man helps show how big these are. Although I've built them for 15mm, they'd be fine in 28mm too.
 |
| See? I told you. |
The paint was a bit patchy but I was fairly happy with the end result.
 |
| A very buried curler. |
I tried a range of different angles for the curlers ot be buried.
 |
| Could make a nice tent using PVA/baby wipe? |
Next task was to base coat the curlers. I just used a matt black spray can and the paint seemed to stick fine.
 |
| Curlers base-coated. |
There was only one place I couldn't get the spray (or the texture paint) but I can fix that later.
 |
| Matt black spray base coat. |
The ground was painted with my usual Wilko household emulsion tester pots, Nutmeg Spice base coat, Coffee splotches to add variation then a drybrush of Desert Sand.
 |
| Main colours done. |
The hair curlers received a coat of acrylic craft paint, burnt umber as a base with some burnt sienna daubed in patches to give a nice rusted look.
 |
| Ground drybrushed and ready for vegetation. |
I trimmed a few extra bars out of the "window" curler so it will be easier for someone inside to fire (or climb) out.
 |
| Enlarged window. |
The final part of painting was to drybrush all the curlers with my trusty old GW chainmail paint.
 |
| Curlers drybrushed with chainmail. |
Onto the flocking! I grabbed my tub of random mixed flock which includes all the left-over sweepings I've gathered up after the main batches we made had been put into separate tubs.
 |
| Vegetation applied. |
I applied some PVA to the bases where I wanted the flock to go and sprinkled on random pinches from the tub.
 |
| "Just needs a lick of paint and a new roof..." |
After the foam flock, green-dyed tea leaves were liberally sprinkled around the edges.
 |
| "Will it keep the rain off?" |
The place where it was too awkward to paint was flooded with thinned down PVA and tea leaves sprinkled in to fill the space.
 |
| Not sure he'll fit under the lower one... |
The final touch was a sprinkling of pale brown/green static grass around the edges of some of the vegetation. I used a dropper-bottle to apply thinned PVA to all the vegetation, this soaked in and helped fix it formly in place (or at least it did once it had been sitting on theh windowsill in theh sun for a couple of days).
 |
| Easy to climb in and out? |
Overall, I'm ridiculously pleased with how these have turned out. They
only took a few evenings to complete and as a first attempt at doing
"proper" vegetation I think it looks very good. Using the flock
sweepings had the unplanned advantage of giving a real mix of
colours.tectures which has added to the realism.
 |
| Admiring the view. Or maybe not. |
The tea leaves also turned out very well, this was an idle experiment one afternoon when I found my old tub of forest floor tea leaves and decided to try dying them with paint because I haven't got around to geting any sawdust yet.
Genial!
ReplyDeletePretty darn cool looking, bro!
ReplyDeleteAwesome idea, & the results look brilliant! Top work, Paul.
ReplyDelete