Tuesday, 28 March 2023

Spring of Scenery 2023 - Part 5: Scenic Photo backdrop - painting

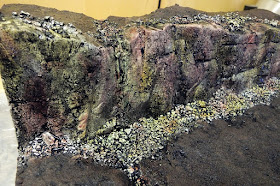
For the next stage of my photo backdrop, I painted the main ground surface with brown texture paint (burnt umber craft paint, fine sand, pre-mixed filler and some PVA).

I sprinkled some cat litter along the bottom of the cliff face to represent fallen rock rubble.  This was all painted white to match the cliffs.

I also filled the stream bed where the flow of water will have washed away the sediment, leaving the larger rocks behind.

I sprinkled a small amount of the cat litter along the top of the cliff too.

The cliffs were painted using the "Leopard Spot" technique using watered down craft paints.  I started with a caramel colour and some burnt sienna.

The caramel was applied first, covering around 1/3 of the cliff face and rubble.

Next, the burnt sienna was applied over a similar proportion of the cliffs and rubble.

This always looks very garish at first!

I used a variety of greens to simulate the growth of algae and moss.  These were heavily thinned to provide little more than a green tint.

The greens were applied down the cliff where the stream will be flowing.

With the base colours completed, the scenery was left for several hours to allow the paints to fully dry and cure.

Next it was time for some washes.  I used acrylic matt varnish, water, a dash of isopropyl alcohol and some black and peat brown inks.

The ink wash was applied liberally across the whole piece of scenery.  Always ensure you have your work surface protected, you end up with runs and drips, so a layer of plastic sheeting or lots of old newspapers are essential to avoid accidents!

The ink wash immediately improves the appearance of the rocks, toning down the bright colours and enhancing the texture.

It was at this stage that I decided never to use cat litter ever again.  I know that some people say it's the best thing for rubble, but I found that it absorbed so much of the ink wash that it took almost an entire week to dry completely, especially in the bottom of the pool at the base of the cliffs.  I think I'm happier just using sharp sand and other less absorbent materials.

Once the terrain had finally dried, I gave the cliffs a drybrush of taupe craft paint.

I overdid this stage and a lot of the subtle shading and colour variation seemed to disappear from the cliffs.

Looking more closely, the variation was still there, and it looked really good, so my initial worries were unfounded.  It’s only meant to be a background anyway, so it is supposed to be fairly neutral.

The green staining around the stream down the cliff face had all but vanished, so this would need more attention later.  The rubble looked good though, and blended in well with the base of the cliff.

I was also pleased with the loose rocks along the top of the cliff.

The stream bed looked just as intended, a bit bare along the edges but those would get hidden later when the base was flocked.

With the main painting completed, it was time to apply the finishing touches with some flocks…

Sunday, 26 March 2023

Spring of Scenery 2023 - Part 4: Scenic Photo backdrop - basic construction

I like to try and have a suitable background for photographing my models.  I sometimes use a sheet of neutral grey card, but it's nice to have something more interesting or atmospheric sometimes.  I wanted to put together some textured ground cover and a rocky backdrop to test a few new techniques and materials.  This was actually made back in January 2021, so predates the landscaped gaming boar and tree covered rocky hills that I've previously covered in this blog.  I somehow misplaced the photographs and only recently rediscovered them...

Basic shape carved.

I carved out a section from some 4 inch thick insulation foam sheet.  I cut some angular cliffs about 2 inches high to make the backdrop with a flatter area in front where the figures would stand.

Angular cliff detail carved in.

I cut a stream bed into the foreground and a small pool at the base of the cliff.  This is set off to one side so it can provide a bit of extra visual interest if desired, but can be kept out of frame if I don't need it.

Stream bed.

I used a chunky, fractured piece of flint from the garden to texture the surface of the rock face.

Texturing the cliffs.

I mixed up some wet, pulped toilet roll with casting plaster and smoothed it on to create the ground surface.  The cliff face was painted with white masonry paint to create a good surface for the next stages of decoration.

Ground surface applied.

The polyisocyanurate foam I used (the foil-faced insulation type) turned out to be more springy than extruded polystyrene.  Most of the texture I applied with the flint has returned to its original form, so the cliffs look quite smooth again now.

Cliff painted with white masonry paint.

 In the next post, I will cover the painting of the scenery.

Friday, 24 March 2023

Spring of Scenery 2023 - Part 3 : Finished forest test base

With the trees ready, the base was painted with PVA, then my "forest floor mix" sprinkled over.  This includes 4 or 5 different green flocks in varying sizes, green painted tea-leaves, plain brown tea-leaves, finely chopped coir (coconut fibre), finely shredded dried leaves and tiny scraps of reindeer lichen.

I added a few twigs from the garden, snapped and glued into position as fallen branches/trees.  After a walk in the local woods, I decided that my model forest floor had too much greenery, so more shredded dried leaves were added, plus some brown tile grout and soil mixture. This also helped blend in the "fallen branches" with drifts of fallen leaves.

Everything was sealed in place by spraying with water/isopropanol then drizzling heavily diluted PVA/matt varnish all over the base.  A few small bushes were added, and the forest base was complete.

Here are some close-up views of the smaller details.  I've tried to make this a fractal piece of scenery, with large details that you can see from a distance but revealing smaller detail as you get closer.  It's impassable to most vehicles, but there is space for infantry to infiltrate between the trees.  It doesn't just block line of sight, it's interactive as well.


Here are a few photographs with the intended 15mm troops in residence.


A final overhead view gives a better idea of the variation I've created between the trees.

Having determined which techniques will work for my woodlands, the next task will be to improve the rest of the trees and cut out a lot more bases for them.  I'll also construct a few small ruins etc to add some interest and create potential objective markers within the woods.

Wednesday, 22 March 2023

Spring of Scenery 2023 - Part 2 : Improving Chinese Trees

~~~~~~

I have some bags of model trees,
I think them rather fine.
In origin they were Chinese;
But now they are all mine.

 ~~~~~~

My Chinese trees came in 4 sizes:
40 x 1:150 scale 8cm £4.99
50 x Z T Scale 3cm £3.99
50 x 4cm 1/300 £3.55
30 x OO/HO scale topiary £3.73
Plus
10 x palm trees OO/HO or 1:100 scale £3.23 (as seen in my recent "Palm Tree Improvements" post)
 

My large palm trees (plus smaller cake decorations)

I had lots of flock ready to use, I also whipped up a few bushes from Reindeer lichen sponged with brown paint, painted with PVA and sprinkled with fine foam flock.  These can look a bit odd on their own but work well on a base mixed with other scenic elements and textures.

 
My cheap Chinese trees were all very uniform and neat, suitable for ornamental planting but not for my intended use.  I re-flocked them by dabbing a rough coat of PVA over the surface, then sprinkling on a range of foam flocks.  I used a variety of colours and sizes of flock to avoid the trees looking too uniform.  Some had their trunks painted in different greys and browns to give even more variation.
 

A spray of water and isopropanol ensured that a quick follow-up spray of PVA would be drawn into the flock to bind everything together and hopefully avoid too much shedding during games.